> ## Documentation Index
> Fetch the complete documentation index at: https://syteca.com/docs/llms.txt
> Use this file to discover all available pages before exploring further.
# Smart Card Access
> Syteca smart card authentication: enforce PIV / CAC / domain-certificate sign-in to the Management Tool, so only users holding the physical card can administer the platform.
## Cryptographic authentication for the people who run your security platform
Password-based sign-in is the weakest link in any administrator workflow - phished, sprayed, reused, leaked. For a PAM and User Activity Monitoring platform, where the administrator can see and modify everything, password-only access is a meaningful risk.
Most security teams already know this and respond in one of two ways: layer 2FA on top of passwords (better, but TOTP secrets can still be phished in real time), or accept the residual risk and hope. **Syteca smart card authentication** is the third option - replace password sign-in with a **physical smart card** holding a domain-issued client certificate. Without the card, the Management Tool refuses to authenticate at the IIS layer, before sign-in even reaches the Syteca application. Phishing a smart card requires possessing the physical hardware *and* knowing the PIN.
**Use smart card access when you need to:**
* Meet **PIV / CAC / FIPS 201** requirements for U.S. federal, defense, or contractor environments.
* Enforce hardware-token authentication for administrators of a privileged-access platform.
* Eliminate password-based sign-in to your monitoring and PAM consoles entirely, leaving no credential to phish.
* Satisfy compliance frameworks (NIST 800-53 IA-2, ISO 27001 A.9.4) that require multi-factor for privileged systems.
* Standardize on the smart cards your organization already issues for desktop login.
**Pair it with [Two-Factor Authentication](/docs/administration/access/two-factor-authentication)** - smart cards control *access to the Management Tool URL*, while 2FA adds a TOTP step *inside* the sign-in flow. Some environments require both.
**Not available in SaaS.** Smart card authentication requires the on-premises Management Tool installed on a domain-member server, with IIS configured for Client Certificate Mapping. SaaS deployments use [Single Sign-On (SSO)](/docs/administration/integrations/keycloak-sso) instead.
This page walks through the prerequisites, the two stages of setup (IIS role + IIS configuration), and how sign-in works for the user. Set it up once and every subsequent sign-in is card-and-PIN.
## Prerequisites
The following are required before configuring smart card access:
* **A Domain Controller** with Active Directory.
* **A Certification Authority** to issue Client certificates.
* **Smart cards with enrolled Client certificates** from that Certification Authority - one per administrator who will sign in.
* **The Syteca Management Tool installed** on a Windows server that is a **member of the domain**.
After confirming the prerequisites, set up smart card access in two stages:
1. [Set up the Client Certificate Mapping Authentication role](#1-set-up-the-client-certificate-mapping-authentication-role) (turn on the IIS feature).
2. [Configure Client Certificate Mapping Authentication](#2-configure-client-certificate-mapping-authentication) (enable it on the Management Tool site).
## 1. Set up the Client Certificate Mapping Authentication role
This IIS feature handles the certificate validation. The setup steps depend on your Windows OS - pick the matching tab.
Open Windows **Control Panel → Programs and Features**, then click **Turn Windows features on or off**.
In the **Windows Features** tree, expand:
**Internet Information Services → World Wide Web Services → Security**
and select the **Client Certificate Mapping Authentication** checkbox.
Click **OK**, then **Close** when the change completes.
From the **Start** menu, open **Server Manager**.
* **Windows Server 2016:** in the navigation pane select **Dashboard**, then click **Add roles and features**.
* **Windows Server 2012:** open the **Manage** menu, then click **Add roles and features**.
Click **Next** on the welcome page. On the **Installation Type** page, select the required installation type and click **Next**. On the **Server Selection** page, pick the destination server and click **Next**.
On the **Server Roles** page, expand **Web Server (IIS) → Web Server → Security**, then select the **Client Certificate Mapping Authentication** checkbox. Click **Next**.
On the **Features** page, click **Next**. On the **Confirmation** page, click **Install**. When the **Results** page shows success, click **Close**.
## 2. Configure Client Certificate Mapping Authentication
With the role installed, enable it on the Management Tool site and require SSL.
Open IIS Manager using the route for your OS:
* **Windows Server 2012 / 2016** - Taskbar **Server Manager → Tools → Internet Information Services (IIS) Manager**.
* **Windows 10** - **Windows+X → Control Panel → Administrative Tools → Internet Information Services (IIS) Manager**.
* **Windows 7** - **Start → Control Panel → Administrative Tools → Internet Information Services (IIS) Manager**.
You can also press **Windows+R**, type `inetmgr`, and press **Enter** - works on any Windows version.
In the **Connections** pane, click the server name. In the server's **Home** pane, double-click **Authentication**.
On the **Authentication** page, right-click **Active Directory Client Certificate Authentication** and select **Enable**.
If any other authentication types are enabled (Anonymous, Windows, Forms, etc.), right-click each one and select **Disable**. Smart card authentication should be the only enabled method.
In the **Connections** pane, expand **Sites → Default Web Site**, then click the Management Tool website name (default: **Syteca**). In the **Home** pane, scroll to the **IIS** section and double-click **SSL Settings**.
On the **SSL Settings** page:
* Select the **Require SSL** checkbox.
* In the **Client certificates** section, select the **Require** option.
Click **Apply** in the **Actions** pane.
Smart card authentication is now active. The Management Tool will only accept connections from clients presenting a valid certificate from the domain.
## Sign in using a smart card
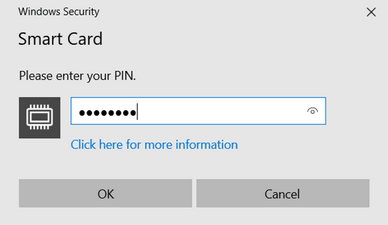 Once smart card access is configured, every sign-in to the Management Tool requires the physical card.
Insert the smart card into the computer where you're signing in.
In your browser, go to `https:///` - for example, `https://john-pc/Syteca`.
In the **Windows Security** window, enter the smart card PIN, then click **OK**.
The Management Tool sign-in page opens. Enter the credentials of an existing user - internal or Active Directory - as on a normal [sign-in](/docs/get-started/management-tool-basics#open-and-sign-in).
If the user doesn't have a domain certificate, or the certificate doesn't match the smart card, the browser displays an error and the Management Tool sign-in page never loads.
## Related
TOTP-based 2FA - can be combined with smart cards or used standalone.
Single Sign-On - an alternative authentication strategy.
The standard sign-in flow that smart cards augment.
Pre-install setup, including the HTTPS certificate this builds on.
Once smart card access is configured, every sign-in to the Management Tool requires the physical card.
Insert the smart card into the computer where you're signing in.
In your browser, go to `https:///` - for example, `https://john-pc/Syteca`.
In the **Windows Security** window, enter the smart card PIN, then click **OK**.
The Management Tool sign-in page opens. Enter the credentials of an existing user - internal or Active Directory - as on a normal [sign-in](/docs/get-started/management-tool-basics#open-and-sign-in).
If the user doesn't have a domain certificate, or the certificate doesn't match the smart card, the browser displays an error and the Management Tool sign-in page never loads.
## Related
TOTP-based 2FA - can be combined with smart cards or used standalone.
Single Sign-On - an alternative authentication strategy.
The standard sign-in flow that smart cards augment.
Pre-install setup, including the HTTPS certificate this builds on.