> ## Documentation Index
> Fetch the complete documentation index at: https://syteca.com/docs/llms.txt
> Use this file to discover all available pages before exploring further.
# Two-Factor Authentication
> Require a TOTP second factor for logging in to Syteca Windows and Linux Client computers, using Google or Microsoft Authenticator. Includes Mass 2FA setup.
Two-factor authentication (2FA) adds a layer of protection by requiring users of critical endpoints to enter a time-based one-time password (TOTP) - generated by an authenticator app - when they log in. It works on Windows Clients (local and Active Directory users) and Linux Clients (local users only), and supports Google Authenticator, Microsoft Authenticator, and other TOTP apps. Both Linux terminal (local and SSH) and GUI sessions (including Wayland) are supported.
Enabling 2FA has two parts: turning it on for **Client computers**, and configuring it for **users**. For Windows, the **Mass 2FA** feature configures users automatically; for Linux, you add users manually.
For 2FA to authenticate, the system time and time zone on the Application Server and the user's device must be synchronized.
## 1. Enable 2FA on Client computers
*Required for all Windows and Linux Clients.*
Sign in with the [Client Configuration Management permission](/docs/administration/users/client-permissions), open the **Clients** page, and click the Client or Client group to edit it.
On the **Authentication Options** tab, under **Two-Factor and Secondary Authentication**, select **Enable two-factor authentication**.
Select **Do not generate QR code automatically** only if you want to turn off Mass 2FA, so Windows users must be added manually instead.
Click **Finish**.
With Mass 2FA on (the default for Windows), users are added to the Two-Factor Authentication grid automatically when they scan the QR code on their first login. Linux users always need manual setup (Step 2).
## 2. Configure 2FA for users manually
*Required for Linux users. Also required for Windows users only if Mass 2FA is disabled.*
Sign in with the [User Management permission](/docs/administration/users/administrative-permissions), open the **Access Requests** page, select the **Two-Factor Authentication** tab, and click **Add**.
In **Add User**, choose one:
* **Active Directory user** (Windows only) - select Domain and User login. *(Individual users only, not groups.)*
* **Local computer user** (Windows and Linux) - select Computer name and User login. *(The only supported type on Linux.)*
* **Syteca user for secondary authentication** (Windows only) - select User login.
Click **Generate** to create a QR code and key, then copy and send them to the user.
Once you close the dialog, the QR code and key can't be viewed again, for security. Capture them before closing.
Click **Save**. The user appears in the Two-Factor Authentication grid. On their next login (if 2FA is enabled on their Client) they scan the QR code and use the app for a TOTP thereafter.
## 3. How users log in with 2FA
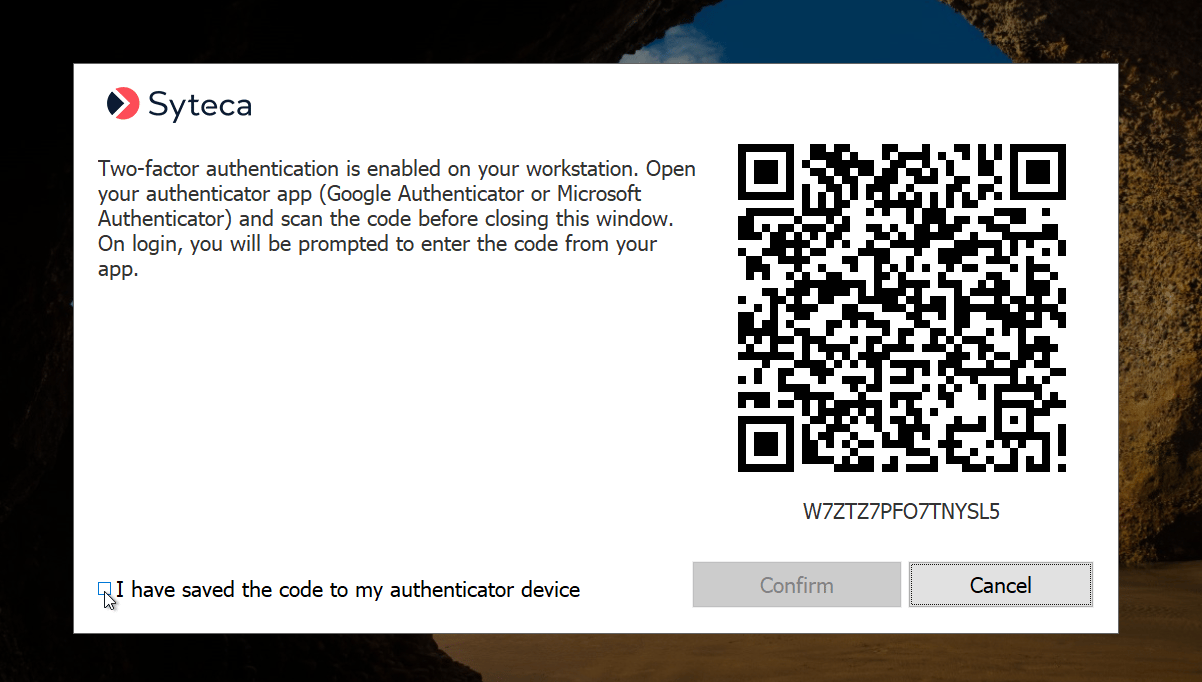 The user logs in with their normal Windows/Linux/AD credentials, then enters the TOTP from their authenticator app.
On the **first** login after 2FA is enabled, they scan a QR code (or enter the key):
* **Manually configured users** (usually Linux) get the QR code from whoever added them.
* **Mass 2FA users** (Windows) see the QR code on screen at first login; after selecting **I have saved the code to my authenticator device** and clicking **Confirm**, they're added to the grid automatically.
If a user can't generate a TOTP (for example, no access to their phone), a Management Tool user can read the current code for them from the grid (see below). The text beside the QR code is customizable on the Configuration page's [Customization](/docs/administration/configuration/customization-settings#two-factor-authentication) tab.
## 4. Manage 2FA access
On the **Two-Factor Authentication** tab, a user with the Client Configuration Management and User Management permissions can:
| Action | Effect |
| ----------------------------------- | ------------------------------------------------------------------------------------------------------ |
| **Show** icon | View the user's current TOTP (changes every 30 seconds) - useful if they can't generate it themselves. |
| **Remove** icon (or **Remove All**) | Remove a user's 2FA; they re-scan a QR code on next login - useful after a phone change. |
| **Add** (Linux only) | Manually add users who must use 2FA. |
To stop requiring 2FA entirely for a user, also disable **Enable two-factor authentication** on their Client(s). If the Client is offline when you remove a user from the grid, deselect and then reselect that checkbox before they can use 2FA again.
## Related
The Access Requests page this tab lives on.
Require approval before users log in to Clients.
The user logs in with their normal Windows/Linux/AD credentials, then enters the TOTP from their authenticator app.
On the **first** login after 2FA is enabled, they scan a QR code (or enter the key):
* **Manually configured users** (usually Linux) get the QR code from whoever added them.
* **Mass 2FA users** (Windows) see the QR code on screen at first login; after selecting **I have saved the code to my authenticator device** and clicking **Confirm**, they're added to the grid automatically.
If a user can't generate a TOTP (for example, no access to their phone), a Management Tool user can read the current code for them from the grid (see below). The text beside the QR code is customizable on the Configuration page's [Customization](/docs/administration/configuration/customization-settings#two-factor-authentication) tab.
## 4. Manage 2FA access
On the **Two-Factor Authentication** tab, a user with the Client Configuration Management and User Management permissions can:
| Action | Effect |
| ----------------------------------- | ------------------------------------------------------------------------------------------------------ |
| **Show** icon | View the user's current TOTP (changes every 30 seconds) - useful if they can't generate it themselves. |
| **Remove** icon (or **Remove All**) | Remove a user's 2FA; they re-scan a QR code on next login - useful after a phone change. |
| **Add** (Linux only) | Manually add users who must use 2FA. |
To stop requiring 2FA entirely for a user, also disable **Enable two-factor authentication** on their Client(s). If the Client is offline when you remove a user from the grid, deselect and then reselect that checkbox before they can use 2FA again.
## Related
The Access Requests page this tab lives on.
Require approval before users log in to Clients.