> ## Documentation Index
> Fetch the complete documentation index at: https://syteca.com/docs/llms.txt
> Use this file to discover all available pages before exploring further.
# Install Additional Application Servers for Load Balancing
> Install additional Syteca Application Server instances alongside an existing deployment to distribute Client load across a cluster in High Availability mode.
## Scale a Syteca deployment beyond one Application Server
Small deployments run comfortably on a single Application Server. Once a deployment grows past the workload one server can handle (large numbers of Clients recording simultaneously, high video ingest rates, or the tolerance-for-downtime requirements of a critical system), a single server becomes the bottleneck. Load balancing solves both concerns at once. Multiple Application Server instances share the Client workload and provide High Availability if any one instance fails.
**Use this guide when your deployment needs any of the following:**
1. More throughput than a single Application Server can provide for a growing number of Clients.
2. High Availability so that Client monitoring continues if an Application Server fails.
3. Geographic distribution of servers to reduce network latency for Clients in different locations.
4. Planned capacity expansion ahead of a large rollout of new Clients or endpoints.
For the conceptual overview of how load balancing, disaster recovery, and high availability fit together in a Syteca deployment, see [High Availability](/docs/administration/deployment/high-availability). This page covers the installation procedure for the additional Application Server instances themselves.
**NOT AVAILABLE IN SAAS.** Load balancing across multiple Application Servers is an on-premises architecture.
**This guide assumes an existing Syteca deployment.** If no Application Server exists yet, first install the initial Application Server following [Install the Application Server](/docs/administration/deployment/install-application-server). Only then return to this guide to add additional instances.
## Prerequisites for each additional Application Server
Each additional Application Server machine must meet the standard [Syteca System Requirements](/docs/get-started/system-requirements). Beyond hardware, Windows system components must be installed before the Application Server MSI can run.
### Required system components
Install the following on every machine that will host an additional Application Server or Management Tool instance:
#### For the Application Server
Syteca Application Server v7.23 and later requires **.NET 8.0**, specifically the .NET Runtime 8.0 and ASP.NET Core 8.0 Runtime components. Both can be installed directly from the Requirements page of the Application Server installer by clicking the links provided there.
For Syteca versions earlier than 7.23, install [.NET Framework 4.8](https://dotnet.microsoft.com/en-us/download/dotnet-framework/thank-you/net48-offline-installer) instead of .NET 8.0. .NET Framework installation requires administrator permissions and a computer restart after installation completes.
#### For the Management Tool
If the additional machine will also host a Management Tool instance, two more components are required:
1. **Internet Information Services (IIS).** See [Configuring IIS](/docs/administration/deployment/management-tool-prerequisites#3-configure-iis) for the setup steps.
2. **.NET Framework 4.8.** Download from [the Microsoft site](https://dotnet.microsoft.com/en-us/download/dotnet-framework/thank-you/net48-offline-installer).
.NET Framework 4.8 requires administrator permissions to install, and the computer must be restarted after installation completes.
For a full walkthrough of these prerequisites in the context of a first Syteca installation, see the [Quick Start Deployment Guide](/docs/get-started/checklist).
## Import the Syteca master certificate
Every Application Server instance in a load-balanced cluster must trust the same master certificate. New instances cannot generate their own certificate; they must reuse the one already created for the existing deployment.
**The same Syteca master certificate must be used during installation of every additional Application Server instance.** Using different certificates across instances will break the trust required for load-balanced operation.
### Certificate transfer procedure
Perform these operations on the existing Application Server machine first, then repeat the import step on every additional machine.
1. **Export the master certificate from the existing Application Server machine.** See [Master Certificate Management](/docs/administration/security/master-certificate) for the export procedure using the Windows certificate management tools.
2. **Copy the exported certificate file** to each machine where an additional Application Server will be installed. Use whatever secure file transfer mechanism your organization allows (a signed and encrypted archive is a safe default).
3. **Import the certificate on each additional machine** into the local certificate store.
4. **Add the certificate to the Trusted Root Certification Authorities** store on each additional machine. Without this trust anchor, the Application Server MSI will refuse to complete installation.
For step-by-step certificate export, import, and trust configuration, see the [Installing, Uninstalling, and Updating the Application Server](/docs/administration/deployment/install-application-server) section of the User Manual.
## Add new Application Server instances to an existing deployment
Once every additional Application Server machine has the required system components and the imported master certificate, run the Application Server installer on each machine and select the **Add Application Server to existing Deployment** installation mode.
Perform this procedure for every additional Application Server instance to be installed.
Download the required version of the Syteca Application Server installer, `Syteca_Server.exe`
Run the installer to open the **Syteca Setup** wizard. On the **Welcome to the Syteca Setup** page, click **Next**.
On the **License Agreement** page, read the End User License Agreement carefully. If you agree with the terms, click **I agree**.
On the **Choose the Installation Mode** page, select **Add Application Server to existing Deployment** from the drop-down list, then click **Next**.
On the **Choose Install Location** page, select the folder where Syteca is to be installed on this machine, then click **Next**.
On the **Information about the Existing Application Server** page, enter:
1. The hostname or IP address of the existing Application Server.
2. The username of a Management Tool user with administrator permissions.
3. The password for that Management Tool user.
Verify that the existing Application Server is reachable from this machine over the network, then click **Next**.
If the master certificate has not yet been added to the Trusted Root Certification Authorities on this computer, the installer prompts for it. Do the following:
1. Select the master certificate file by navigating to the folder where it was placed during the earlier import step.
2. Enter the password for the master certificate.
Click **Next**. The installer verifies that the master certificate matches the one on the existing Application Server. If they match, the certificate is added to the Trusted Root Certification Authorities on this machine automatically, and installation begins.
If a different master certificate is already in the Trusted Root Certification Authorities on this computer, the installer replaces it with the one selected above. Verify that the selected certificate is the correct one before continuing.
On the **Completing Syteca Setup** page, click **Finish** to close the wizard.
The additional Application Server instance is now installed. Install and configure an associated Management Tool for it. For the Management Tool install procedure, see the [Quick Start Deployment Guide](/docs/get-started/checklist).
## Manage the cluster from the Management Tool
Once every additional Application Server instance is installed and each has its associated Management Tool configured, an administrator can view and manage the whole cluster from any Management Tool.
### Open the Cluster Settings tab
1. Log in to any Management Tool as a user with administrative permissions.
2. Click the **Configuration** button at the top of the Management Tool interface.
3. On the **Configuration** page, select the **Cluster Settings** tab.
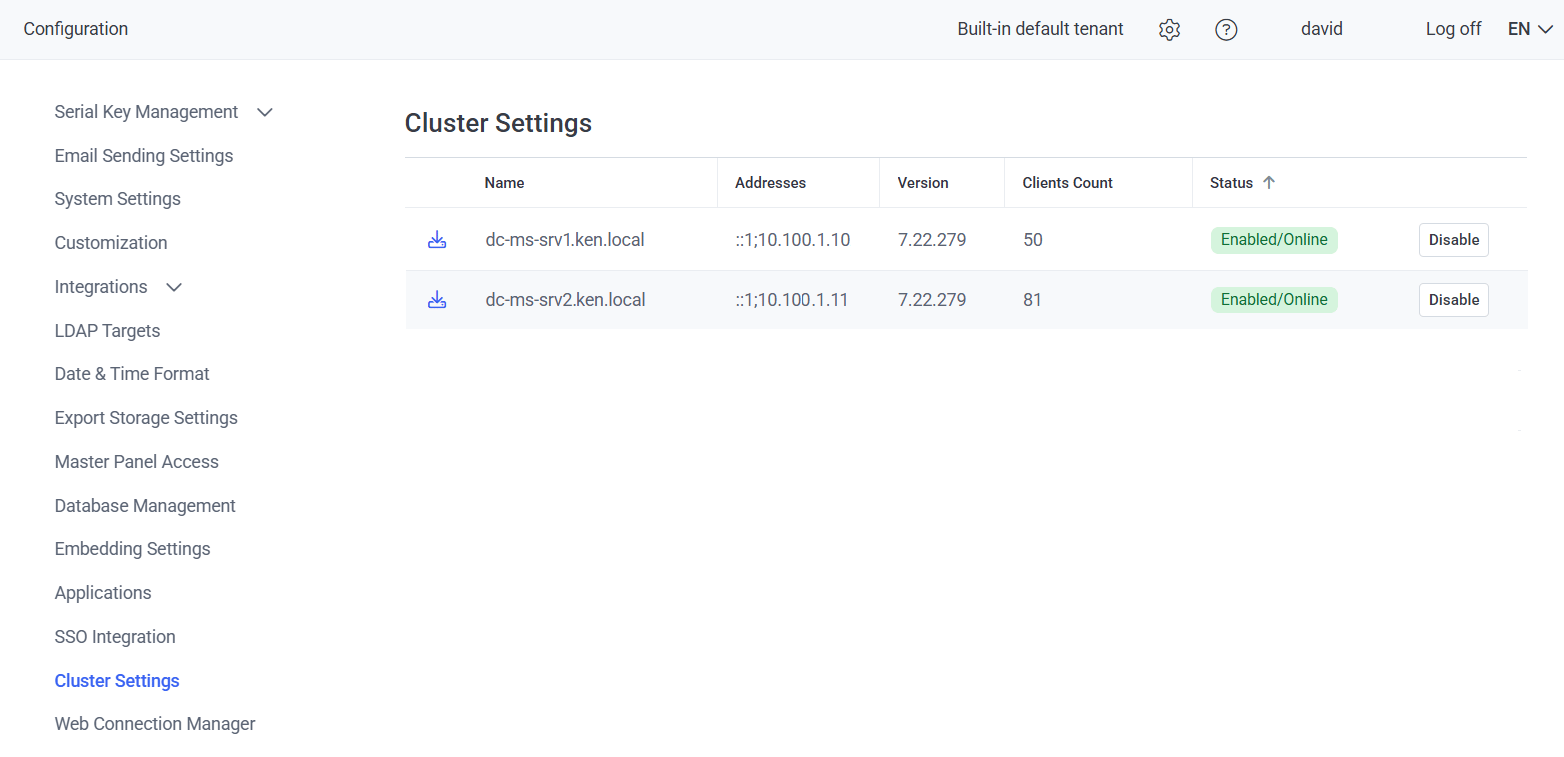
The Cluster Settings tab lists every Application Server instance in the deployment when running in load-balanced High Availability mode.
 ### Per-Application-Server actions
For each Application Server instance in the list, the following actions are available:
| Field or action | Purpose |
| ------------------------ | -------------------------------------------------------------------------------------------------- |
| **Status** column | Current operational status of the Application Server. |
| **Clients Count** column | Number of Clients currently connected to this Application Server (the live load). |
| **Version** column | Syteca version number of this Application Server. Useful when planning a whole-deployment upgrade. |
| **Disable** button | Put the Application Server into Isolation mode, for example during system maintenance. |
| **Download logs** icon | Download the Application Server logs, when the Application Server is online. |
On the [Client Management](/docs/administration/clients/overview) page, the **Node** column and **Node filter** show which Application Server each Client is currently connected to, when the Client is online and the deployment is running in High Availability mode.
### End-to-end setup with a third-party load balancer
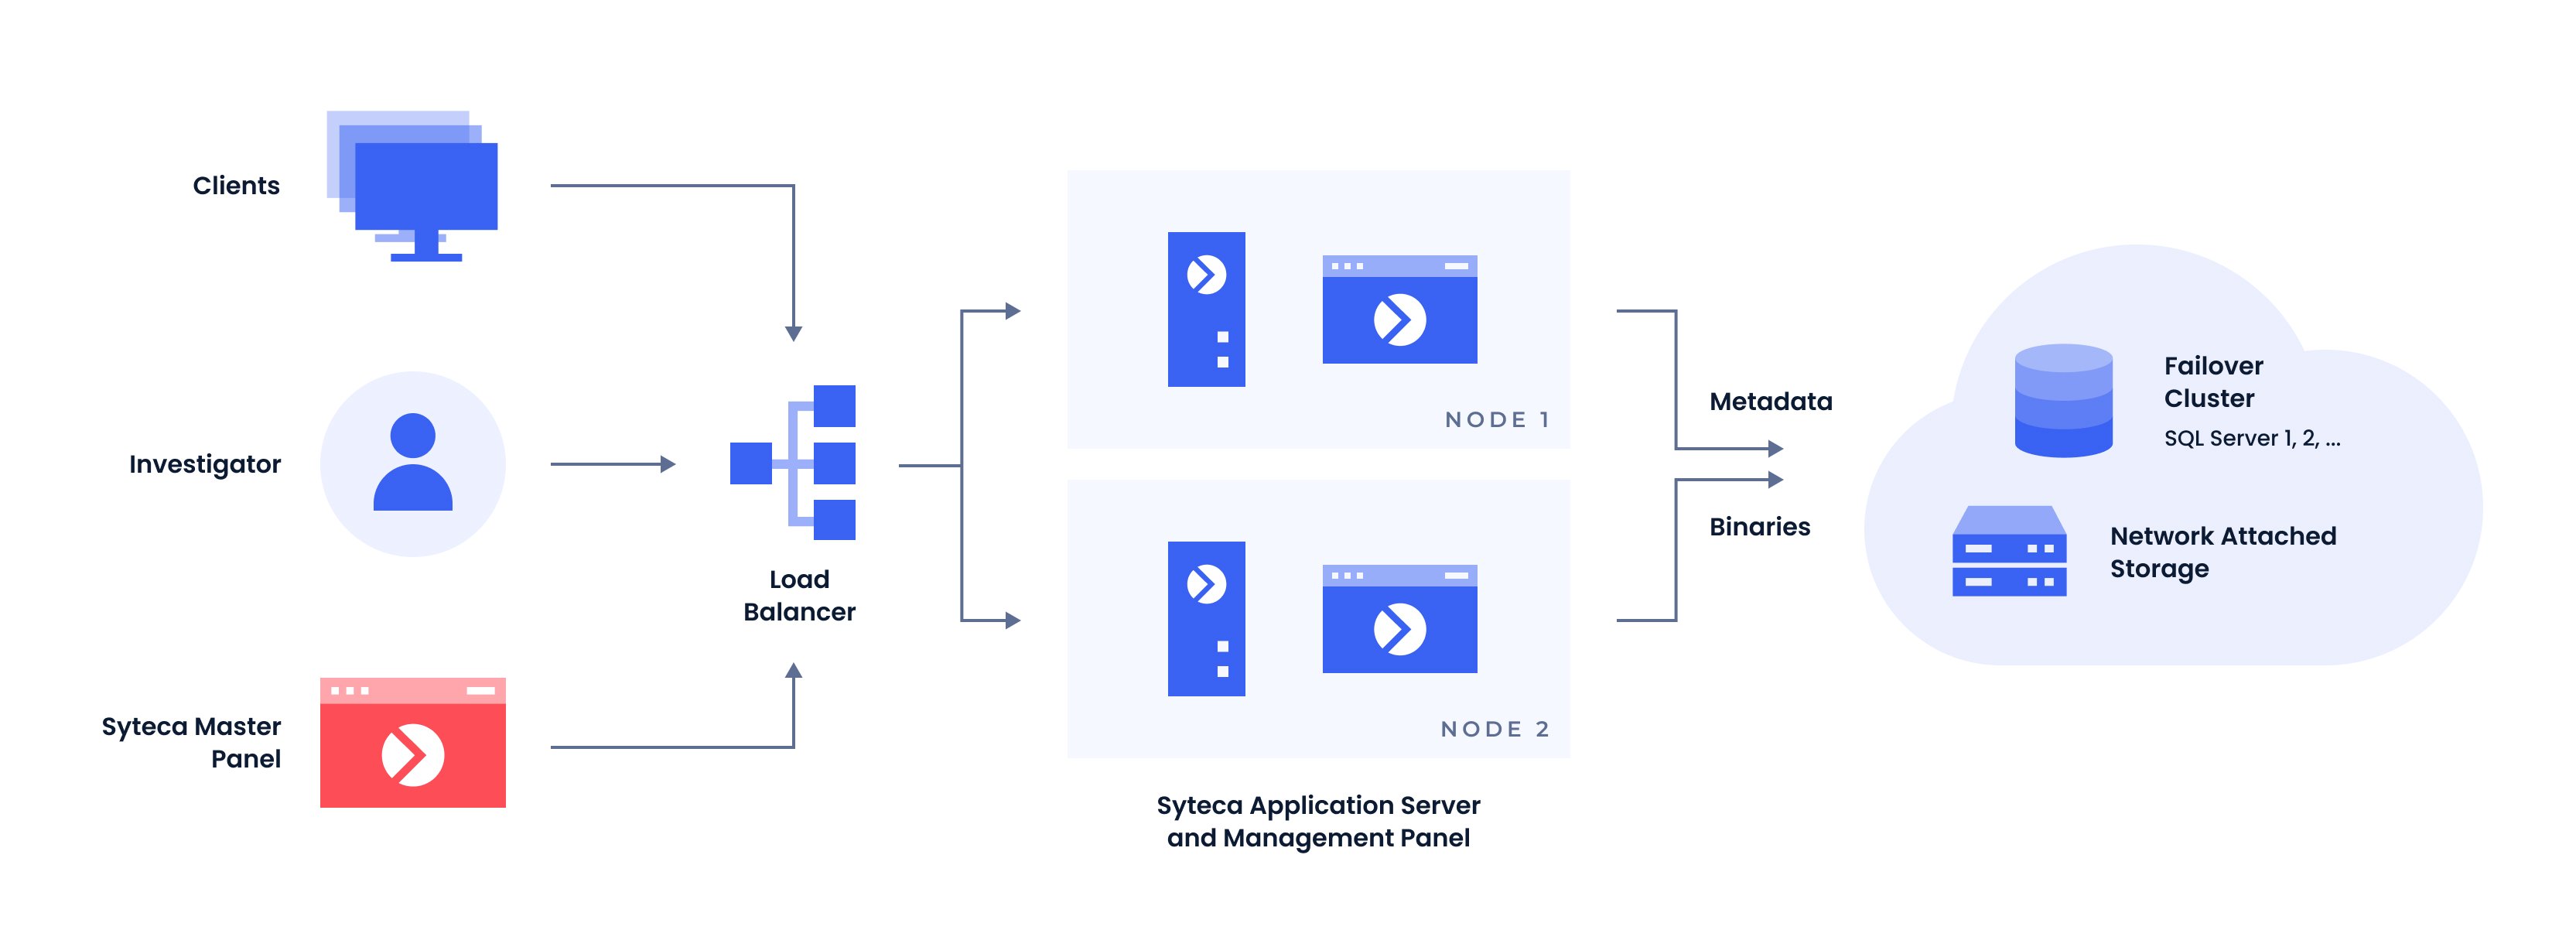
For the cluster to distribute Client load correctly, a third-party load balancer sits between Clients and Application Servers. When set up correctly, the following four connections exist:
1. All Clients are connected to the load balancer.
2. All Application Servers are connected to the load balancer.
3. All Application Servers are connected to the shared Syteca database.
4. Each Application Server has its own Management Tool.
### Per-Application-Server actions
For each Application Server instance in the list, the following actions are available:
| Field or action | Purpose |
| ------------------------ | -------------------------------------------------------------------------------------------------- |
| **Status** column | Current operational status of the Application Server. |
| **Clients Count** column | Number of Clients currently connected to this Application Server (the live load). |
| **Version** column | Syteca version number of this Application Server. Useful when planning a whole-deployment upgrade. |
| **Disable** button | Put the Application Server into Isolation mode, for example during system maintenance. |
| **Download logs** icon | Download the Application Server logs, when the Application Server is online. |
On the [Client Management](/docs/administration/clients/overview) page, the **Node** column and **Node filter** show which Application Server each Client is currently connected to, when the Client is online and the deployment is running in High Availability mode.
### End-to-end setup with a third-party load balancer
For the cluster to distribute Client load correctly, a third-party load balancer sits between Clients and Application Servers. When set up correctly, the following four connections exist:
1. All Clients are connected to the load balancer.
2. All Application Servers are connected to the load balancer.
3. All Application Servers are connected to the shared Syteca database.
4. Each Application Server has its own Management Tool.
 ### Load balancer health-check endpoint
Integrate the third-party load balancer with the healthcheck endpoint on each Application Server. Use the following URL on every Management Tool:
```text theme={"system"}
https:///EkranSystem/healthcheck?debug=True
```
| Response status | Meaning |
| ----------------------------- | ------------------------------------------------------------------------- |
| **200 (Successful)** | The Application Server and its Management Tool are working correctly. |
| **50x (Service Unavailable)** | The Application Server may be stopped. Investigate the specific instance. |
Any Management Tool in the cluster can be used to view the same information about every Client and Session on every Application Server in the cluster. To view sessions across multiple clusters in a single interface, deploy the [Master Panel](/docs/administration/deployment/master-panel).
## Related
Architectural overview of load balancing, disaster recovery, and HA modes.
Full Application Server installation procedure. Follow it on every additional machine after this guide's prerequisites are done.
Export, import, and lifecycle of the Syteca master certificate.
Hardware, OS, and network requirements for Application Servers.
### Load balancer health-check endpoint
Integrate the third-party load balancer with the healthcheck endpoint on each Application Server. Use the following URL on every Management Tool:
```text theme={"system"}
https:///EkranSystem/healthcheck?debug=True
```
| Response status | Meaning |
| ----------------------------- | ------------------------------------------------------------------------- |
| **200 (Successful)** | The Application Server and its Management Tool are working correctly. |
| **50x (Service Unavailable)** | The Application Server may be stopped. Investigate the specific instance. |
Any Management Tool in the cluster can be used to view the same information about every Client and Session on every Application Server in the cluster. To view sessions across multiple clusters in a single interface, deploy the [Master Panel](/docs/administration/deployment/master-panel).
## Related
Architectural overview of load balancing, disaster recovery, and HA modes.
Full Application Server installation procedure. Follow it on every additional machine after this guide's prerequisites are done.
Export, import, and lifecycle of the Syteca master certificate.
Hardware, OS, and network requirements for Application Servers.