> ## Documentation Index
> Fetch the complete documentation index at: https://syteca.com/docs/llms.txt
> Use this file to discover all available pages before exploring further.
# Update the Application Server
> Upgrade the Syteca Application Server to a newer version — Setup wizard's Update path, database update vs reinstall, .NET 8.0 prereqs, and SMBv2 update warning.
This is the Application Server-specific portion of a Syteca upgrade — running `Syteca_Server.exe` with the **Update/Add/Remove components** path. For the **full system upgrade procedure** including pre-update database backup, Isolation Mode, post-update data migration, and Client updates, see [Update Syteca](/docs/administration/deployment/update-syteca).
**NOT AVAILABLE IN SAAS.** SaaS deployments are updated by your vendor. This procedure applies to **on-premises** deployments only.
Before running this procedure, follow the **Phase 1** preparation steps in [Update Syteca](/docs/administration/deployment/update-syteca#1-before-updating-the-system) — disable auto-update on Clients, enable Isolation Mode, back up the database, snapshot the Application Server host. Skipping those steps leaves the deployment without a recovery path if anything goes wrong.
## Run the Setup wizard's Update path
 Run **`Syteca_Server.exe`** for the **new** Syteca version on the Application Server host. The same installer binary handles install, update, and uninstall.
Click **Next** on the **Welcome** page. On the **License Agreement** page, accept the EULA.
On the **Requirements** page, the wizard checks for **.NET Runtime 8.0** and **ASP.NET Core 8.0 Runtime** (required for Syteca v.7.23 and higher).
* **Yellow triangles** indicate missing components — click the links to install each, then click **Refresh**.
* **Green checkmarks** indicate satisfied prerequisites.
Click **Next** when all icons are green.
For pre-v.7.23 installations being upgraded **to** v.7.23 or higher, the .NET requirement changes from **.NET Framework 4.8** to **.NET 8.0**. Install the .NET 8.0 runtimes on the Application Server host **before** running the update.
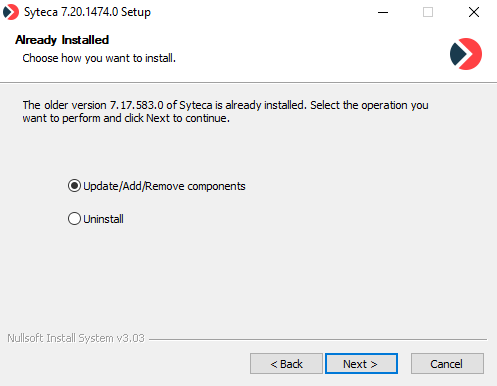
On the **Already Installed** page, select **Update/Add/Remove components**, then click **Next**.
If you see an **SMBv2 update warning** pop-up when updating to v.7.23 or higher with a shared folder for binary data storage, see [Application Server issues and error messages](/docs/resources/troubleshooting/application-server-troubleshooting) for the resolution.
On the **Database Update** page, pick one:
| Option | What it does |
| ------------------------------------ | ----------------------------------------------------------------------------------------------------------------------------- |
| **Update database to a new version** | Keeps existing data; applies the schema migrations needed for the new Syteca version. *(Most common — preserves history.)* |
| **Reinstall the database** | Drops the existing database and creates a fresh one. **All historical data is lost.** Use only when you intend to start over. |
**Changing the database type** (e.g. PostgreSQL ↔ MS SQL Server) requires reinstalling the entire system, not just the database. The **Reinstall the database** option only handles re-creating within the same database type.
Click **Next** to start the update.
When the update completes, click **Finish** to exit the wizard.
The Application Server starts automatically. The **orange Data Migration Progress Bar** appears at the top of all Management Tool pages while post-update data migration runs in the background — see [After updating the system](/docs/administration/deployment/update-syteca#3-after-updating-the-system) in the system-wide upgrade procedure for the post-migration steps (update Clients, disable Isolation Mode, verify operation).
## Related
The system-wide upgrade workflow — backup, Isolation Mode, data migration, Client updates.
Fresh Application Server installation (for new deployments).
Back up the Master Certificate before updating — required for recovery if the update fails.
Review changes between your current version and the target — including data migrations.
Run **`Syteca_Server.exe`** for the **new** Syteca version on the Application Server host. The same installer binary handles install, update, and uninstall.
Click **Next** on the **Welcome** page. On the **License Agreement** page, accept the EULA.
On the **Requirements** page, the wizard checks for **.NET Runtime 8.0** and **ASP.NET Core 8.0 Runtime** (required for Syteca v.7.23 and higher).
* **Yellow triangles** indicate missing components — click the links to install each, then click **Refresh**.
* **Green checkmarks** indicate satisfied prerequisites.
Click **Next** when all icons are green.
For pre-v.7.23 installations being upgraded **to** v.7.23 or higher, the .NET requirement changes from **.NET Framework 4.8** to **.NET 8.0**. Install the .NET 8.0 runtimes on the Application Server host **before** running the update.
On the **Already Installed** page, select **Update/Add/Remove components**, then click **Next**.
If you see an **SMBv2 update warning** pop-up when updating to v.7.23 or higher with a shared folder for binary data storage, see [Application Server issues and error messages](/docs/resources/troubleshooting/application-server-troubleshooting) for the resolution.
On the **Database Update** page, pick one:
| Option | What it does |
| ------------------------------------ | ----------------------------------------------------------------------------------------------------------------------------- |
| **Update database to a new version** | Keeps existing data; applies the schema migrations needed for the new Syteca version. *(Most common — preserves history.)* |
| **Reinstall the database** | Drops the existing database and creates a fresh one. **All historical data is lost.** Use only when you intend to start over. |
**Changing the database type** (e.g. PostgreSQL ↔ MS SQL Server) requires reinstalling the entire system, not just the database. The **Reinstall the database** option only handles re-creating within the same database type.
Click **Next** to start the update.
When the update completes, click **Finish** to exit the wizard.
The Application Server starts automatically. The **orange Data Migration Progress Bar** appears at the top of all Management Tool pages while post-update data migration runs in the background — see [After updating the system](/docs/administration/deployment/update-syteca#3-after-updating-the-system) in the system-wide upgrade procedure for the post-migration steps (update Clients, disable Isolation Mode, verify operation).
## Related
The system-wide upgrade workflow — backup, Isolation Mode, data migration, Client updates.
Fresh Application Server installation (for new deployments).
Back up the Master Certificate before updating — required for recovery if the update fails.
Review changes between your current version and the target — including data migrations.