> ## Documentation Index
> Fetch the complete documentation index at: https://syteca.com/docs/llms.txt
> Use this file to discover all available pages before exploring further.
# Update Syteca
> Best-practice procedure for updating an on-premises Syteca deployment — pre-update backup, Isolation Mode, .NET prereqs, data migration, and Client update strategy.
This is the upgrade procedure for an existing on-premises Syteca deployment moving to a newer Application Server version. Three sequential phases: prepare, update, and post-update. Follow them in order — skipping pre-update preparation (especially Isolation Mode and database backup) leaves the deployment vulnerable if something goes wrong.
**NOT AVAILABLE IN SAAS.** Syteca SaaS deployments are updated by your vendor — customers don't perform these steps. This procedure applies to **on-premises** deployments only.
**Unsupported components.** The following are **no longer supported** for any current Syteca version — confirm your existing infrastructure isn't running them before upgrading:
* Windows Server 2008
* MS SQL 2008
* The Firebird database
* Old load balancers
If you're still on any of these, contact Syteca Support before attempting an update.
## Prerequisites for the new version
Before you can install the new Syteca, the host computers must have the right .NET version installed.
| Component | Required runtime |
| -------------------------------------------------------- | ---------------------------------------------------------------------------------------------------------------------------------------------------------------------------------------- |
| **Syteca Management Tool** | [.NET Framework 4.8](https://dotnet.microsoft.com/en-us/download/dotnet-framework/thank-you/net48-offline-installer) |
| **Syteca Application Server (v.7.23 and higher)** | **.NET 8.0** — both .NET Runtime 8.0 and ASP.NET Core 8.0 Runtime. The installer's Requirements page offers download links. |
| **Syteca Application Server (versions prior to v.7.23)** | [.NET Framework 4.8](https://dotnet.microsoft.com/en-us/download/dotnet-framework/thank-you/net48-offline-installer). Installation requires administrator permissions and a host reboot. |
## 1. Before updating the system
### 1.1 Plan the update for a quiet time
Good practice is to update when Client-to-Application-Server load is at a minimum. Also check whether the update includes **data migrations** (database structure changes) — these affect performance for some time after the update and may temporarily increase storage usage.
Every data migration is listed in the [Syteca Release Notes](/docs/release-notes/overview) as an improvement called **"\[Database:] The database structure has been optimized."** Review the release notes for every version between your current and target versions to see what migrations will run.
### 1.2 Disable "Update Client automatically" *(if currently enabled)*
To prevent Clients from automatically updating during the immediate post-update data migration window (when the Application Server is under load) and to avoid the bandwidth spike of many Clients updating simultaneously, **temporarily disable auto-update before the system update**. Plan to update Clients manually afterwards via the **Update Selected Clients** Bulk Action on the Clients page.
See [Update Windows Clients manually](/docs/administration/clients/update-clients), [Update macOS Clients manually](/docs/administration/clients/update-clients), and [Update Linux Clients manually](/docs/administration/clients/update-clients) for the manual procedures.
If **Update Client automatically** stays enabled, those Clients will only update when the Application Server itself updates to a new version — but they'll all do so at once.
### 1.3 Enable Isolation Mode
[Isolation Mode](/docs/administration/deployment/database-management#isolate-the-database-from-clients) temporarily disconnects all Clients from the Application Server, blocking them from sending monitoring data. This avoids loading the Application Server with Client requests while data migration is in progress immediately after the update.
### 1.4 Back up the database
Use your database's native tools (or a trusted third-party backup tool) to back up the Syteca database before updating. If anything goes wrong, this backup is your recovery point.
### 1.5 Snapshot the Application Server machine(s)
Use VM snapshots or filesystem-level snapshots on each Application Server host before the update. Combined with the database backup, this gives you a complete rollback path.
## 2. Update the system
### 2.1 Download the latest version
The latest released Syteca version is always available at:
```text theme={"system"}
https://download.syteca.com/Syteca-en.zip
```
The installation package includes Release Notes documenting every change since the previous version.
### 2.2 Update the Application Server
Run `Syteca_Server.exe` to open the **Setup** wizard. When prompted, select the **Update** option.
For full details, see [Update the Application Server](/docs/administration/deployment/update-application-server).
### 2.3 Update the Management Tool
Run `Syteca_ManagementTool.exe` to open the **Setup** wizard. When prompted, select the **Update** option.
For full details, see [Update the Management Tool](/docs/administration/deployment/update-syteca).
**All Syteca components must be at the same released version** to function correctly. Don't run a v.7.23 Application Server against a v.7.22 Management Tool, or vice versa.
**High Availability and load-balanced deployments:** all Application Server and Management Tool instances must be updated **one by one**. During each instance's update, Clients connected to it are automatically reconnected to other instances. Before each update, check the version of the Application Server on each node in the task list on the **Cluster Settings** tab of the **Configuration** page.
## 3. After updating the system
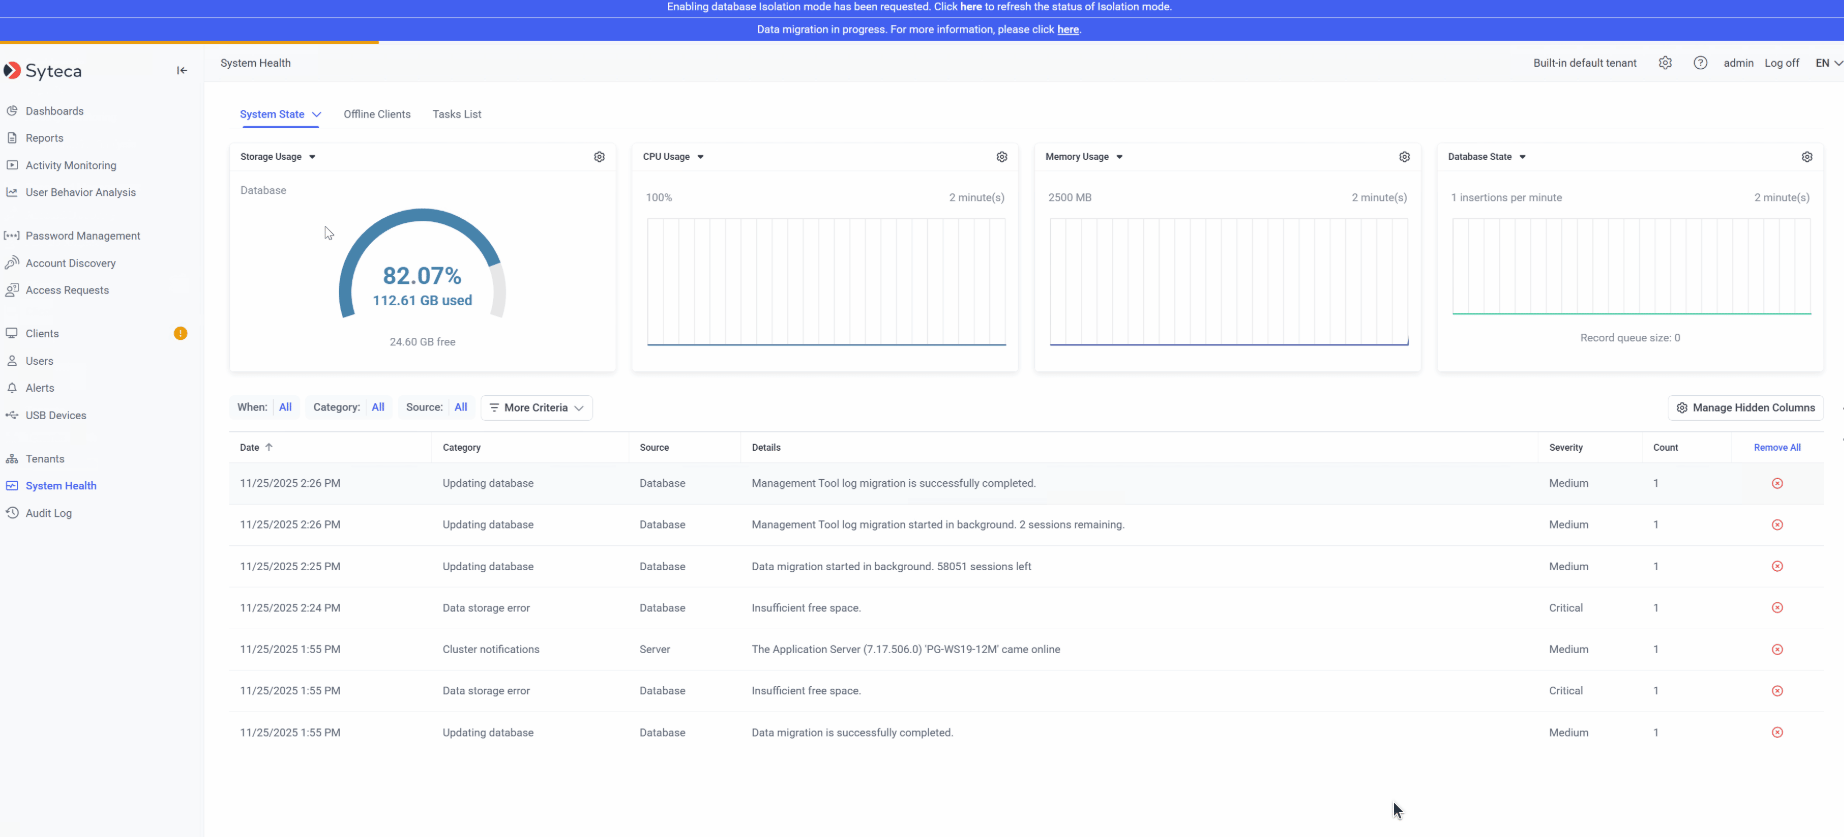 Wait for data migration to complete **before** updating Clients and **before** disabling Isolation Mode.
After the Application Server starts up, data migration begins automatically. An **orange Data Migration Progress Bar** displays at the top of all Management Tool pages while migration runs.
**Data migration runs in the background and may take some time.** Client sessions are migrated **newest first, oldest last** — older sessions won't open in the Session Viewer until migration completes. Plan a quiet window where ongoing investigations aren't blocked.
### 3.1 Update the Clients *(if auto-update is disabled)*
Update any Clients that don't have **Update Client automatically** enabled via **Update Selected Clients** Bulk Action on the [Clients](/docs/administration/clients/overview) page.
Once Clients reconnect, they resume sending monitoring data — **including any data they cached locally while offline during the update**. No data is lost.
See [Update Clients](/docs/administration/clients/update-clients) for the per-OS manual update procedures.
### 3.2 Disable Isolation Mode *(if enabled in Phase 1)*
Once data migration is complete and Clients are updated, [disable Isolation Mode](/docs/administration/deployment/database-management#isolate-the-database-from-clients). All Clients resume sending monitoring data, including any locally-cached data from the isolation window.
## Related
Every version's changes — review releases between your current and target versions before updating.
Per-OS manual update procedures for Windows, macOS, and Linux Clients.
The full task list for a fresh deployment — useful as a sanity check post-update.
Real-time platform health monitoring to confirm everything is operating normally after the update.
Wait for data migration to complete **before** updating Clients and **before** disabling Isolation Mode.
After the Application Server starts up, data migration begins automatically. An **orange Data Migration Progress Bar** displays at the top of all Management Tool pages while migration runs.
**Data migration runs in the background and may take some time.** Client sessions are migrated **newest first, oldest last** — older sessions won't open in the Session Viewer until migration completes. Plan a quiet window where ongoing investigations aren't blocked.
### 3.1 Update the Clients *(if auto-update is disabled)*
Update any Clients that don't have **Update Client automatically** enabled via **Update Selected Clients** Bulk Action on the [Clients](/docs/administration/clients/overview) page.
Once Clients reconnect, they resume sending monitoring data — **including any data they cached locally while offline during the update**. No data is lost.
See [Update Clients](/docs/administration/clients/update-clients) for the per-OS manual update procedures.
### 3.2 Disable Isolation Mode *(if enabled in Phase 1)*
Once data migration is complete and Clients are updated, [disable Isolation Mode](/docs/administration/deployment/database-management#isolate-the-database-from-clients). All Clients resume sending monitoring data, including any locally-cached data from the isolation window.
## Related
Every version's changes — review releases between your current and target versions before updating.
Per-OS manual update procedures for Windows, macOS, and Linux Clients.
The full task list for a fresh deployment — useful as a sanity check post-update.
Real-time platform health monitoring to confirm everything is operating normally after the update.