> ## Documentation Index
> Fetch the complete documentation index at: https://syteca.com/docs/llms.txt
> Use this file to discover all available pages before exploring further.
# Manage Tenants
> View, add, edit, change licenses, change the domain admin, delete, and switch between tenants in Syteca Multi-Tenant mode — all from the Tenants page.
All day-to-day tenant management happens on the **Tenants** page in the Management Tool. This page covers viewing the tenant list, adding new tenants, editing existing ones (including license counts and the domain admin), deleting tenants, and switching between tenant accounts.
For the conceptual overview, the role comparison table, and how to enable Multi-Tenant mode in the first place, see [Multi-Tenant mode overview](/docs/administration/multi-tenant/overview).
**Not available in SaaS.** Multi-Tenant mode is only supported on on-premises and self-hosted Syteca deployments.
All tasks on this page require the [Tenant Management and System Configuration administrative permission](/docs/administration/users/administrative-permissions), and must be performed by a user of the built-in default tenant (the technician).
## View the tenant list
Sign in to the Management Tool as the technician, then click the **Tenants** navigation link in the left navigation.
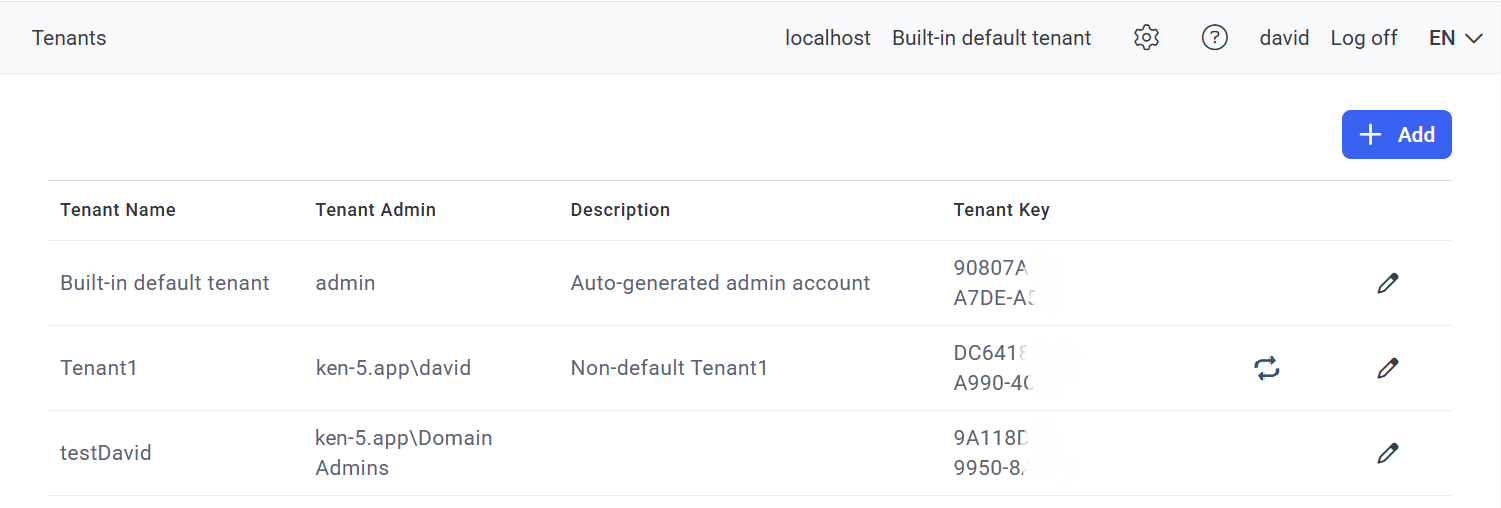
The Tenants page shows every tenant in the deployment with these columns:
| Column | Shows |
| ------------------------ | -------------------------------------------------------------------------------------------------------------------------------------------------------------------------------------------------------- |
| **Tenant Name** | The tenant's name. |
| **Tenant Admin** | The login of the tenant's admin user. |
| **Description** | Optional description of the tenant. |
| **Tenant Key** | A unique identifier used by Clients to detect the tenant they belong to. |
| **Switch To** *(icon)* | Click to log out and log in as the tenant admin of that tenant. Available only for tenants where the tenant admin has [granted the technician access](/docs/administration/multi-tenant/cross-tenant-access). |
| **Edit Tenant** *(icon)* | Click to edit (or delete) the tenant. |
 ## Add a tenant
Click **Tenants** in the left navigation.
Click **Add** in the top right of the Tenants page.
On the **Tenant Details** tab, in the **Tenant Properties** section, enter the **Name** and an optional **Description**.
In the **Tenant Admin** section, choose one of two options:
Select **Register the tenant admin via email**, then enter the tenant admin's email address. An email with the login credentials is sent to that address.
Select **Select the tenant admin from the domain users/user group**, then specify the **Domain** and the **User / User Group**.
A domain user who belongs to multiple tenants will be prompted to select the required tenant when logging in to the Management Tool.
Click **Next**.
On the **Licenses** tab, set the number of licenses of each type to grant to the new tenant.
When Multi-Tenant mode is first enabled, **all licenses are granted to the built-in default tenant**. Before granting licenses to a new tenant, you must first decrease the **Licenses Granted** count for an existing tenant (typically the default). See [Change the licenses granted to a tenant](#change-the-licenses-granted-to-a-tenant) below.
Click **Finish** in the bottom right. The new tenant appears on the Tenants page.
## Edit a tenant
All edits go through the same flow — you open the tenant, change parameters on the tabs, save.
On the **Tenants** page, click the **Edit Tenant** icon next to the tenant.
Edit the tenant the same way as when [adding a tenant](#add-a-tenant) — name, description, tenant admin, and license counts on the corresponding tabs.
Click **Finish** in the bottom right.
### Change the licenses granted to a tenant
The number of licenses granted to any tenant can be increased (if licenses are available in the pool) or decreased to free them up for another tenant.
Click the **Edit Tenant** icon next to the tenant.
On the **Licenses** tab, increase the values in the **Licenses Granted** column (limited by the **Licenses Available** column) or decrease them to return licenses to the pool. You can change PAM seat licenses and each endpoint license type independently.
Click **Finish**.
If after decreasing the number of licenses granted, the new count is **fewer than the licenses already assigned** to that tenant's PAM users and Clients, the excess users/Clients will become **unlicensed**. Confirm assignments before reducing grants.
### Change the domain tenant admin
Click the **Edit Tenant** icon next to the tenant.
On the **Tenant Details** tab, in the **Tenant Admin** section, search for and select a new **Domain** and a new **User / User Group**.
Click **Finish**. The domain tenant admin is changed. The login and password are managed in Active Directory.
## Delete a tenant
Deleting a tenant means the tenant admin can no longer use the system and loses access to all tenant data and users. If the tenant admin is logged in to the Management Tool at the moment of deletion, they immediately lose access.
If the tenant has at least one Client, the tenant **cannot be deleted**. [Delete all the tenant's Clients first](/docs/administration/clients/delete-clients).
Click the **Edit Tenant** icon next to the tenant on the Tenants page.
On the **Tenant Details** tab, click the red **Delete Tenant** button in the bottom left.
In the confirmation message, click **Delete**.
## Switch to another tenant account
The technician can log in as the tenant admin of any tenant that has granted them access — useful for hands-on troubleshooting and support.
Click **Tenants** in the left navigation.
Find the required tenant in the list and click the **Switch To** icon on the right.
The **Switch To** icon is only shown for tenants whose admin has [granted the technician access](/docs/administration/multi-tenant/cross-tenant-access). Without that grant, the technician cannot log in to a tenant's account.
You're automatically logged out as the technician and logged back in as the tenant admin of the selected tenant. You can now view all data and perform all actions available to that tenant admin.
To return to the technician account, log off and log back in with your technician credentials for the built-in default tenant.
## Related
What Multi-Tenant mode is, who can do what, and how to enable it.
How a tenant admin grants the technician access to their tenant.
How licenses flow from the serial key to tenants to users and Clients.
Assigning Clients to tenants at install time.
## Add a tenant
Click **Tenants** in the left navigation.
Click **Add** in the top right of the Tenants page.
On the **Tenant Details** tab, in the **Tenant Properties** section, enter the **Name** and an optional **Description**.
In the **Tenant Admin** section, choose one of two options:
Select **Register the tenant admin via email**, then enter the tenant admin's email address. An email with the login credentials is sent to that address.
Select **Select the tenant admin from the domain users/user group**, then specify the **Domain** and the **User / User Group**.
A domain user who belongs to multiple tenants will be prompted to select the required tenant when logging in to the Management Tool.
Click **Next**.
On the **Licenses** tab, set the number of licenses of each type to grant to the new tenant.
When Multi-Tenant mode is first enabled, **all licenses are granted to the built-in default tenant**. Before granting licenses to a new tenant, you must first decrease the **Licenses Granted** count for an existing tenant (typically the default). See [Change the licenses granted to a tenant](#change-the-licenses-granted-to-a-tenant) below.
Click **Finish** in the bottom right. The new tenant appears on the Tenants page.
## Edit a tenant
All edits go through the same flow — you open the tenant, change parameters on the tabs, save.
On the **Tenants** page, click the **Edit Tenant** icon next to the tenant.
Edit the tenant the same way as when [adding a tenant](#add-a-tenant) — name, description, tenant admin, and license counts on the corresponding tabs.
Click **Finish** in the bottom right.
### Change the licenses granted to a tenant
The number of licenses granted to any tenant can be increased (if licenses are available in the pool) or decreased to free them up for another tenant.
Click the **Edit Tenant** icon next to the tenant.
On the **Licenses** tab, increase the values in the **Licenses Granted** column (limited by the **Licenses Available** column) or decrease them to return licenses to the pool. You can change PAM seat licenses and each endpoint license type independently.
Click **Finish**.
If after decreasing the number of licenses granted, the new count is **fewer than the licenses already assigned** to that tenant's PAM users and Clients, the excess users/Clients will become **unlicensed**. Confirm assignments before reducing grants.
### Change the domain tenant admin
Click the **Edit Tenant** icon next to the tenant.
On the **Tenant Details** tab, in the **Tenant Admin** section, search for and select a new **Domain** and a new **User / User Group**.
Click **Finish**. The domain tenant admin is changed. The login and password are managed in Active Directory.
## Delete a tenant
Deleting a tenant means the tenant admin can no longer use the system and loses access to all tenant data and users. If the tenant admin is logged in to the Management Tool at the moment of deletion, they immediately lose access.
If the tenant has at least one Client, the tenant **cannot be deleted**. [Delete all the tenant's Clients first](/docs/administration/clients/delete-clients).
Click the **Edit Tenant** icon next to the tenant on the Tenants page.
On the **Tenant Details** tab, click the red **Delete Tenant** button in the bottom left.
In the confirmation message, click **Delete**.
## Switch to another tenant account
The technician can log in as the tenant admin of any tenant that has granted them access — useful for hands-on troubleshooting and support.
Click **Tenants** in the left navigation.
Find the required tenant in the list and click the **Switch To** icon on the right.
The **Switch To** icon is only shown for tenants whose admin has [granted the technician access](/docs/administration/multi-tenant/cross-tenant-access). Without that grant, the technician cannot log in to a tenant's account.
You're automatically logged out as the technician and logged back in as the tenant admin of the selected tenant. You can now view all data and perform all actions available to that tenant admin.
To return to the technician account, log off and log back in with your technician credentials for the built-in default tenant.
## Related
What Multi-Tenant mode is, who can do what, and how to enable it.
How a tenant admin grants the technician access to their tenant.
How licenses flow from the serial key to tenants to users and Clients.
Assigning Clients to tenants at install time.