> ## Documentation Index
> Fetch the complete documentation index at: https://syteca.com/docs/llms.txt
> Use this file to discover all available pages before exploring further.
# Multi-Tenant Mode
> Syteca Multi-Tenant mode: run one Syteca deployment as multiple isolated tenants, each with its own admin, users, Clients, licenses, alerts, and reports.
## One deployment, many isolated tenants
Most security platforms force a hard choice: deploy one instance per organization (expensive and impossible to maintain at MSP scale), or share one instance with everyone seeing everyone else's data (a non-starter for any environment with confidentiality requirements). The alternative — running fully separate Syteca installations for each business unit, customer, or department — multiplies your infrastructure, licensing, and operational overhead by however many divisions you support.
**Syteca Multi-Tenant mode** is the middle path. One Syteca deployment hosts **multiple isolated tenants**. Each tenant has its own admin user, its own end users, its own Clients, its own licenses, its own alerts and reports — and **no visibility whatsoever into other tenants' data**. A central technician administers the platform itself (serial keys, tenant creation, license distribution) without seeing inside individual tenants, unless a tenant admin explicitly grants them access.
**Use Multi-Tenant mode when you need to:**
* Run Syteca as an **MSP / MSSP** offering managed PAM and User Activity Monitoring to multiple end customers from one deployment.
* Serve **separate business units, subsidiaries, or departments** of a single organization that require strict isolation from each other.
* Provide PAM to **acquired companies or joint-venture environments** without giving them visibility into the parent organization's data.
* Centralize platform maintenance (one Application Server, one database, one upgrade path) while still hard-isolating tenant data.
* Replace the patchwork of separate per-customer installations many MSPs currently maintain by hand.
**Pair it with [Licensing](/docs/administration/licensing/overview)** — in Multi-Tenant mode the technician grants licenses to each tenant; tenant admins then assign those licenses to their own PAM users and Clients.
Multi-Tenant mode is **not available in SaaS**. It's only supported on on-premises and self-hosted Syteca deployments.
This page is the conceptual overview and the procedure to enable Multi-Tenant mode. For day-to-day tenant management (adding, editing, switching, changing licenses), see [Manage tenants](/docs/administration/multi-tenant/manage-tenants). For granting the technician access to a non-default tenant, see [Cross-tenant access](/docs/administration/multi-tenant/cross-tenant-access).
## How tenant isolation works
By default, Syteca is installed in **Single-Tenant mode**, where all Clients and settings are shared among users according to their permissions. When you enable **Multi-Tenant mode**, the system partitions:
* **Clients** are assigned to exactly one tenant. The tenant a macOS or Linux Client belongs to is defined during [Client installation](/docs/administration/clients/install-linux). Windows Clients are similarly assigned by their installation parameters.
* **Users** belong to one tenant and only see data within that tenant.
* **Licenses** are granted by the technician to each tenant from a central pool. Tenant admins assign their granted licenses to their PAM users and Clients.
* **Alerts, USB rules, reports, and dashboards** are tenant-scoped — a tenant admin only sees data from their own Clients.
The technician — the admin user of the built-in default tenant — administers the platform but does **not** automatically see inside other tenants. Cross-tenant access is opt-in: a tenant admin must explicitly enable it (see [Cross-tenant access](/docs/administration/multi-tenant/cross-tenant-access)).
 ## User types and what each can do
Multi-Tenant mode has three user types, with clearly partitioned capabilities. The technician runs the platform; tenant admins run their tenants; tenant users do work inside a tenant.
| Capability | Technician *(admin of built-in default tenant)* | Tenant admin *(admin of a non-default tenant)* | Tenant user |
| ------------------------------------------------------- | ----------------------------------------------- | ---------------------------------------------- | --------------- |
| Activate / deactivate serial keys | ✓ | — | — |
| Grant licenses to tenants | ✓ | — | — |
| Create, edit, delete tenants | ✓ | — | — |
| View System State on the System Health page | ✓ | — | — |
| Download Application Server / Management Tool log files | ✓ | — | — |
| Configure system-wide settings | ✓ | — | — |
| Manage tenant users and user groups | ✓ *(default tenant only)* | ✓ *(own tenant)* | — |
| Generate Client installation packages | ✓ *(default tenant)* | ✓ *(own tenant)* | — |
| Manage Client groups | ✓ *(default tenant)* | ✓ *(own tenant)* | — |
| Manage alerts and USB monitoring rules | ✓ *(default tenant)* | ✓ *(own tenant)* | — |
| Assign licenses to PAM users and Clients | ✓ *(default tenant)* | ✓ *(own tenant, from granted pool)* | — |
| Block users, set access restrictions, enable 2FA | ✓ *(default tenant)* | ✓ *(own tenant)* | — |
| View, export, and download Client sessions | ✓ *(default tenant)* | ✓ *(own tenant)* | Per permissions |
| Use dashboards, generate reports | ✓ *(default tenant)* | ✓ *(own tenant)* | Per permissions |
| View the Audit log | ✓ *(default tenant)* | ✓ *(own tenant)* | — |
| Grant the technician access to their tenant | — | ✓ | — |
| Other actions within a tenant | — | — | Per permissions |
**Tenant users** are end users (or junior admins) inside a tenant. They perform a subset of tenant admin actions based on the [administrative permissions](/docs/administration/users/administrative-permissions) granted to them. They never see data from other tenants.
The technician needs the [Tenant Management and System Configuration](/docs/administration/users/administrative-permissions) administrative permission. The technician cannot be removed from the Administrators user group.
The technician's default login is **admin** and the password is set during Application Server installation.
## Enable Multi-Tenant mode
Once Multi-Tenant mode is enabled, **Windows Clients already installed must be reinstalled** to be assigned to a specific tenant. Plan the changeover during a maintenance window.
Sign in to the Management Tool as a user of the built-in default tenant with the [Tenant Management and System Configuration administrative permission](/docs/administration/users/administrative-permissions).
Click the **Configuration** button at the top of the Management Tool.
On the **System Settings** tab, in the **Syteca Mode** section, select **Enable Multi-Tenant mode**, then click **Save** at the bottom of the page. The **Tenants** navigation link appears in the left navigation.
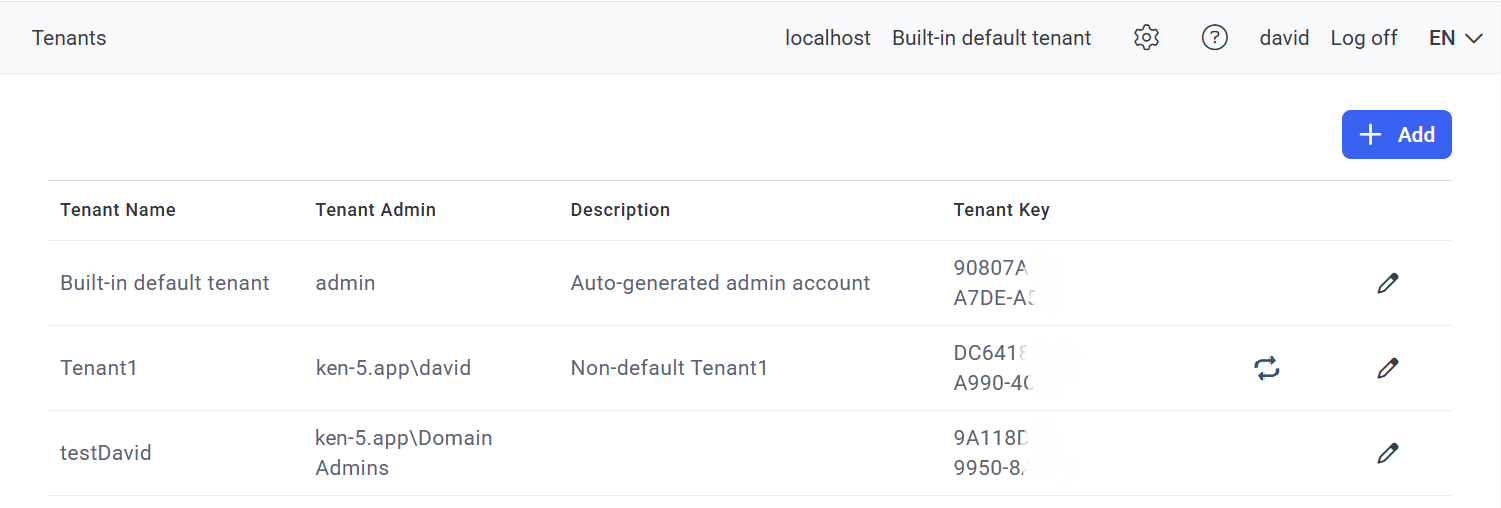
Click the **Tenants** navigation link, then click the **Edit Tenant** icon next to **Built-in default tenant**.
On the **Edit Tenant** page, select the **Licenses** tab. **Decrease** the number of licenses granted to the default tenant in the **Licenses Granted** column — these freed licenses become available to grant to new tenants. Click **Finish**.
When Multi-Tenant mode is first enabled, **all licenses are initially granted to the default tenant**. You must ungrant licenses from the default tenant before you can grant them to additional tenants.
Now you can [add new tenants](/docs/administration/multi-tenant/manage-tenants#add-a-tenant), assigning each one its own admin, license counts, and Clients.
## User types and what each can do
Multi-Tenant mode has three user types, with clearly partitioned capabilities. The technician runs the platform; tenant admins run their tenants; tenant users do work inside a tenant.
| Capability | Technician *(admin of built-in default tenant)* | Tenant admin *(admin of a non-default tenant)* | Tenant user |
| ------------------------------------------------------- | ----------------------------------------------- | ---------------------------------------------- | --------------- |
| Activate / deactivate serial keys | ✓ | — | — |
| Grant licenses to tenants | ✓ | — | — |
| Create, edit, delete tenants | ✓ | — | — |
| View System State on the System Health page | ✓ | — | — |
| Download Application Server / Management Tool log files | ✓ | — | — |
| Configure system-wide settings | ✓ | — | — |
| Manage tenant users and user groups | ✓ *(default tenant only)* | ✓ *(own tenant)* | — |
| Generate Client installation packages | ✓ *(default tenant)* | ✓ *(own tenant)* | — |
| Manage Client groups | ✓ *(default tenant)* | ✓ *(own tenant)* | — |
| Manage alerts and USB monitoring rules | ✓ *(default tenant)* | ✓ *(own tenant)* | — |
| Assign licenses to PAM users and Clients | ✓ *(default tenant)* | ✓ *(own tenant, from granted pool)* | — |
| Block users, set access restrictions, enable 2FA | ✓ *(default tenant)* | ✓ *(own tenant)* | — |
| View, export, and download Client sessions | ✓ *(default tenant)* | ✓ *(own tenant)* | Per permissions |
| Use dashboards, generate reports | ✓ *(default tenant)* | ✓ *(own tenant)* | Per permissions |
| View the Audit log | ✓ *(default tenant)* | ✓ *(own tenant)* | — |
| Grant the technician access to their tenant | — | ✓ | — |
| Other actions within a tenant | — | — | Per permissions |
**Tenant users** are end users (or junior admins) inside a tenant. They perform a subset of tenant admin actions based on the [administrative permissions](/docs/administration/users/administrative-permissions) granted to them. They never see data from other tenants.
The technician needs the [Tenant Management and System Configuration](/docs/administration/users/administrative-permissions) administrative permission. The technician cannot be removed from the Administrators user group.
The technician's default login is **admin** and the password is set during Application Server installation.
## Enable Multi-Tenant mode
Once Multi-Tenant mode is enabled, **Windows Clients already installed must be reinstalled** to be assigned to a specific tenant. Plan the changeover during a maintenance window.
Sign in to the Management Tool as a user of the built-in default tenant with the [Tenant Management and System Configuration administrative permission](/docs/administration/users/administrative-permissions).
Click the **Configuration** button at the top of the Management Tool.
On the **System Settings** tab, in the **Syteca Mode** section, select **Enable Multi-Tenant mode**, then click **Save** at the bottom of the page. The **Tenants** navigation link appears in the left navigation.
Click the **Tenants** navigation link, then click the **Edit Tenant** icon next to **Built-in default tenant**.
On the **Edit Tenant** page, select the **Licenses** tab. **Decrease** the number of licenses granted to the default tenant in the **Licenses Granted** column — these freed licenses become available to grant to new tenants. Click **Finish**.
When Multi-Tenant mode is first enabled, **all licenses are initially granted to the default tenant**. You must ungrant licenses from the default tenant before you can grant them to additional tenants.
Now you can [add new tenants](/docs/administration/multi-tenant/manage-tenants#add-a-tenant), assigning each one its own admin, license counts, and Clients.
 ## Related
Add, edit, delete, switch to, and change licenses for tenants.
How a tenant admin grants the technician access to their tenant.
Grant licenses to tenants from a central pool.
How Clients are assigned to tenants at install time.
## Related
Add, edit, delete, switch to, and change licenses for tenants.
How a tenant admin grants the technician access to their tenant.
Grant licenses to tenants from a central pool.
How Clients are assigned to tenants at install time.