> ## Documentation Index
> Fetch the complete documentation index at: https://syteca.com/docs/llms.txt
> Use this file to discover all available pages before exploring further.
# Master Certificate Management
> Manage the Syteca Master Certificate (EkranMasterCertificate) — back up, delete, import, reissue, and optionally migrate from RSA-2048 to RSA-4096 encryption. Essential for Application Server recovery, migration, and High Availability setup.
## The single most important backup in your Syteca deployment
The **Syteca Master Certificate** — internally named `EkranMasterCertificate` — sits at the root of Syteca's encryption hierarchy. It encrypts the Data Protection certificate (which encrypts every screen capture), the TOTP initial vectors, the database connection string, and the password protecting the symmetric key for logged keystrokes. **Without it, the Syteca database is unreadable. There is no recovery mechanism.**
That makes the Master Certificate the single most important artifact to back up. Every operational scenario that involves moving Syteca — Application Server recovery after host failure, migration to a new server, High Availability cluster setup, system upgrade, even reinstalling on the same host with a preserved database — depends on having a working backup of this certificate. Compare this to general key management in CyberArk (Vault Server keys), Delinea (Encryption Key), and BeyondTrust (Master Key): the cryptographic foundation under all of them is similar; what matters is whether your operations team treats it with the same seriousness.
**NOT AVAILABLE IN SAAS.** The Master Certificate is managed by the vendor in SaaS deployments — customers don't perform these operations. This procedure applies to **on-premises** deployments only.
Master Certificate operations require **administrator access to the Application Server computer**. The operations themselves are performed via the **Microsoft Management Console (MMC)** Certificates snap-in, scoped to the **Local Computer account → Personal → Certificates** store.
## When you need this
| Scenario | Operations required |
| -------------------------------------------------------------------------- | ------------------------------------------------------------------------------------------------------------------------------------------------------------------------------------------------------------- |
| **First time installing the Application Server** | After install, [back up](#back-up-the-master-certificate) immediately. Store the backup in a secure location separate from the Application Server host. |
| **Reinstalling on the same host, reusing the existing database** | [Delete](#delete-the-master-certificate) the newly-generated certificate; [import](#import-the-master-certificate) the original backup. |
| **Migrating to a different Application Server host** | On the old host: [back up](#back-up-the-master-certificate). On the new host: install Application Server selecting **Use an existing certificate**, then [import](#import-the-master-certificate) the backup. |
| **High Availability cluster — adding additional Application Server nodes** | [Back up](#back-up-the-master-certificate) from the first node. On each additional node, [import](#import-the-master-certificate) the backup before installing the Application Server. |
| **Master Certificate has expired** | [Reissue](#reissue-the-master-certificate) the certificate. The system continues operating with an expired certificate, but generates ongoing Windows Event log alerts until reissued. |
| **Upgrading deployment to RSA-4096 encryption** *(post-v.7.23)* | Use the **Migrate Master Certificate to 4096-bit** option in the Database Parameters tool — see [Migrate to RSA-4096](#migrate-to-rsa-4096) below. |
## Back up the Master Certificate
The backup is a `.pfx` file (Personal Information Exchange) containing the certificate and its private key, protected with a password you set during export. Keep both the file and the password somewhere safe and **not on the Application Server host itself**.
On the Application Server computer, press **Windows + R**, enter `mmc` in the **Run** window, and press **Enter**. Click **Yes** in the User Account Control prompt.
In the **Console** window, select **File → Add/Remove Snap-in**. In the **Add or Remove Snap-ins** window, select **Certificates**, then click **Add**.
In the **Certificates Snap-in** window, select **Computer account**, then click **Next**. In the **Select Computer** window, select **Local computer**, then click **Finish**. Back in the **Add or Remove Snap-ins** window, click **OK**.
In the **Certificates (Local Computer)** tree-view, expand **Personal → Certificates**. Find the certificate named `EkranMasterCertificate`.
Right-click `EkranMasterCertificate`, then select **All Tasks → Export** from the context menu. The **Certificate Export Wizard** opens; click **Next** on the welcome page.
On the **Export Private Key** page, select **Yes, export the private key**, then click **Next**.
Without the private key, the export is **useless** for recovery. Always export the private key when backing up the Master Certificate.
On the **Export File Format** page, select **Personal Information Exchange** and the following options under it:
* **Include all certificates in the certification path if possible**
* **Export all extended properties**
Click **Next**.
On the **Security** page, select the **Password** checkbox, then enter and confirm a password.
**Remember this password.** You'll need it to restore the certificate or import it on another host. There is no password-reset path — if you lose the password, the backup is unusable.
Click **Next**.
On the **File to Export** page, specify the location and filename for the `.pfx` file. Pick a meaningful name like `EkranMasterCertificate--.pfx`. Click **Next**, then **Finish** on the completion page.
Store the `.pfx` file and its password **separately** — for example, the file in a secured network share or backup vault, and the password in a password manager or sealed envelope. Storing both together on the same machine defeats the purpose.
## Delete the Master Certificate
Deletion is needed in two scenarios: (1) cleaning up a duplicate certificate before a fresh install, and (2) replacing the certificate after a [reissue](#reissue-the-master-certificate).
**Never delete the Master Certificate without a verified backup** unless you've already imported a replacement. Without the certificate, the Syteca database becomes unreadable.
On the Application Server computer, press **Windows + R**, enter `mmc`, then press **Enter**. Click **Yes** in the UAC prompt.
In the **Console** window: **File → Add/Remove Snap-in → Certificates → Add → Computer account → Next → Local Computer → Finish → OK**.
In the **Certificates (Local Computer)** tree-view, expand **Personal → Certificates**. Find `EkranMasterCertificate`.
Right-click `EkranMasterCertificate`, then select **Delete** in the context menu. Click **Yes** in the confirmation message.
## Export the master certificate
**NOT AVAILABLE IN SAAS.**
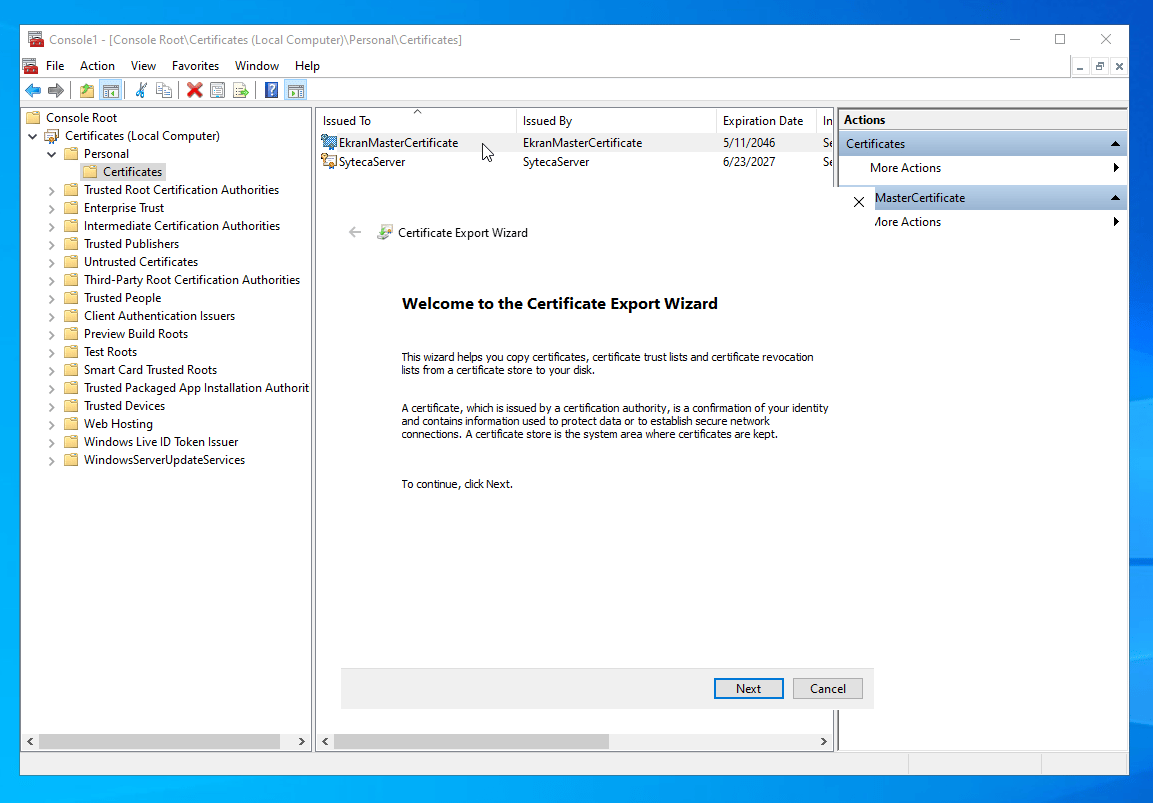
Exporting the master certificate produces a file you can copy to another computer and [import](/docs/administration/security/master-certificate#import-the-master-certificate) there — for example, when moving an MS SQL Server database signed with the certificate to a different machine.
On the Application Server computer, press **Windows+R**, enter `mmc`, and press **Enter**. Click **Yes** on the User Account Control prompt.
In the Console window, select **File > Add/Remove Snap-in**. Select **Certificates** and click **Add**.
Select **Computer account**, click **Next**, select **Local computer: (the computer this console is running on)**, and click **Finish**. Click **OK** to close the Add or Remove Snap-ins window.
In the tree view, select **Certificates (Local Computer) > Personal > Certificates**, and find the master certificate used to sign monitoring data in the database.
Right-click the certificate and select **All Tasks > Export**.
Click **Next** through the **Welcome** and **Export Private Key** pages, select the export **file format**, click **Next**, specify where to save the exported file and its name (or use **Browse**), click **Next**, then **Finish**.
Copy the exported certificate file to the new computer, then [import it](/docs/administration/security/master-certificate#import-the-master-certificate) there.
 ## Import the Master Certificate
Restoring from a `.pfx` backup — used after reinstallation, host migration, HA cluster setup, or reissue.
On the Application Server computer, press **Windows + R**, enter `mmc`, press **Enter**, click **Yes** in the UAC prompt.
In the **Console** window: **File → Add/Remove Snap-in → Certificates → Add → Computer account → Next → Local Computer → Finish → OK**.
In the **Console** window, select **Action → All Tasks → Import**. The **Certificate Import Wizard** opens; click **Next** on the welcome page.
On the **File to Import** page, click **Browse**, select the `.pfx` backup file, then click **Next**.
On the **Private Key Protection** page, enter the password you set during backup, then click **Next**.
On the **Certificate Store** page, select **Place all certificates in the following folder**, click **Browse**, select **Personal**, then click **Next**.
Click **Finish** on the completion page.
## Reissue the Master Certificate
The Master Certificate has an expiration date. Expiration does **not** stop Syteca from functioning - the system continues operating normally - but the Application Server starts logging alerts to the Windows Event log about the expiration. Reissue replaces the certificate so the alerts stop.
## Import the Master Certificate
Restoring from a `.pfx` backup — used after reinstallation, host migration, HA cluster setup, or reissue.
On the Application Server computer, press **Windows + R**, enter `mmc`, press **Enter**, click **Yes** in the UAC prompt.
In the **Console** window: **File → Add/Remove Snap-in → Certificates → Add → Computer account → Next → Local Computer → Finish → OK**.
In the **Console** window, select **Action → All Tasks → Import**. The **Certificate Import Wizard** opens; click **Next** on the welcome page.
On the **File to Import** page, click **Browse**, select the `.pfx` backup file, then click **Next**.
On the **Private Key Protection** page, enter the password you set during backup, then click **Next**.
On the **Certificate Store** page, select **Place all certificates in the following folder**, click **Browse**, select **Personal**, then click **Next**.
Click **Finish** on the completion page.
## Reissue the Master Certificate
The Master Certificate has an expiration date. Expiration does **not** stop Syteca from functioning - the system continues operating normally - but the Application Server starts logging alerts to the Windows Event log about the expiration. Reissue replaces the certificate so the alerts stop.
 Log in to the Application Server host as an **admin user**.
In the Windows Notification area, right-click the **Syteca Server** tray icon and select **Database Parameters** to open the **`DbSetupToolUI`** application.
If your deployment was upgraded **to Syteca v.7.23 or higher** and the Master Certificate hasn't been migrated yet, the **Advanced** tab displays a **Migrate Master Certificate to 4096-bit** button. See [Migrate to RSA-4096](#migrate-to-rsa-4096) below — complete that migration **before** clicking Reissue.
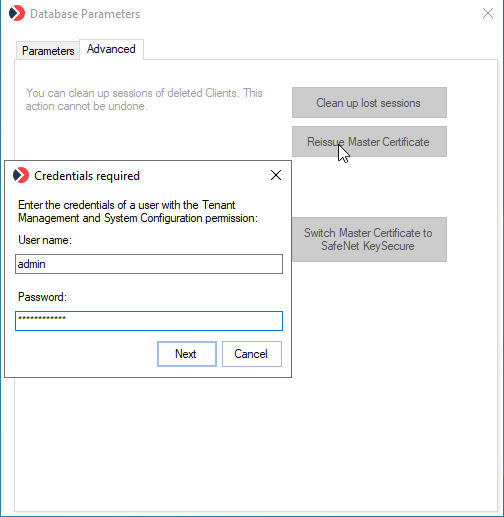
On the **Advanced** tab, click **Reissue Master Certificate**.
In the **Credentials required** pop-up, enter the **User name** and **Password** of a user with the [administrative Tenant Management and System Configuration permission](/docs/administration/users/administrative-permissions#tenant-management-and-system-configuration), then click **Next**.
In the **Certificate generated successfully** pop-up, the system displays the password of the new Master Certificate. **Copy and save this password** somewhere secure — you'll need it when importing.
Click **Save**. In the **Save as** window, choose a location and click **Save**.
The reissue alone doesn't stop the Windows Event log alerts. Three follow-up steps are required:
1. [Back up the **existing** (about-to-be-replaced) Master Certificate](#back-up-the-master-certificate) as a final fallback.
2. [Delete the **existing** Master Certificate](#delete-the-master-certificate) from the Certificate Store.
3. [Import the **new** Master Certificate](#import-the-master-certificate) that was just generated.
After completing all three, the expiration alerts stop.
A reissue is recorded in the Management Tool's [Audit log](/docs/administration/audit-log) as: `Configuration / Generating / The user has issued and saved a new Master Certificate.`
## Migrate to RSA-4096
For deployments upgraded **to Syteca v.7.23 or higher** from earlier versions, the Master Certificate remains at its original **RSA-2048** encryption. An optional migration to **RSA-4096** is available — providing stronger encryption for the entire key hierarchy. The migration is one-way (RSA-4096 cannot be downgraded back to RSA-2048 in-place).
**New deployments** of Syteca v.7.23 or higher generate the Master Certificate at the version's default encryption strength. The Migrate option is only relevant for existing deployments that have been **upgraded** from an earlier version.
Right-click the **Syteca Server** tray icon and select **Database Parameters** to open the `DbSetupToolUI` application.
On the **Advanced** tab, click **Migrate Master Certificate to 4096-bit**. The button only appears if the deployment is on v.7.23 or higher and the Master Certificate is still RSA-2048.
A series of pop-up windows guides the migration process. Follow each pop-up's instructions.
Once migration completes, the **Migrate Master Certificate to 4096-bit** button no longer appears on the Advanced tab. The **Reissue Master Certificate** button is now available for use on the migrated certificate.
## Related
The full key hierarchy — Master Certificate, Data Protection certificate, AES-256, RSA-2048/4096, Diffie-Hellman.
Where the Master Certificate is first generated.
Store the Master Certificate in a Thales HSM instead of the Windows Certificate Store.
The full upgrade procedure — includes the Master Certificate backup step before updating.
Log in to the Application Server host as an **admin user**.
In the Windows Notification area, right-click the **Syteca Server** tray icon and select **Database Parameters** to open the **`DbSetupToolUI`** application.
If your deployment was upgraded **to Syteca v.7.23 or higher** and the Master Certificate hasn't been migrated yet, the **Advanced** tab displays a **Migrate Master Certificate to 4096-bit** button. See [Migrate to RSA-4096](#migrate-to-rsa-4096) below — complete that migration **before** clicking Reissue.
On the **Advanced** tab, click **Reissue Master Certificate**.
In the **Credentials required** pop-up, enter the **User name** and **Password** of a user with the [administrative Tenant Management and System Configuration permission](/docs/administration/users/administrative-permissions#tenant-management-and-system-configuration), then click **Next**.
In the **Certificate generated successfully** pop-up, the system displays the password of the new Master Certificate. **Copy and save this password** somewhere secure — you'll need it when importing.
Click **Save**. In the **Save as** window, choose a location and click **Save**.
The reissue alone doesn't stop the Windows Event log alerts. Three follow-up steps are required:
1. [Back up the **existing** (about-to-be-replaced) Master Certificate](#back-up-the-master-certificate) as a final fallback.
2. [Delete the **existing** Master Certificate](#delete-the-master-certificate) from the Certificate Store.
3. [Import the **new** Master Certificate](#import-the-master-certificate) that was just generated.
After completing all three, the expiration alerts stop.
A reissue is recorded in the Management Tool's [Audit log](/docs/administration/audit-log) as: `Configuration / Generating / The user has issued and saved a new Master Certificate.`
## Migrate to RSA-4096
For deployments upgraded **to Syteca v.7.23 or higher** from earlier versions, the Master Certificate remains at its original **RSA-2048** encryption. An optional migration to **RSA-4096** is available — providing stronger encryption for the entire key hierarchy. The migration is one-way (RSA-4096 cannot be downgraded back to RSA-2048 in-place).
**New deployments** of Syteca v.7.23 or higher generate the Master Certificate at the version's default encryption strength. The Migrate option is only relevant for existing deployments that have been **upgraded** from an earlier version.
Right-click the **Syteca Server** tray icon and select **Database Parameters** to open the `DbSetupToolUI` application.
On the **Advanced** tab, click **Migrate Master Certificate to 4096-bit**. The button only appears if the deployment is on v.7.23 or higher and the Master Certificate is still RSA-2048.
A series of pop-up windows guides the migration process. Follow each pop-up's instructions.
Once migration completes, the **Migrate Master Certificate to 4096-bit** button no longer appears on the Advanced tab. The **Reissue Master Certificate** button is now available for use on the migrated certificate.
## Related
The full key hierarchy — Master Certificate, Data Protection certificate, AES-256, RSA-2048/4096, Diffie-Hellman.
Where the Master Certificate is first generated.
Store the Master Certificate in a Thales HSM instead of the Windows Certificate Store.
The full upgrade procedure — includes the Master Certificate backup step before updating.