> ## Documentation Index
> Fetch the complete documentation index at: https://syteca.com/docs/llms.txt
> Use this file to discover all available pages before exploring further.
# Users and User Groups
> Syteca user management: three user types (internal, Active Directory, application account), four default user groups, custom groups, per-Client permission scoping, two-factor authentication, and admin hardening.
## RBAC built for the people who run a PAM platform
Every security platform has user roles. Most do the minimum — admin, operator, viewer, maybe a custom role tier — and call it RBAC. That works until you're running a real PAM and User Activity Monitoring deployment, at which point you need to express things like: *"Sarah can view monitoring results for the Finance Client group but not Engineering, can't see clipboard text, can approve One-Time Password requests, can't disable the default admin, and her permissions inherit from the Supervisors user group except when overridden by her own grants."* Generic RBAC doesn't fit that shape; you either over-grant and hope, or you write workarounds.
Competitors at this layer — CyberArk Privilege Cloud, Delinea Secret Server, BeyondTrust Password Safe — handle similar problems with their own permission models, but with varying granularity. **Syteca's permission model** is built around exactly the operations a UAM/PAM admin needs: seven [administrative permissions](/docs/administration/users/administrative-permissions) that gate platform-wide actions, six [Client permissions](/docs/administration/users/client-permissions) that gate per-Client operations, **User-to-User access scoping** for restricting which *endpoint users'* monitoring results a Management Tool user can see, and three user types (internal, Active Directory, application account) that share the same permission engine.
**Use Syteca user management when you need to:**
* Implement **separation of duties** between platform admins, investigators, and operations staff — with permissions granular enough to express the real boundaries.
* **Inherit AD user groups** automatically — domain group → Management Tool user group → user, so new hires get correct access on day one.
* Restrict **which endpoint users a given investigator can monitor** (the "User-to-User" model) — useful for legal-team segmentation, regional separation, or contractor isolation.
* Enforce **2FA per user** — TOTP via any authenticator app — with admin-managed reset for lost devices.
* **Harden the default admin** by disabling it entirely once other Administrators are configured — eliminates the "default admin compromise" attack surface.
* Wire applications into Syteca via **Application Account users** through the [Application Credentials Broker](/docs/api/acb/overview) for service-to-service automation.
**Pair it with [Smart card access](/docs/administration/access/smart-card-access)** — RBAC scopes *what* a user can do; smart card access scopes *who can authenticate as that user*. Defense in depth.
All user and user group management requires the [administrative User Management permission](/docs/administration/users/administrative-permissions). In Multi-Tenant mode, users and user groups are completely independent per tenant.
## The default admin and tenant model
By default, Syteca ships with one administrator — login `admin`, password set during [Application Server installation](/docs/administration/deployment/install-application-server). The default admin has every permission required to work with the system and is the **technician** in Multi-Tenant mode, with the ability to create tenants. Once another admin is configured, [the default admin can be disabled](#disable-the-default-admin) to harden the deployment.
## Three user types
| User type | Best for |
| ----------------------- | ------------------------------------------------------------------------------------------------------------------------------------------------------------------------------------------------ |
| **Internal** | Local Management Tool accounts — most common for small deployments or for break-glass admin accounts. Authenticate with username + password defined in Syteca. |
| **Active Directory** | Domain users and domain user groups — most common for enterprise deployments. Authenticate with AD credentials. Requires an [LDAP target](/docs/administration/integrations/ldap-targets) configured. |
| **Application Account** | Service-to-service accounts for the [Application Credentials Broker (ACB)](/docs/api/acb/overview) API. **Not available in SaaS.** |
## Four default user groups
Every Syteca deployment ships with four user groups:
| Group | Contains | Permissions |
| ------------------ | ------------------------------------------------------------------------------------------------------------------ | ---------------------------------------------- |
| **All Users** | Every user — automatic, can't be removed | None inherent |
| **Administrators** | Users who can perform administrative functions | **All** administrative and Client permissions |
| **Supervisors** | Users whose job is to analyze Clients | **Viewing Monitoring Results** for all Clients |
| **PAM Users** | Users of [Syteca Connection Manager](/docs/pam/access/desktop-connection-manager) who don't have Management Tool access | None for Management Tool |
The default `admin` user of the built-in default tenant **cannot be removed** from the **Administrators** user group.
You can add custom user groups for finer-grained role definitions — see [Add a user group](#add-a-user-group) below.
## Permission inheritance
A user can belong to multiple user groups. When a user is in a group:
* They **inherit** every permission granted to that group.
* **Inherited permissions can only be removed by removing the user from the group** — they can't be revoked individually on the user.
* The user can also have **their own** permissions in addition to inherited ones.
If an Active Directory user is added as an independent internal user **and** as a member of a Windows domain user group, **the user's own permissions take priority** over the domain-group-inherited ones.
For a worked example of how user-level and group-level permissions combine, see [Example of permissions](/docs/administration/users/client-permissions#example-of-permission-inheritance).
## Open the Users page
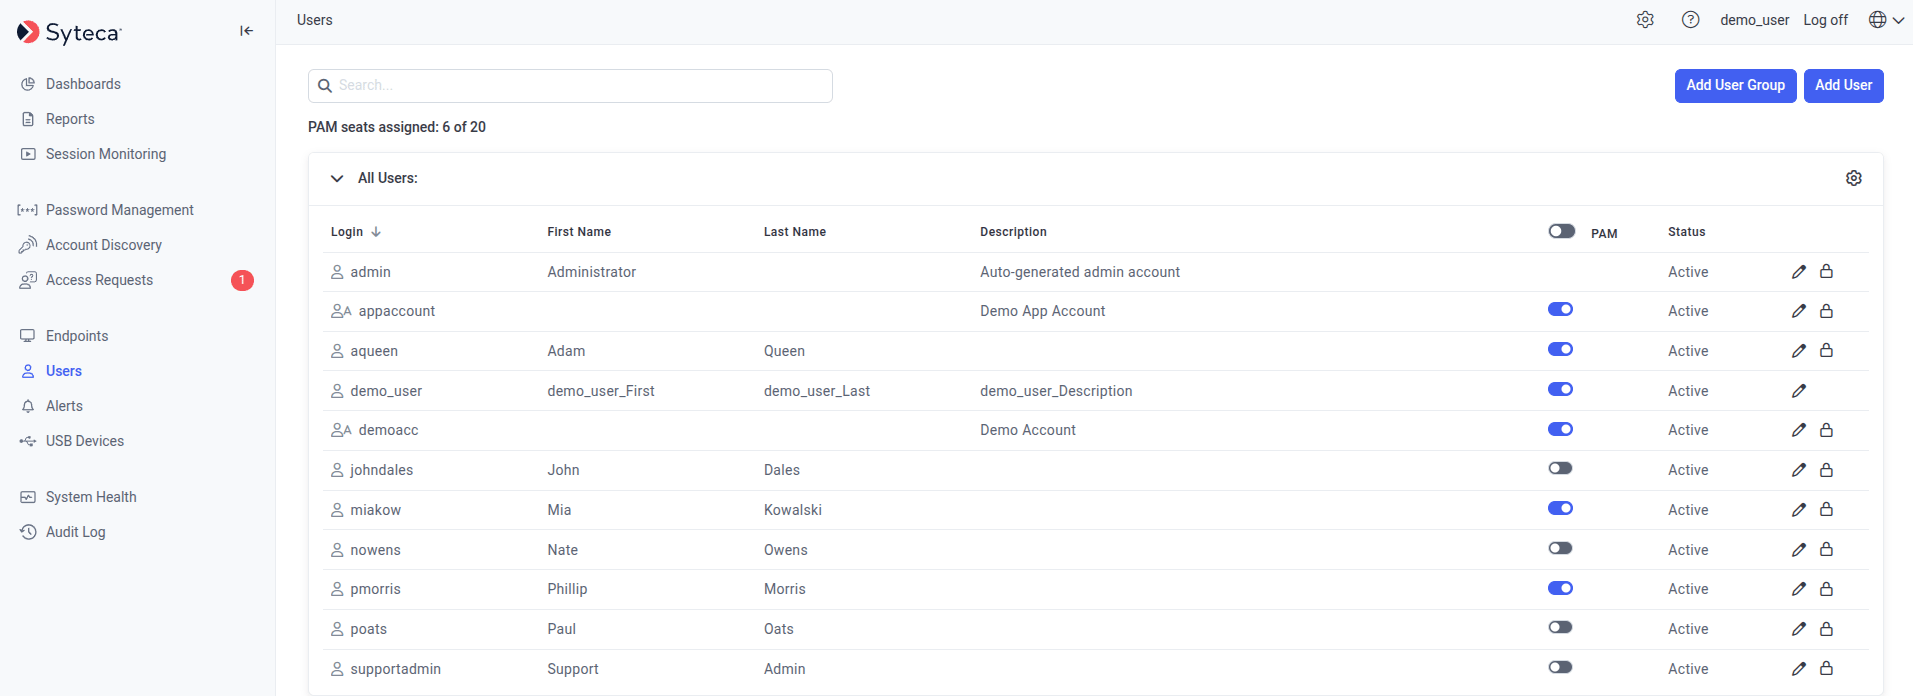
Sign in to the Management Tool, click **Users** in the left navigation. Users are listed grouped by the user groups they belong to. Each row shows:
| Column | Shows |
| ------------------------------ | ---------------------------------------------------------------------------------------------------------------------------------------------------------------- |
| **Login** | The user's login name. |
| **First Name** / **Last Name** | Filled in manually for internal users; **auto-populated for AD users after first sign-in**. |
| **Description** | Optional description. |
| **PAM** *(toggle)* | Whether the user has a [PAM seat license](/docs/administration/licensing/assign-pam-seat-licenses) assigned — required for Password Management and Account Discovery. |
| **Status** | **Active** or **Locked**, plus icons for **Edit User** and **Lock User** / **Unlock User**. |
Use the **Search box** at the top to find users or user groups by user name, group name, first name, last name, or description.
 ## Add a user
On the **Users** page, click **Add User** in the top right.
On the **User Type** tab of the **Adding New User** page, click one:
* **Add an Internal User** — create a local Management Tool account.
* **Add an Active Directory User / User Group** — add an existing AD user or user group.
* **Add Application Account** — create an account for the [ACB API](/docs/api/acb/overview). *Not available in SaaS.*
Active Directory users / user groups can't be added if no [LDAP target](/docs/administration/integrations/ldap-targets) has been configured for the domain, or if the domain is currently unavailable.
If an Active Directory user already belongs to two or more AD user groups in Syteca, that user can't add themselves as an independent user — only other administrators with appropriate permissions can.
On the **User Details** tab, complete the form depending on user type:
* **Login** — must be unique. *(In Multi-Tenant mode, users of different tenants can share the same login.)*
* **Password** — at least 8 characters, with at least one lowercase letter, one uppercase letter, one numeric character, and one special character. Cannot contain more than 3 consecutive identical characters or the user's login name.
* **First Name** / **Last Name** / **Description** — optional, max 200 characters each.
* **Email** — required for the user to receive an automatically generated one-time password.
* **Enable two-factor authentication on login** — force the user to set up TOTP 2FA on first sign-in.
* **User / User Group** — search across any configured domain and select.
* **Enable two-factor authentication on login** — force 2FA in addition to AD authentication.
* **Login** — name of the application account.
* **Application Account Settings** — refer to the [ACB documentation](/docs/api/acb/overview) for the required configuration.
Click **Next**.
On the **User Groups** tab, select the groups this user will belong to. Click **Next**.
The user is automatically added to the **All Users** default group — this can't be changed.
On the **Administrative Permissions** tab, select the [administrative permissions](/docs/administration/users/administrative-permissions) to grant the user directly (in addition to any inherited from groups).
You can only **add** new permissions on top of group-inherited ones. To remove inherited permissions, remove the user from the relevant group.
Click **Next**.
On the **Client Access** tab, for each Client or Client group:
* Click the **Edit Permissions** icon on the right.
* In the **Client Permissions** window, select which [Client permissions](/docs/administration/users/client-permissions) to grant.
* Click **Save**.
Use the **Search box** + **Apply Filters** button at the top to find specific Clients or groups by name.
Click **Next**.
On the **User Access** tab, restrict *which endpoint users' monitoring results this Management Tool user can see*. If you leave this empty, the user sees sessions for all endpoint users they have Viewing Monitoring Results permission for.
To restrict:
* Click **Add User** on the right.
* Pick the **Domain / Computer Name** and **User / User Group** from the drop-downs. **Use `*` as a wildcard.**
* Click the **Add** icon to commit.
The drop-downs only show domains, computers, users, and groups already seen by Syteca during monitoring — but you can also type new names directly.
Settings here apply to **all** sessions for the added endpoint users — past and future. **Exception:** if you add a *domain group*, only sessions recorded *after* adding the group are accessible.
After saving, on the **Users** page, toggle the **PAM** column on for users who need [Password Management](/docs/pam/overview) and [Account Discovery](/docs/pam/discovery/overview) — see [PAM seat licenses](/docs/administration/licensing/assign-pam-seat-licenses).
Click **Finish** in the bottom right. The new user appears on the Users page.
## Edit a user
On the **Users** page, click the **Edit User** icon next to the user.
Edit the user details, group memberships, permissions, Client access, and User-to-User access on the corresponding tabs — same as when [adding a user](#add-a-user).
A **Reset 2FA** button appears next to the **Enable two-factor authentication on login** checkbox — but **only after** the user has already signed in and set up 2FA, and **only for** the tenant admin and Management Tool users with the User Management permission. Click it to delete the user's 2FA profile, useful when the user has lost both their phone and their 2FA recovery code.
Click **Finish** to save and exit, or **Next** to save progressively across tabs.
The **Delete User** button appears in the bottom left when editing — see [Delete a user](#delete-a-user) below. For the default `admin` user, the **Disable User** button replaces **Delete User** — see [Disable the default admin](#disable-the-default-admin).
## Lock and unlock users
User accounts can be locked automatically (after too many failed sign-ins — see [Brute-force lockout](/docs/get-started/management-tool-basics#lock-user-accounts-on-multiple-failed-sign-in-attempts)) or manually by an administrator.
On the **Users** page, click the **Lock User** icon on the right of the user. Click **Confirm** in the pop-up.
On the **Users** page, click the **Unlock User** icon. Click **Confirm** in the pop-up.
## Delete a user
Deleting a user means they immediately lose access to the system. If they're signed in at the moment of deletion, the Management Tool becomes unavailable immediately and pages stop loading.
Click the **Edit User** icon next to the user on the Users page.
On the **User Details** tab, click **Delete User** in the bottom left.
Click **Delete** in the confirmation message.
The default `admin` user can't be deleted — use [Disable the default admin](#disable-the-default-admin) instead.
## Disable the default admin
The default `admin` user has unrestricted access to everything in Syteca — useful for initial setup, a meaningful risk during operation. After initial deployment, security-conscious organizations disable the default admin entirely and rely on other Administrators users (each with auditable, configurable permissions) to operate the platform.
## Add a user
On the **Users** page, click **Add User** in the top right.
On the **User Type** tab of the **Adding New User** page, click one:
* **Add an Internal User** — create a local Management Tool account.
* **Add an Active Directory User / User Group** — add an existing AD user or user group.
* **Add Application Account** — create an account for the [ACB API](/docs/api/acb/overview). *Not available in SaaS.*
Active Directory users / user groups can't be added if no [LDAP target](/docs/administration/integrations/ldap-targets) has been configured for the domain, or if the domain is currently unavailable.
If an Active Directory user already belongs to two or more AD user groups in Syteca, that user can't add themselves as an independent user — only other administrators with appropriate permissions can.
On the **User Details** tab, complete the form depending on user type:
* **Login** — must be unique. *(In Multi-Tenant mode, users of different tenants can share the same login.)*
* **Password** — at least 8 characters, with at least one lowercase letter, one uppercase letter, one numeric character, and one special character. Cannot contain more than 3 consecutive identical characters or the user's login name.
* **First Name** / **Last Name** / **Description** — optional, max 200 characters each.
* **Email** — required for the user to receive an automatically generated one-time password.
* **Enable two-factor authentication on login** — force the user to set up TOTP 2FA on first sign-in.
* **User / User Group** — search across any configured domain and select.
* **Enable two-factor authentication on login** — force 2FA in addition to AD authentication.
* **Login** — name of the application account.
* **Application Account Settings** — refer to the [ACB documentation](/docs/api/acb/overview) for the required configuration.
Click **Next**.
On the **User Groups** tab, select the groups this user will belong to. Click **Next**.
The user is automatically added to the **All Users** default group — this can't be changed.
On the **Administrative Permissions** tab, select the [administrative permissions](/docs/administration/users/administrative-permissions) to grant the user directly (in addition to any inherited from groups).
You can only **add** new permissions on top of group-inherited ones. To remove inherited permissions, remove the user from the relevant group.
Click **Next**.
On the **Client Access** tab, for each Client or Client group:
* Click the **Edit Permissions** icon on the right.
* In the **Client Permissions** window, select which [Client permissions](/docs/administration/users/client-permissions) to grant.
* Click **Save**.
Use the **Search box** + **Apply Filters** button at the top to find specific Clients or groups by name.
Click **Next**.
On the **User Access** tab, restrict *which endpoint users' monitoring results this Management Tool user can see*. If you leave this empty, the user sees sessions for all endpoint users they have Viewing Monitoring Results permission for.
To restrict:
* Click **Add User** on the right.
* Pick the **Domain / Computer Name** and **User / User Group** from the drop-downs. **Use `*` as a wildcard.**
* Click the **Add** icon to commit.
The drop-downs only show domains, computers, users, and groups already seen by Syteca during monitoring — but you can also type new names directly.
Settings here apply to **all** sessions for the added endpoint users — past and future. **Exception:** if you add a *domain group*, only sessions recorded *after* adding the group are accessible.
After saving, on the **Users** page, toggle the **PAM** column on for users who need [Password Management](/docs/pam/overview) and [Account Discovery](/docs/pam/discovery/overview) — see [PAM seat licenses](/docs/administration/licensing/assign-pam-seat-licenses).
Click **Finish** in the bottom right. The new user appears on the Users page.
## Edit a user
On the **Users** page, click the **Edit User** icon next to the user.
Edit the user details, group memberships, permissions, Client access, and User-to-User access on the corresponding tabs — same as when [adding a user](#add-a-user).
A **Reset 2FA** button appears next to the **Enable two-factor authentication on login** checkbox — but **only after** the user has already signed in and set up 2FA, and **only for** the tenant admin and Management Tool users with the User Management permission. Click it to delete the user's 2FA profile, useful when the user has lost both their phone and their 2FA recovery code.
Click **Finish** to save and exit, or **Next** to save progressively across tabs.
The **Delete User** button appears in the bottom left when editing — see [Delete a user](#delete-a-user) below. For the default `admin` user, the **Disable User** button replaces **Delete User** — see [Disable the default admin](#disable-the-default-admin).
## Lock and unlock users
User accounts can be locked automatically (after too many failed sign-ins — see [Brute-force lockout](/docs/get-started/management-tool-basics#lock-user-accounts-on-multiple-failed-sign-in-attempts)) or manually by an administrator.
On the **Users** page, click the **Lock User** icon on the right of the user. Click **Confirm** in the pop-up.
On the **Users** page, click the **Unlock User** icon. Click **Confirm** in the pop-up.
## Delete a user
Deleting a user means they immediately lose access to the system. If they're signed in at the moment of deletion, the Management Tool becomes unavailable immediately and pages stop loading.
Click the **Edit User** icon next to the user on the Users page.
On the **User Details** tab, click **Delete User** in the bottom left.
Click **Delete** in the confirmation message.
The default `admin` user can't be deleted — use [Disable the default admin](#disable-the-default-admin) instead.
## Disable the default admin
The default `admin` user has unrestricted access to everything in Syteca — useful for initial setup, a meaningful risk during operation. After initial deployment, security-conscious organizations disable the default admin entirely and rely on other Administrators users (each with auditable, configurable permissions) to operate the platform.
 **Why disable the default admin?**
* Eliminates a known, high-value credential target (the literal `admin` account).
* Forces all administrative actions through accounts that show up in the [Audit log](/docs/administration/audit-log) by name.
* Meets compliance frameworks (NIST 800-53 IA-4, ISO 27001 A.9.2) that restrict generic admin accounts.
* Required by some Pseudonymizer / regulatory deployment patterns.
### Prerequisites
Before disabling the default admin, **at least one other user must be added to the Administrators user group** — either as an internal user, an AD user, or via membership in an AD user group added to Administrators.
Additionally, the default admin can't be disabled while they're the **sole owner** of certain options or rules. Address these first:
| Option / Rule | Block | Remediation |
| ------------------------------ | ------------------------------------------------------------------------------------------------------------------------------------------------ | ---------------------------------------------------------------------------------------------------------------------------- |
| **Scheduled Reports** | Default admin is the only user in **Who Can Download** for a [Scheduled Report rule](/docs/session-monitoring/reports/scheduled-reports). | Add another user to the **Who Can Download** field. |
| **Secrets** | Default admin is the only **Owner** of a [secret](/docs/pam/secrets/view-manage-secrets). | Add another user as Owner of the secret. |
| **Folders** | Default admin is the only **Owner** of a folder (including [Workforce Password Management](/docs/pam/secrets/workforce-password-management) folders). | Add another user as Owner of the folder. |
| **Endpoint Access requests** | Default admin is the only user who can approve [Endpoint Access](/docs/administration/access/endpoint-access-control) requests. | Add another user to **Users Who Can Approve Access**. |
| **One-Time Password requests** | Default admin is the only user who can approve [OTP requests](/docs/pam/secrets/password-checkout). | Add another user to **Users who can approve access** on the **Authentication Options** tab of Editing Client / Client Group. |
| **Access to Usage of Secret** | Default admin is the only user who can approve [secret-usage requests](/docs/pam/secrets/use-secrets). | Add another user to **Users who can approve access** on the **Restrictions** tab of Edit Secret. |
| **Mass Storage Device Access** | Default admin is the only user who can approve [USB access requests](/docs/session-monitoring/usb-devices/usb-access-approval). | Add another user to **Users who can approve access** on the **Additional Options** tab of the USB rule. |
If the default admin is the **owner** (i.e. created) of a Scheduled Report rule, disabling the default admin **stops the rule from running** and removes it from the Scheduled Reports tab. To preserve the rule, transfer ownership before disabling — or recreate the rule under another user.
### Disable the default admin
Sign in to the Management Tool as **any user in the Administrators group except the default admin**.
Only users in the default **Administrators** user group (internal or AD, or AD user-group members) can disable the default admin.
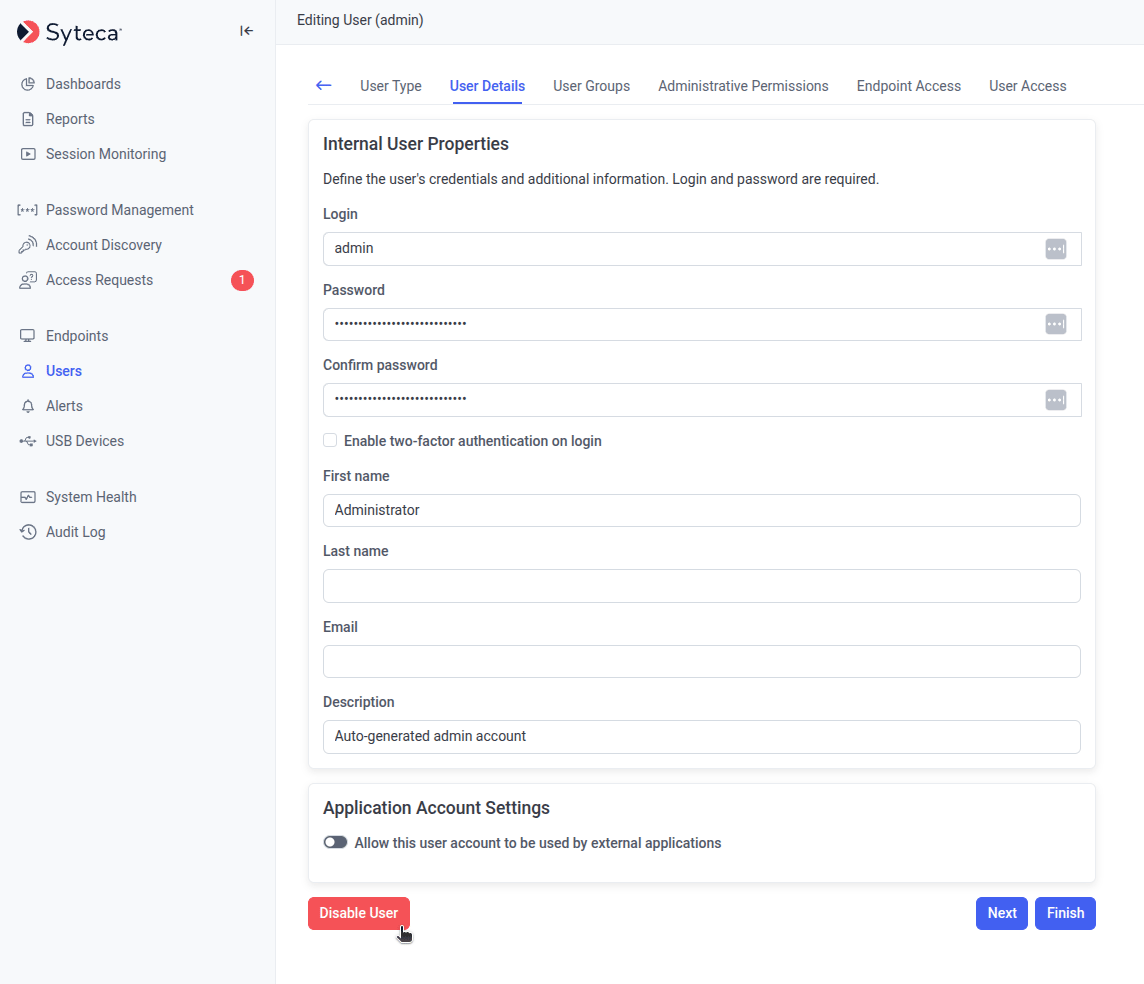
Click **Users** in the left navigation. Click the **Edit User** icon next to the default `admin` user.
On the **User Details** tab, click **Disable User** in the bottom left.
The **Disable User** button replaces **Delete User** for the default admin. It only appears if at least one other user has been added to the Administrators group.
Click **Confirm** in the warning pop-up. If the default admin is the sole owner of any options/rules listed in the prerequisites table, the **Confirm** button won't be available — resolve those first.
After the default admin is disabled, **the last remaining user in the Administrators group cannot be deleted** — Syteca preserves at least one administrator.
### Restrictions after disabling
Disabling the default admin changes the behavior of several features:
| Feature | Behavior after disabling |
| -------------------------------------------------------------------------- | ----------------------------------------------------------------------------------------------------------------------------------------------------------------------------------------------------------------------------------------------------------- |
| **[Pseudonymizer](/docs/session-monitoring/masking/pseudonymizer)** | The **Enable De-Anonymization Password** section is hidden on the Pseudonymization configuration tab. If the password was set before disabling, **it continues to function** but **cannot be deselected or changed** until the default admin is re-enabled. |
| **[Syteca API Data Connector](/docs/api/data-connector/overview)** | The default admin's API key can no longer be used for API requests. Use the API key of any Administrators-group user instead. **Note:** Data Connector v.1.9 installation still requires the default admin credentials, so install before disabling. |
| **[Account Discovery](/docs/pam/discovery/overview)** | If the default admin was in the **Send email notifications about new accounts found to** field of an Account Discovery rule, they're removed from it and no longer receive notifications. |
| **[Multi-Tenant mode](/docs/administration/multi-tenant/overview)** | The default `admin` username no longer appears in the **Tenant Admin** column for the Built-in default tenant on the Tenants page. |
| **[High Availability mode](/docs/administration/deployment/high-availability)** | Installing Syteca Application Server in High Availability (including with load balancing) can be done by any Administrators-group user. |
## Add a user group
User groups work the same way as users — same Client Access, same Administrative Permissions, same User-to-User access mechanism. Users in a group inherit the group's permissions.
On the **Users** page, click **Add User Group** in the top right.
On the **Group Properties** tab, enter a **Name** (optionally a description), then click **Next**.
On the **Management Tool Users** tab, click **Add Users** in the top left, select the users to add, then click **Next**.
On the **Administrative Permissions** tab, select the [administrative permissions](/docs/administration/users/administrative-permissions) all group members will inherit. Click **Next**.
On the **Client Access** tab, for each Client or Client group, click the **Edit Permissions** icon and select the [Client permissions](/docs/administration/users/client-permissions) to grant. Click **Save** after each, then **Next**.
On the **User Access** tab, restrict which endpoint users' monitoring results group members can see — same mechanism as for individual users in [Add a user](#add-a-user).
Click **Finish**. The new user group appears on the Users page.
## Edit a user group
On the **Users** page, click the **Edit Group** icon in the top right of the user group.
Edit properties, members, permissions, and Client access on the corresponding tabs — same as when [adding a user group](#add-a-user-group).
Click **Finish** to save and exit, or **Next** to save progressively.
The default `admin` user can't be removed from the **Administrators** user group.
## Delete a user group
Deleting a user group **doesn't delete the users in it** — but those users lose any permissions they inherited only from this group. Permissions inherited from other groups or assigned directly to the user remain.
Click the **Edit Group** icon in the top right of the user group on the Users page.
On the **Group Properties** tab, click **Delete Group** at the bottom of the page.
Click **Approve** in the confirmation message.
The **All Users** group can't be deleted.
## Related
The seven administrative permissions and what each one grants.
The six per-Client permissions, plus a worked permission-inheritance example.
Configure 2FA across users and the deployment.
Service-to-service authentication for the API.
**Why disable the default admin?**
* Eliminates a known, high-value credential target (the literal `admin` account).
* Forces all administrative actions through accounts that show up in the [Audit log](/docs/administration/audit-log) by name.
* Meets compliance frameworks (NIST 800-53 IA-4, ISO 27001 A.9.2) that restrict generic admin accounts.
* Required by some Pseudonymizer / regulatory deployment patterns.
### Prerequisites
Before disabling the default admin, **at least one other user must be added to the Administrators user group** — either as an internal user, an AD user, or via membership in an AD user group added to Administrators.
Additionally, the default admin can't be disabled while they're the **sole owner** of certain options or rules. Address these first:
| Option / Rule | Block | Remediation |
| ------------------------------ | ------------------------------------------------------------------------------------------------------------------------------------------------ | ---------------------------------------------------------------------------------------------------------------------------- |
| **Scheduled Reports** | Default admin is the only user in **Who Can Download** for a [Scheduled Report rule](/docs/session-monitoring/reports/scheduled-reports). | Add another user to the **Who Can Download** field. |
| **Secrets** | Default admin is the only **Owner** of a [secret](/docs/pam/secrets/view-manage-secrets). | Add another user as Owner of the secret. |
| **Folders** | Default admin is the only **Owner** of a folder (including [Workforce Password Management](/docs/pam/secrets/workforce-password-management) folders). | Add another user as Owner of the folder. |
| **Endpoint Access requests** | Default admin is the only user who can approve [Endpoint Access](/docs/administration/access/endpoint-access-control) requests. | Add another user to **Users Who Can Approve Access**. |
| **One-Time Password requests** | Default admin is the only user who can approve [OTP requests](/docs/pam/secrets/password-checkout). | Add another user to **Users who can approve access** on the **Authentication Options** tab of Editing Client / Client Group. |
| **Access to Usage of Secret** | Default admin is the only user who can approve [secret-usage requests](/docs/pam/secrets/use-secrets). | Add another user to **Users who can approve access** on the **Restrictions** tab of Edit Secret. |
| **Mass Storage Device Access** | Default admin is the only user who can approve [USB access requests](/docs/session-monitoring/usb-devices/usb-access-approval). | Add another user to **Users who can approve access** on the **Additional Options** tab of the USB rule. |
If the default admin is the **owner** (i.e. created) of a Scheduled Report rule, disabling the default admin **stops the rule from running** and removes it from the Scheduled Reports tab. To preserve the rule, transfer ownership before disabling — or recreate the rule under another user.
### Disable the default admin
Sign in to the Management Tool as **any user in the Administrators group except the default admin**.
Only users in the default **Administrators** user group (internal or AD, or AD user-group members) can disable the default admin.
Click **Users** in the left navigation. Click the **Edit User** icon next to the default `admin` user.
On the **User Details** tab, click **Disable User** in the bottom left.
The **Disable User** button replaces **Delete User** for the default admin. It only appears if at least one other user has been added to the Administrators group.
Click **Confirm** in the warning pop-up. If the default admin is the sole owner of any options/rules listed in the prerequisites table, the **Confirm** button won't be available — resolve those first.
After the default admin is disabled, **the last remaining user in the Administrators group cannot be deleted** — Syteca preserves at least one administrator.
### Restrictions after disabling
Disabling the default admin changes the behavior of several features:
| Feature | Behavior after disabling |
| -------------------------------------------------------------------------- | ----------------------------------------------------------------------------------------------------------------------------------------------------------------------------------------------------------------------------------------------------------- |
| **[Pseudonymizer](/docs/session-monitoring/masking/pseudonymizer)** | The **Enable De-Anonymization Password** section is hidden on the Pseudonymization configuration tab. If the password was set before disabling, **it continues to function** but **cannot be deselected or changed** until the default admin is re-enabled. |
| **[Syteca API Data Connector](/docs/api/data-connector/overview)** | The default admin's API key can no longer be used for API requests. Use the API key of any Administrators-group user instead. **Note:** Data Connector v.1.9 installation still requires the default admin credentials, so install before disabling. |
| **[Account Discovery](/docs/pam/discovery/overview)** | If the default admin was in the **Send email notifications about new accounts found to** field of an Account Discovery rule, they're removed from it and no longer receive notifications. |
| **[Multi-Tenant mode](/docs/administration/multi-tenant/overview)** | The default `admin` username no longer appears in the **Tenant Admin** column for the Built-in default tenant on the Tenants page. |
| **[High Availability mode](/docs/administration/deployment/high-availability)** | Installing Syteca Application Server in High Availability (including with load balancing) can be done by any Administrators-group user. |
## Add a user group
User groups work the same way as users — same Client Access, same Administrative Permissions, same User-to-User access mechanism. Users in a group inherit the group's permissions.
On the **Users** page, click **Add User Group** in the top right.
On the **Group Properties** tab, enter a **Name** (optionally a description), then click **Next**.
On the **Management Tool Users** tab, click **Add Users** in the top left, select the users to add, then click **Next**.
On the **Administrative Permissions** tab, select the [administrative permissions](/docs/administration/users/administrative-permissions) all group members will inherit. Click **Next**.
On the **Client Access** tab, for each Client or Client group, click the **Edit Permissions** icon and select the [Client permissions](/docs/administration/users/client-permissions) to grant. Click **Save** after each, then **Next**.
On the **User Access** tab, restrict which endpoint users' monitoring results group members can see — same mechanism as for individual users in [Add a user](#add-a-user).
Click **Finish**. The new user group appears on the Users page.
## Edit a user group
On the **Users** page, click the **Edit Group** icon in the top right of the user group.
Edit properties, members, permissions, and Client access on the corresponding tabs — same as when [adding a user group](#add-a-user-group).
Click **Finish** to save and exit, or **Next** to save progressively.
The default `admin` user can't be removed from the **Administrators** user group.
## Delete a user group
Deleting a user group **doesn't delete the users in it** — but those users lose any permissions they inherited only from this group. Permissions inherited from other groups or assigned directly to the user remain.
Click the **Edit Group** icon in the top right of the user group on the Users page.
On the **Group Properties** tab, click **Delete Group** at the bottom of the page.
Click **Approve** in the confirmation message.
The **All Users** group can't be deleted.
## Related
The seven administrative permissions and what each one grants.
The six per-Client permissions, plus a worked permission-inheritance example.
Configure 2FA across users and the deployment.
Service-to-service authentication for the API.