> ## Documentation Index
> Fetch the complete documentation index at: https://syteca.com/docs/llms.txt
> Use this file to discover all available pages before exploring further.
# Manage the Data Connector
> After installing the Syteca API Data Connector, manage it from the Management Tool's Applications tab — view registration status, see version info, and deactivate (remove integration) when needed.
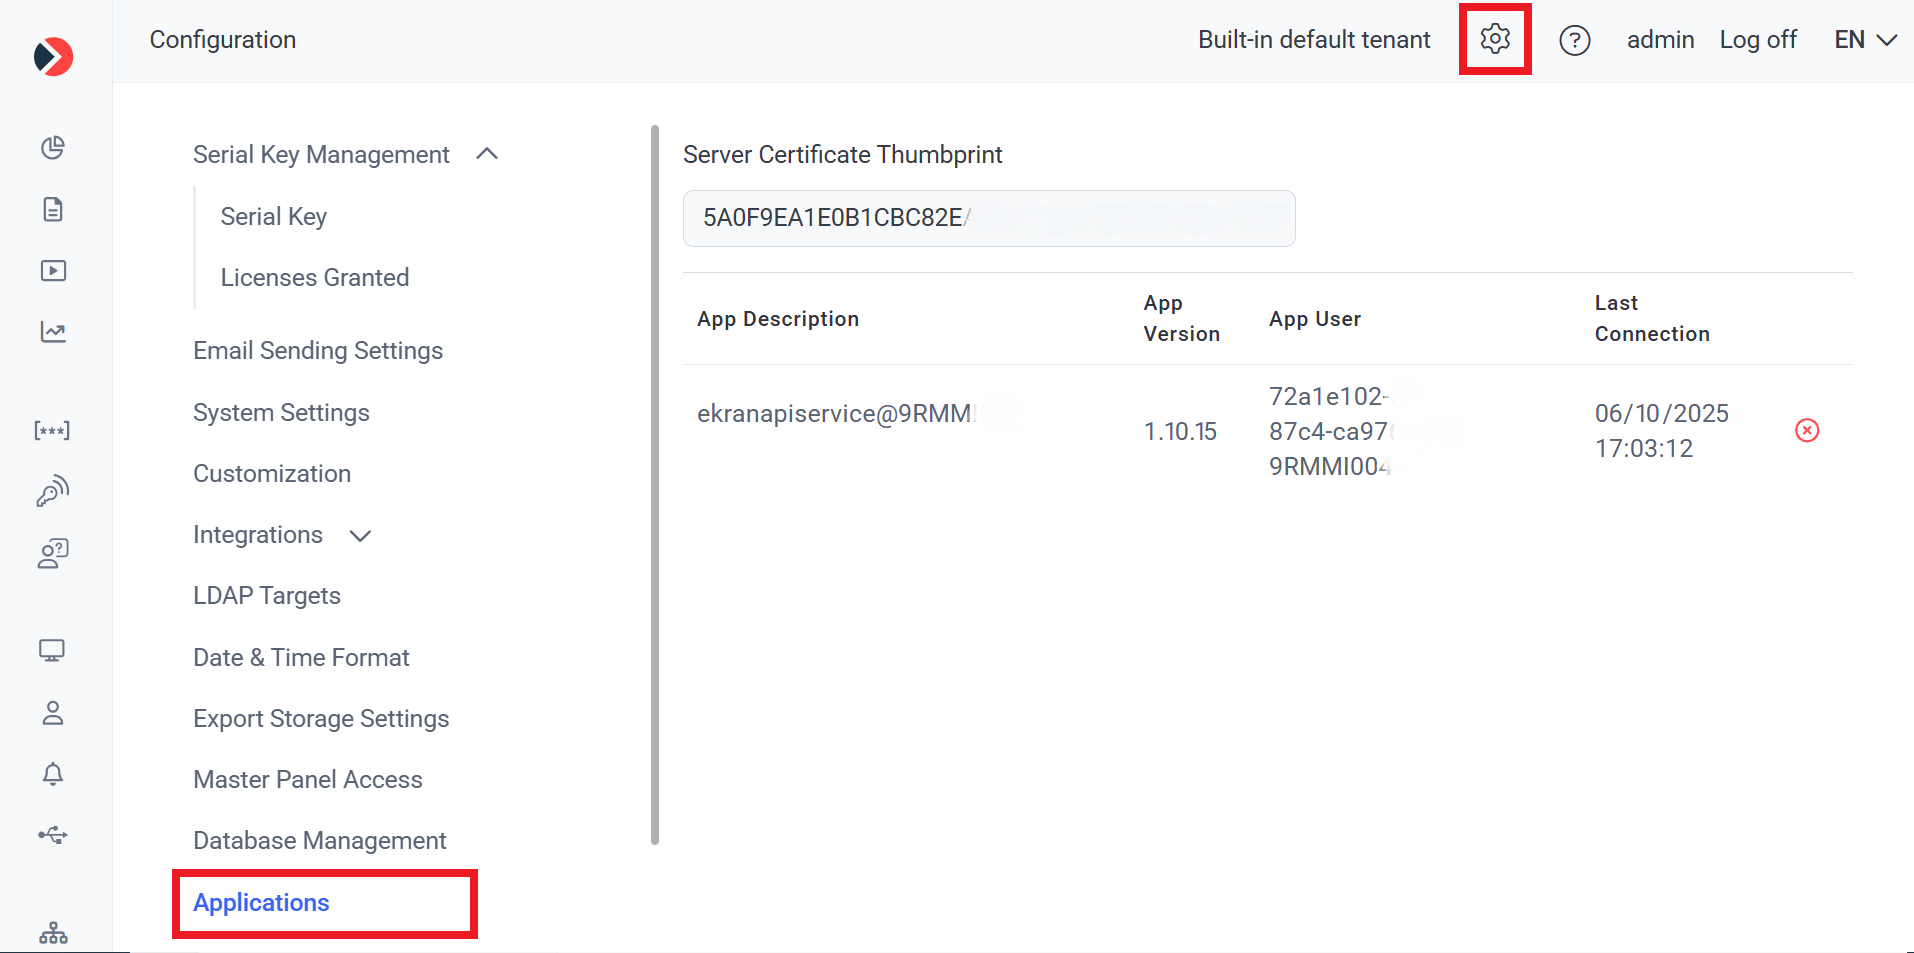
After [installing](/docs/api/data-connector/overview) the Data Connector, it appears in the Management Tool's **Configuration → Applications** tab as a registered application. This is where you confirm registration succeeded, see version information, and (when needed) deactivate the integration.
**NOT AVAILABLE IN SAAS.** This procedure applies to **on-premises** deployments only.
Managing the Data Connector requires the [administrative Tenant Management and System Configuration permission](/docs/administration/users/administrative-permissions#tenant-management-and-system-configuration).
## Open the Applications tab
Sign in to the Management Tool. Click the **Configuration** (gear) icon at the top.
Select the **Applications** tab. A new record for the Data Connector is displayed after a successful installation — confirming the Data Connector has registered with the Application Server.
 ## Deactivate the Data Connector
To remove the Data Connector's integration with the Application Server — for example, when migrating to a different host or decommissioning the integration:
On the **Applications** tab, click the **Remove** icon on the right of the Data Connector row.
Confirm the removal in the prompt that appears.
**Removing the Data Connector means it must be reinstalled to reactivate it.** The application can't be re-registered without going through the full [installation procedure](/docs/api/data-connector/overview) again. Don't remove unless you're decommissioning or migrating.
After removal, API calls to the Data Connector return **HTTP 403 Forbidden** — the application is no longer registered on the Application Server. See [Status codes](/docs/api/data-connector/api-reference#status-codes) for the full error mapping.
## Get an API key
Each Management Tool user has their own API key. The key inherits the user's [administrative permissions](/docs/administration/users/administrative-permissions), [Client permissions](/docs/administration/users/client-permissions), and User-to-User access — so API consumers see the same data scope the user would see in the Management Tool.
In the Management Tool, click the button in the top right where your user name is displayed.
The **Manage Account** page opens. Find the **Active API Key** field.
Click the **Copy** icon next to the **Active API Key** to copy it to your clipboard. Paste it into your API consumer (Power BI, Postman, your script, etc.) as the `ApiKey` header.
**Treat the API key like a password.** Anyone with this key can read every piece of monitoring data the user has access to. Don't commit it to version control, don't paste it into chat logs, and rotate it if you suspect exposure.
For the full authentication conventions and the header format, see [API reference → Authentication](/docs/api/data-connector/api-reference#authentication).
## Related
The prerequisites and MSI installation procedure.
Authentication, base URL, conventions, and all 9 endpoints.
The permission required to manage the Data Connector and other registered applications.
End-to-end Power BI use case using the API key from this page.
## Deactivate the Data Connector
To remove the Data Connector's integration with the Application Server — for example, when migrating to a different host or decommissioning the integration:
On the **Applications** tab, click the **Remove** icon on the right of the Data Connector row.
Confirm the removal in the prompt that appears.
**Removing the Data Connector means it must be reinstalled to reactivate it.** The application can't be re-registered without going through the full [installation procedure](/docs/api/data-connector/overview) again. Don't remove unless you're decommissioning or migrating.
After removal, API calls to the Data Connector return **HTTP 403 Forbidden** — the application is no longer registered on the Application Server. See [Status codes](/docs/api/data-connector/api-reference#status-codes) for the full error mapping.
## Get an API key
Each Management Tool user has their own API key. The key inherits the user's [administrative permissions](/docs/administration/users/administrative-permissions), [Client permissions](/docs/administration/users/client-permissions), and User-to-User access — so API consumers see the same data scope the user would see in the Management Tool.
In the Management Tool, click the button in the top right where your user name is displayed.
The **Manage Account** page opens. Find the **Active API Key** field.
Click the **Copy** icon next to the **Active API Key** to copy it to your clipboard. Paste it into your API consumer (Power BI, Postman, your script, etc.) as the `ApiKey` header.
**Treat the API key like a password.** Anyone with this key can read every piece of monitoring data the user has access to. Don't commit it to version control, don't paste it into chat logs, and rotate it if you suspect exposure.
For the full authentication conventions and the header format, see [API reference → Authentication](/docs/api/data-connector/api-reference#authentication).
## Related
The prerequisites and MSI installation procedure.
Authentication, base URL, conventions, and all 9 endpoints.
The permission required to manage the Data Connector and other registered applications.
End-to-end Power BI use case using the API key from this page.