> ## Documentation Index
> Fetch the complete documentation index at: https://syteca.com/docs/llms.txt
> Use this file to discover all available pages before exploring further.
# Management Tool Basics
> Open and sign in to the Syteca Management Tool, learn the interface and navigation, set up two-factor authentication, and change your own password.
The Management Tool is the web-based interface where you manage Syteca — users, Clients, alerts, secrets, dashboards, and audit logs. This page walks through opening it for the first time, what the interface looks like, and the two account self-service tasks you'll do most often (changing your password and setting up two-factor authentication).
**In SaaS,** the process of opening and signing in differs slightly. See [the SaaS Quick Start](/docs/get-started/saas-quick-start) for the SaaS-specific flow.
## Open and sign in
In your browser, go to:
```text theme={"system"}
https:///
```
For example, `https://john-pc/MyMonitoringSystem` — or, by default on the install host, `https://hostname/Syteca`. The URL folder is the one you specified during [Management Tool installation](/docs/administration/deployment/install-management-tool#install-the-management-tool).
If the self-signed certificate is not [added to Trusted Root Certification Authorities](/docs/administration/deployment/management-tool-prerequisites#5-add-the-self-signed-certificate-to-trusted-root), or the name in the address bar doesn't match the certificate's **Issued To** field, the browser will display a certificate error.
On Google Chrome 119.0.6045.160 and later, a certificate error may appear. See the troubleshooting note for the **ERR\_SSL\_KEY\_USAGE\_INCOMPATIBLE** error if this happens.
Enter the credentials of an existing user (one shown on the [Users](/docs/administration/users/users) page), then click **Log In**:
Enter the **Login** and **Password** defined when the user was created in the Management Tool.
On first open after install, sign in as **`admin`** (or whatever the built-in admin was renamed to) with the password defined during Application Server installation.
Enter the **Login** as `\` and the Active Directory authentication password.
If an AD user group has been added to the system, any user in that group can sign in with their Windows credentials.
If two-factor authentication is enabled for your account, see [Set up two-factor authentication](#set-up-two-factor-authentication-on-first-sign-in) below for the first-time setup, or enter the code from your authenticator app on subsequent sign-ins.
By default, only one session per credential is allowed. If another user signs in with the same credentials from a different IP, the first session is forcibly logged out. Configure concurrent-session behavior on the **System Settings** tab of the **Configuration** page.
The first time you open the Management Tool after installation, it may take a moment to launch — IIS hasn't yet warmed up the application pool.
## Set up two-factor authentication on first sign-in
If 2FA is enabled on your account (the **Enable two-factor authentication on login** checkbox is selected for you on the **Users** page), you must set it up on first sign-in.
A QR code appears after you enter your password. Open an authenticator app on your phone — Google Authenticator, Microsoft Authenticator, or any TOTP app — and scan the code.
The Management Tool also displays a one-time **recovery code**. Save this somewhere safe in case you lose access to your authenticator device.
If you lose both your authenticator device and your recovery code, an administrator will have to disable 2FA on your account to restore access.
Click **Confirm**, then enter the current code from your authenticator app and click **Continue**.
After this first setup, sign-in is two steps: password, then current authenticator code.
## Change your own password
Internal users — including the built-in administrator — can change their own passwords from within the Management Tool. Active Directory users manage their passwords in Active Directory, not here.
Click your **user name** in the top-right of any Management Tool page.
On the **Manage Account** page:
* **Current password** — enter your existing password.
* **New password** — enter a new password.
* **Confirm password** — re-enter the new password.
Click **Change Password**. Use the new password on your next sign-in.
## Lock user accounts on multiple failed sign-in attempts
To prevent brute-force attacks, the Application Server can automatically lock user accounts after a configurable number of failed sign-in attempts. Once locked, the user can't sign in — even with correct credentials — until either the lockout duration passes or an administrator unlocks them.
To enable this and tune the parameters, edit the **`EkranServer.Settings.config`** file on the Application Server computer and modify these keys:
| Key | What it controls | Default | Range |
| ------------------------------ | ------------------------------------------------ | ------- | ---------- |
| **`LockoutEnabled`** | Enable the lockout feature (`1` = on, `0` = off) | `0` | `0` or `1` |
| **`LockoutAccessFailedCount`** | Consecutive failed attempts before lockout | `5` | `3`–`10` |
| **`LockoutDuration`** | Lockout duration in minutes | `5` | `5`–`20` |
**In SaaS,** the `EkranServer.Settings.config` file is not accessible. Contact your Syteca vendor or the Support team to modify these keys in your environment.
Once enabled, the lockout applies to all users. To unlock a specific user before the duration ends, an administrator with the [User Management administrative permission](/docs/administration/users/administrative-permissions) can unlock them manually. See [Lock and unlock users](/docs/administration/users/users#lock-and-unlock-users).
[Single Sign-On (SSO)](/docs/administration/integrations/keycloak-sso) is independent of this lockout feature — SSO sign-ins are not affected by the lockout counter.
## The Management Tool interface
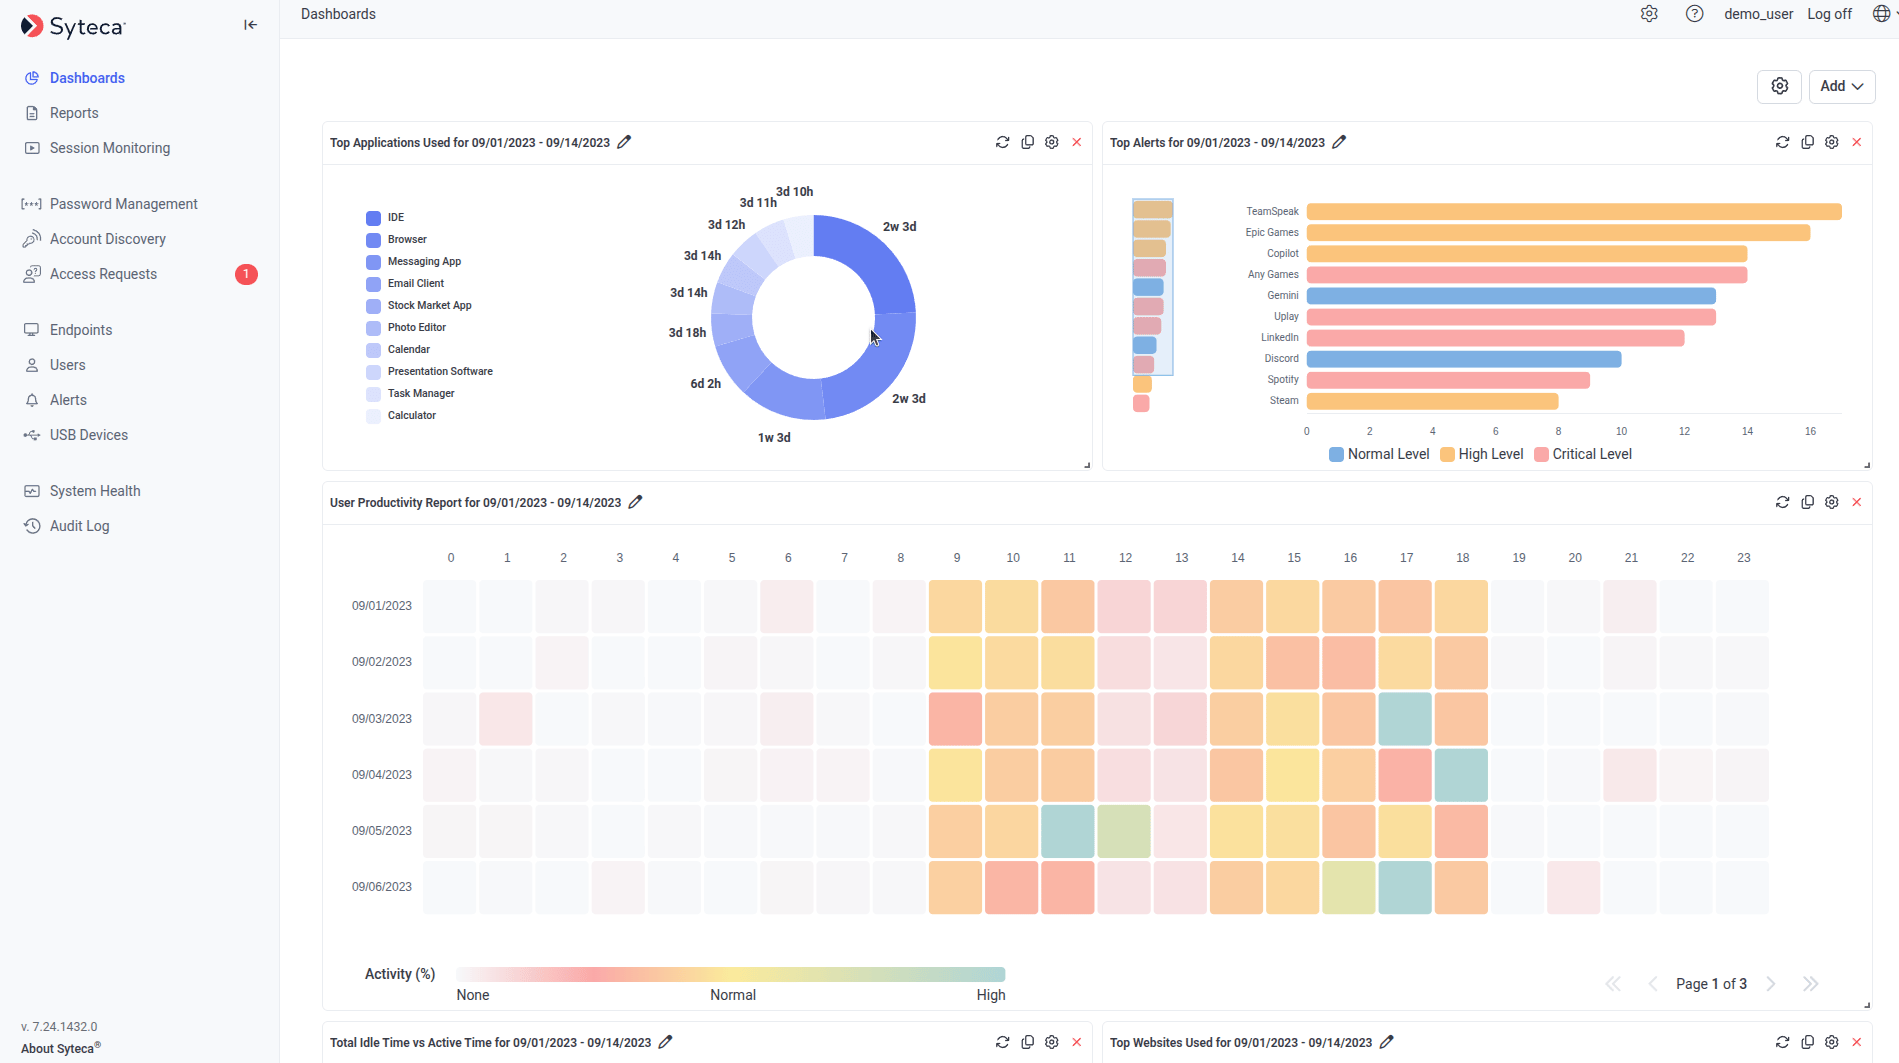 The **Main Menu** runs down the left side of every page. Click the Syteca logo to collapse or expand the menu.
| Main Menu link | Page |
| ------------------------------------------------------- | -------------------------------------------------------------------------------------------------------------------------------------------- |
| **Dashboards** | [User activity dashboards](/docs/session-monitoring/dashboards/user-activity-dashboards) — productivity statistics as interactive charts. |
| **Reports** | [Reports](/docs/session-monitoring/reports/overview) — generate reports of various types; manage scheduled reports on the Scheduled Reports tab. |
| **Activity Monitoring** *(formerly Monitoring Results)* | [Client Sessions list](/docs/session-monitoring/sessions-list) — all sessions received from Clients you have permission to view; export sessions. |
| **User Behavior Analysis** *(not in SaaS)* | [UEBA](/docs/session-monitoring/ueba/overview) — user behavior rules and profiles for User Behavior Analytics. |
| **Password Management** | [PAM](/docs/pam/overview) — manage Privileged Access Management secrets. |
| **Account Discovery** | [Account Discovery](/docs/pam/discovery/overview) — scan the network for privileged accounts and onboard them into secrets. |
| **Access Requests** *(formerly Access Management)* | [Access Requests](/docs/pam/access/access-requests) — two-factor authentication, one-time passwords, endpoint access control. |
| **Clients** *(formerly Client Management)* | [Clients](/docs/administration/clients/windows) — all Windows, macOS, and Linux Clients you have permission to see, plus the Blocked Users list. |
| **Users** *(formerly User Management)* | [Users](/docs/administration/users/users) — all users in the system (requires User Management permission). |
| **Alerts** *(formerly Alert Management)* | [Alerts](/docs/session-monitoring/alerts) — alert rules assigned to Clients. |
| **USB Devices** *(formerly USB Monitoring)* | [USB monitoring](/docs/session-monitoring/usb-devices/overview) — USB monitoring rules and access approval. |
| **Tenants** *(not in SaaS, formerly Tenant Management)* | [Multi-Tenant mode](/docs/administration/multi-tenant/overview) — add, edit, and delete tenants. |
| **System Health** *(formerly Health Monitoring)* | [System Health](/docs/administration/dashboards/system-health-dashboards) — system state and resource usage; Offline Clients tab; Tasks List tab. |
| **Audit Log** | [Audit log](/docs/administration/audit-log) — every administrator action performed in the Management Tool. |
The **Configuration** (cog) button at the top of the interface opens the Configuration page, with tabs for email settings, system settings, [SIEM integration](/docs/administration/integrations/siem), [ticketing system integration](/docs/administration/integrations/ticketing-system), LDAP targets, date & time format, database management, and [serial key management](/docs/administration/licensing/manage-serial-key).
Most main pages also have action buttons in the top right — for example, **Add Client Group**, **Install Clients**, **Manage Licenses**, **Edit the Uninstallation Key**, **Add User**, **Add Alert**, **Add Rule**, **Global Alert Settings**, **Export Alerts**, and **Import Alerts**.
## Related
Run the installer, configure the firewall, update, and uninstall.
Pre-install setup: IIS, .NET, certificates, HTTPS binding.
Optional: enforce smart card authentication for the Management Tool.
Configure 2FA across users and the system as a whole.
The **Main Menu** runs down the left side of every page. Click the Syteca logo to collapse or expand the menu.
| Main Menu link | Page |
| ------------------------------------------------------- | -------------------------------------------------------------------------------------------------------------------------------------------- |
| **Dashboards** | [User activity dashboards](/docs/session-monitoring/dashboards/user-activity-dashboards) — productivity statistics as interactive charts. |
| **Reports** | [Reports](/docs/session-monitoring/reports/overview) — generate reports of various types; manage scheduled reports on the Scheduled Reports tab. |
| **Activity Monitoring** *(formerly Monitoring Results)* | [Client Sessions list](/docs/session-monitoring/sessions-list) — all sessions received from Clients you have permission to view; export sessions. |
| **User Behavior Analysis** *(not in SaaS)* | [UEBA](/docs/session-monitoring/ueba/overview) — user behavior rules and profiles for User Behavior Analytics. |
| **Password Management** | [PAM](/docs/pam/overview) — manage Privileged Access Management secrets. |
| **Account Discovery** | [Account Discovery](/docs/pam/discovery/overview) — scan the network for privileged accounts and onboard them into secrets. |
| **Access Requests** *(formerly Access Management)* | [Access Requests](/docs/pam/access/access-requests) — two-factor authentication, one-time passwords, endpoint access control. |
| **Clients** *(formerly Client Management)* | [Clients](/docs/administration/clients/windows) — all Windows, macOS, and Linux Clients you have permission to see, plus the Blocked Users list. |
| **Users** *(formerly User Management)* | [Users](/docs/administration/users/users) — all users in the system (requires User Management permission). |
| **Alerts** *(formerly Alert Management)* | [Alerts](/docs/session-monitoring/alerts) — alert rules assigned to Clients. |
| **USB Devices** *(formerly USB Monitoring)* | [USB monitoring](/docs/session-monitoring/usb-devices/overview) — USB monitoring rules and access approval. |
| **Tenants** *(not in SaaS, formerly Tenant Management)* | [Multi-Tenant mode](/docs/administration/multi-tenant/overview) — add, edit, and delete tenants. |
| **System Health** *(formerly Health Monitoring)* | [System Health](/docs/administration/dashboards/system-health-dashboards) — system state and resource usage; Offline Clients tab; Tasks List tab. |
| **Audit Log** | [Audit log](/docs/administration/audit-log) — every administrator action performed in the Management Tool. |
The **Configuration** (cog) button at the top of the interface opens the Configuration page, with tabs for email settings, system settings, [SIEM integration](/docs/administration/integrations/siem), [ticketing system integration](/docs/administration/integrations/ticketing-system), LDAP targets, date & time format, database management, and [serial key management](/docs/administration/licensing/manage-serial-key).
Most main pages also have action buttons in the top right — for example, **Add Client Group**, **Install Clients**, **Manage Licenses**, **Edit the Uninstallation Key**, **Add User**, **Add Alert**, **Add Rule**, **Global Alert Settings**, **Export Alerts**, and **Import Alerts**.
## Related
Run the installer, configure the firewall, update, and uninstall.
Pre-install setup: IIS, .NET, certificates, HTTPS binding.
Optional: enforce smart card authentication for the Management Tool.
Configure 2FA across users and the system as a whole.