> ## Documentation Index
> Fetch the complete documentation index at: https://syteca.com/docs/llms.txt
> Use this file to discover all available pages before exploring further.
# SaaS Quick Start
> Provision a Syteca SaaS tenant, install a client, and review your first recorded session — in about 20 minutes.
This quick start gets you from "we just signed up" to "we have a recorded session to look at" in roughly 20 minutes. Use it to evaluate Syteca, prove the concept to a stakeholder, or onboard a new admin.
## Before you start
* A Syteca SaaS tenant URL and an admin login. If you don't have one, [request a trial](https://syteca.com/demo).
* One Windows endpoint you can install software on. A spare laptop or VM is fine.
* 20 minutes of uninterrupted time.
## 1. Sign in to your tenant
Open your tenant URL in a current Chromium or Firefox browser. Sign in with the credentials from your welcome email.
Bookmark the tenant URL you received in your welcome email.There's no shared production login for SaaS.
## 2. Add your first user
Skip this if you'll be the only person testing.
From the left nav, choose **Users**, then **Add user** in the top right.
For evaluation, assign the **Supervisor** role. It can view sessions but not change configuration — safer than the deafult full admin.
## 3. Get the client installer
Choose **Clients** in the left nav, then **Add client**.
Choose **Windows (x64)** and click **Download**. The file is `SytecaClient-x64.msi`.
The same page shows an **Agent key**. Copy it — you'll need it during install.
## 4. Install on your endpoint
For evaluation, the GUI installer is fastest.
```text theme={"system"}
Right-click SytecaClient-x64.msi → Run as administrator
```
When prompted:
* **Server address:** your tenant URL without the `https://` prefix.
* **Server port:** `9447`.
* **Agent key:** paste the value from step 3.
The installer registers automatically. For silent installs and Group Policy rollout, see [Install a Windows Client](/docs/administration/clients/install-windows).
## 5. Watch it appear
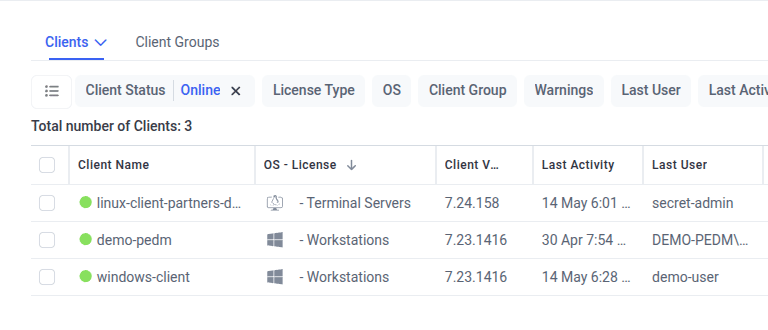
Back in the Management Tool, open **Clients**. Within 30 seconds the new endpoint shows up with **Status: Online**.
 ## 6. Generate a session
On the endpoint, sign in as any user and do something interactive — open a browser, edit a file, run a command. After about a minute, the Application Server has the first session.
## 7. Review the session
Back in the Management Tool, choose **Sessions** in the left nav.
The newest session is at the top. Click the row to open the Session Player.
Use the timeline to scrub. The right-side panel shows keystrokes, application names, and window titles, all searchable.
## Next steps
You have a working tenant with one recorded endpoint. Common next steps:
Detect risky behavior and respond automatically.
Vault a secret and broker a brokered RDP/SSH session.
Add a second factor to every administrator account.
Silent MSI install and Group Policy deployment.
## 6. Generate a session
On the endpoint, sign in as any user and do something interactive — open a browser, edit a file, run a command. After about a minute, the Application Server has the first session.
## 7. Review the session
Back in the Management Tool, choose **Sessions** in the left nav.
The newest session is at the top. Click the row to open the Session Player.
Use the timeline to scrub. The right-side panel shows keystrokes, application names, and window titles, all searchable.
## Next steps
You have a working tenant with one recorded endpoint. Common next steps:
Detect risky behavior and respond automatically.
Vault a secret and broker a brokered RDP/SSH session.
Add a second factor to every administrator account.
Silent MSI install and Group Policy deployment.