> ## Documentation Index
> Fetch the complete documentation index at: https://syteca.com/docs/llms.txt
> Use this file to discover all available pages before exploring further.
# Creating and Managing Privilege Elevation Rules
> Build Privilege Elevation rules that decide when a Windows application should Auto-elevate, require approval, or be denied. It includes targeting criteria, endpoints, users, and how conflicting rules resolve.
A **Privilege Elevation rule** defines what triggers it (which application, on which endpoints, for which users) and what happens when it does: **Auto-elevate**, **Require approval**, or **Deny**.
## The Rules page
Log in as a user with the **Privilege Elevation** administrative permission. In the left navigation, under **Security**, click **Privilege Elevation**.
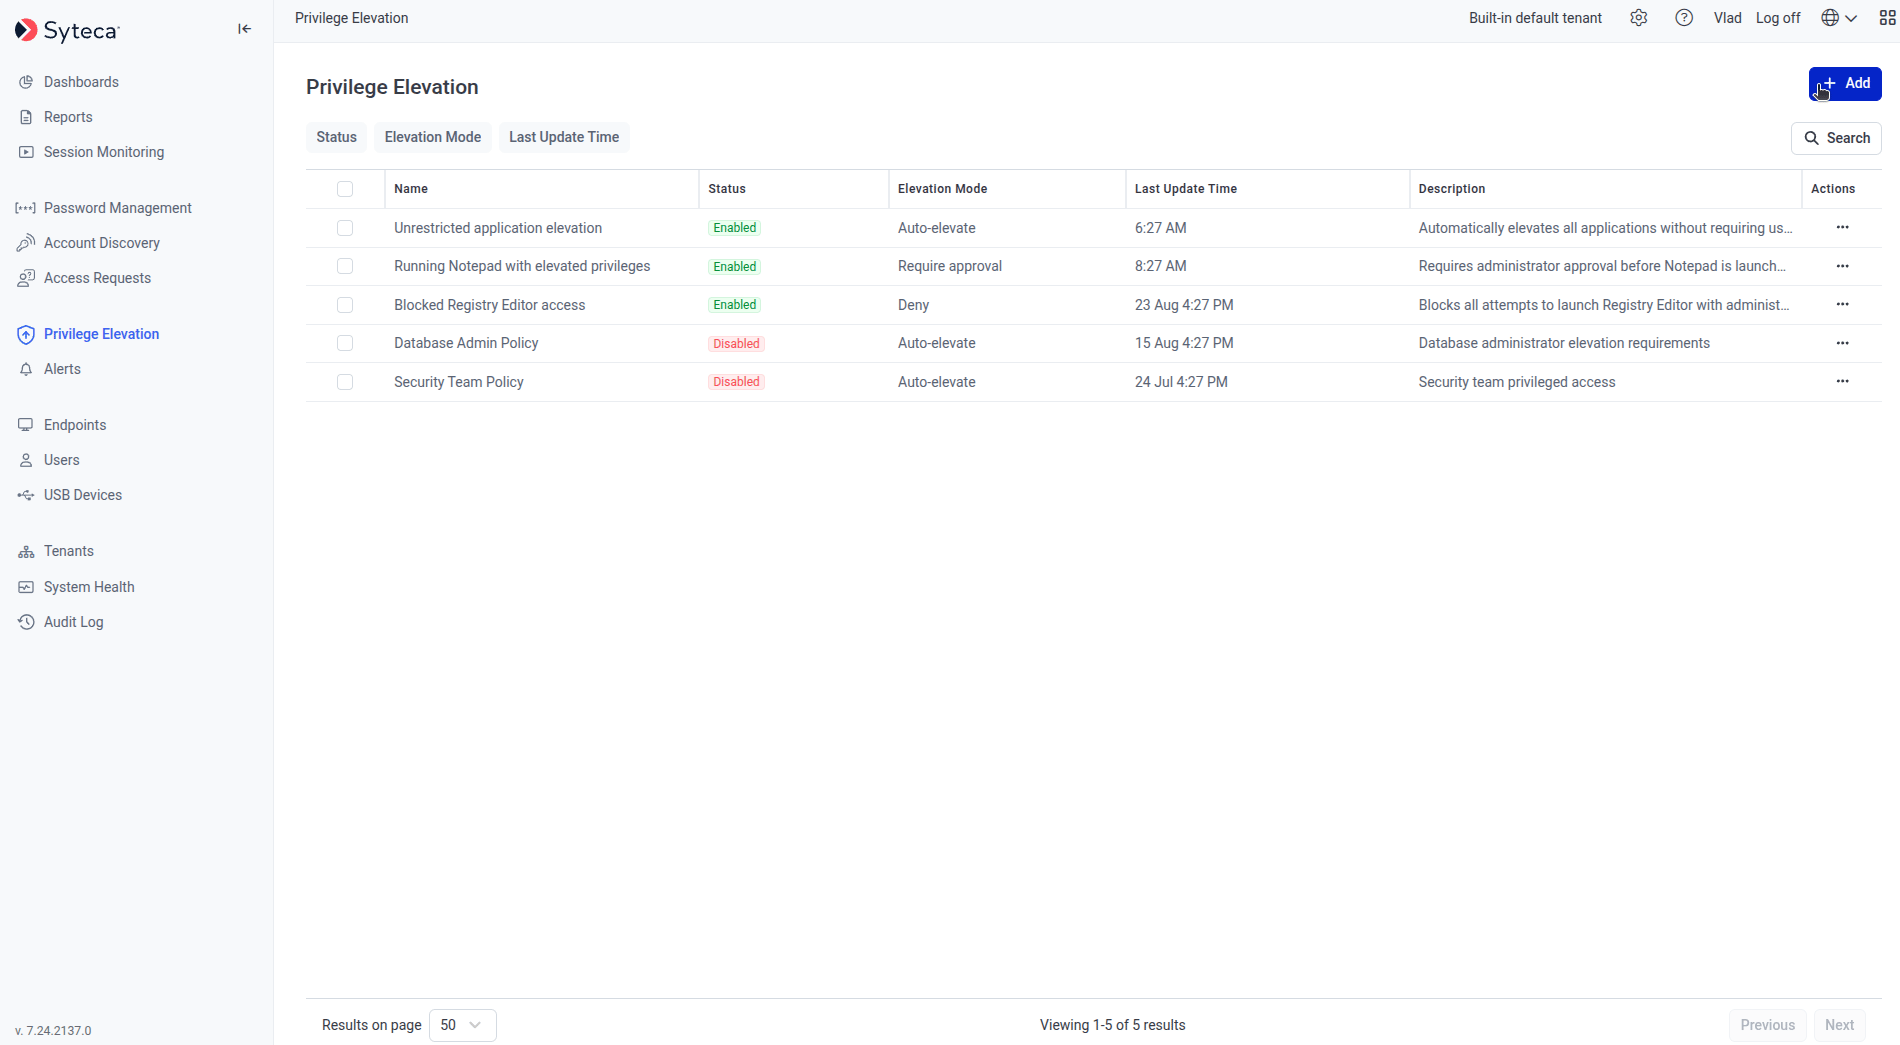
The **Rules** tab shows every configured rule in a grid. It is empty by default until you create one.
 ### The rules grid
| Column | Shows |
| - | - |
| **Name** | The rule's name. |
| **Status** | **Enabled** or **Disabled**. |
| **Elevation Mode** | **Auto-elevate**, **Require approval**, or **Deny**. |
| **Last Update Time** | When the rule was last modified. |
| **Description** | Free-text notes on the rule. |
Click the **⋮** menu next to a rule for **Edit**, **Enable/Disable**, or **Delete**.
**Filters:** Status, Elevation Mode, Last Update Time (date range). **Search** matches Name and Description, full or partial text.
### Bulk actions
Select multiple rules' checkboxes to **Enable**, **Disable**, or **Delete** them together.
* Bulk **Enable/Disable** shows a confirmation: *"You are about to change the status of \ selected rules. Are you sure you want to continue?"*
* Bulk **Delete** shows: *"You are about to permanently delete \ rules. Are you sure you want to continue?"* — deletion is permanent.
If you don't want a rule to run but aren't ready to delete it, you can disable it either from the grid's **⋮** menu, via bulk action, or by clearing the **Enabled** toggle while editing the rule. A disabled rule stays in the system but is never evaluated.
## Create a rule
Click **Add** on the Rules page to open the rule wizard: **Details → Elevation Mode → Targeting Criteria → Assign Endpoints → Assigned Users → Notifications → Summary**. **Back**, **Next**, **Cancel**, and (on Summary) **Save** are available throughout; **Cancel** discards all changes and returns you to the Rules page.
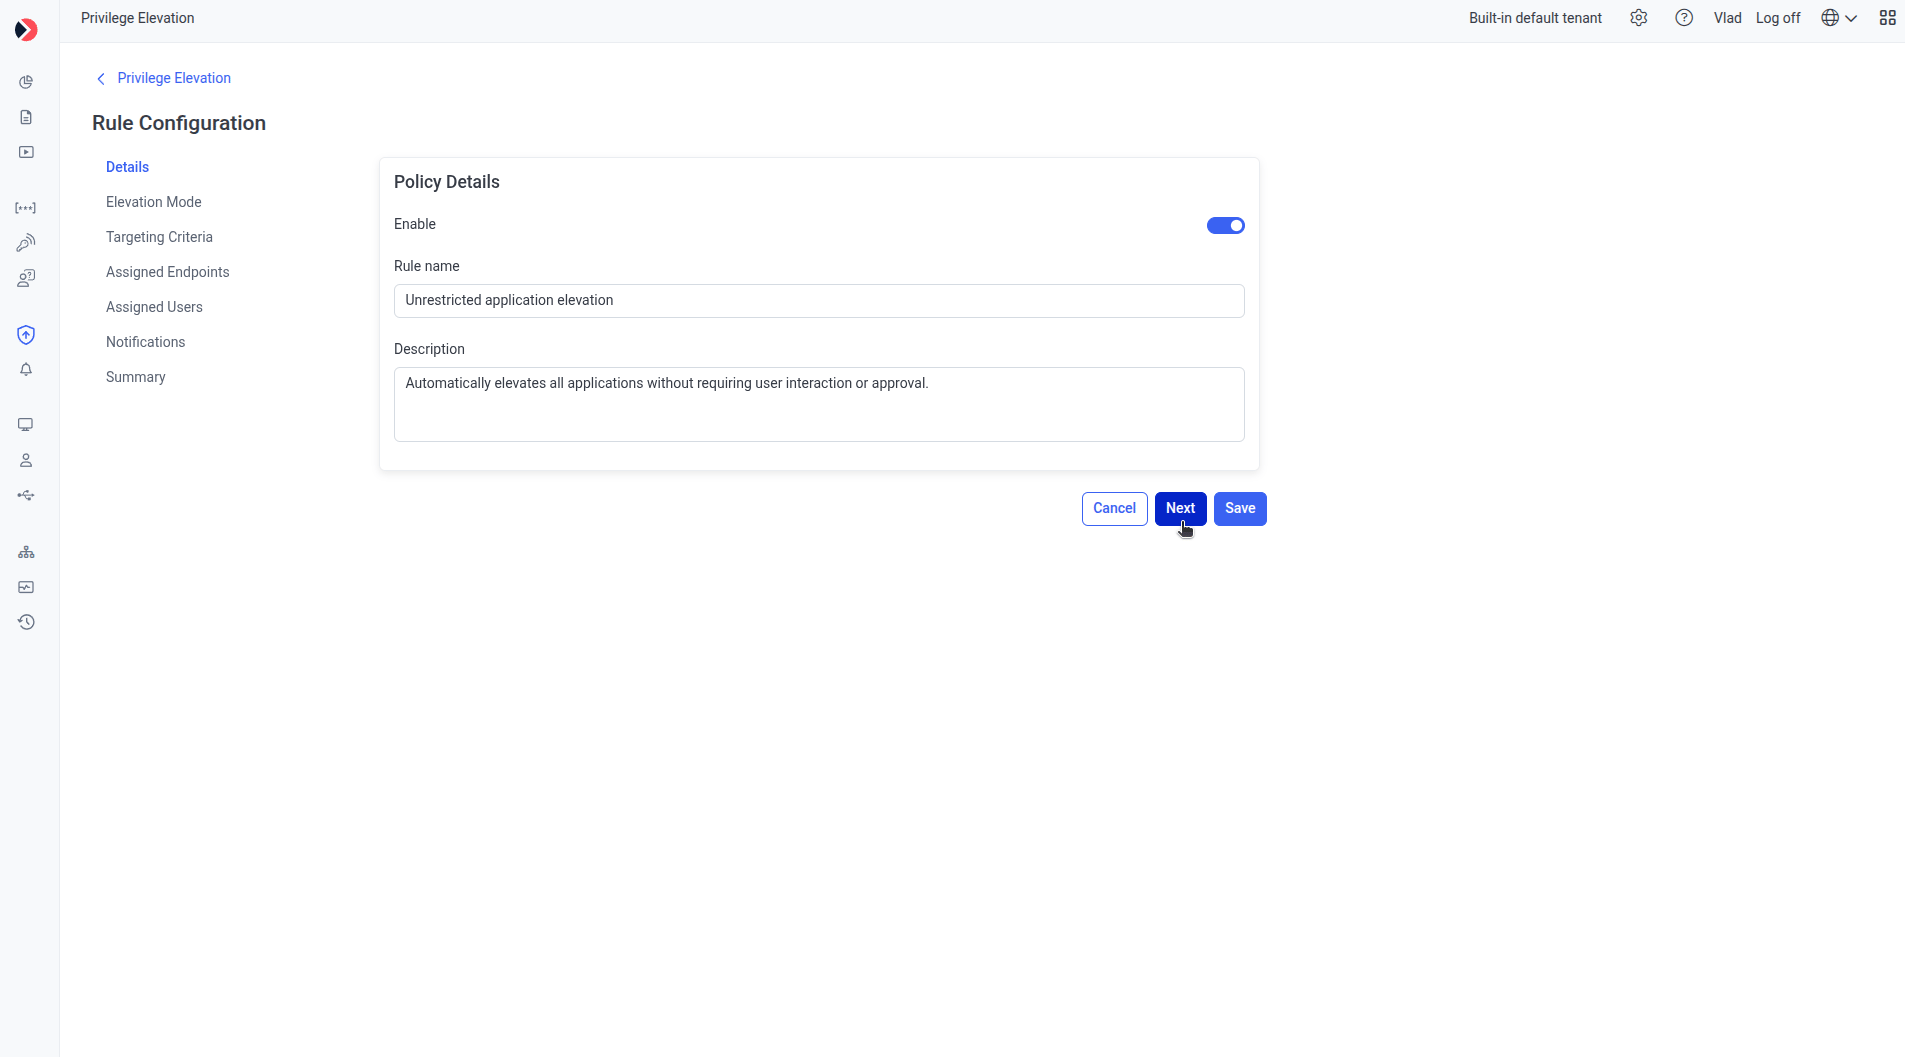
### 1. Details
| Field | Notes |
| - | - |
| **Status** toggle | Disabled by default, it can be enabled when the rule is ready to run. |
| **Rule Name** | Required, up to 200 characters, must be unique. A duplicate name shows: *"A rule with this name already exists."* |
| **Description** | Optional, up to 500 characters. |
### The rules grid
| Column | Shows |
| - | - |
| **Name** | The rule's name. |
| **Status** | **Enabled** or **Disabled**. |
| **Elevation Mode** | **Auto-elevate**, **Require approval**, or **Deny**. |
| **Last Update Time** | When the rule was last modified. |
| **Description** | Free-text notes on the rule. |
Click the **⋮** menu next to a rule for **Edit**, **Enable/Disable**, or **Delete**.
**Filters:** Status, Elevation Mode, Last Update Time (date range). **Search** matches Name and Description, full or partial text.
### Bulk actions
Select multiple rules' checkboxes to **Enable**, **Disable**, or **Delete** them together.
* Bulk **Enable/Disable** shows a confirmation: *"You are about to change the status of \ selected rules. Are you sure you want to continue?"*
* Bulk **Delete** shows: *"You are about to permanently delete \ rules. Are you sure you want to continue?"* — deletion is permanent.
If you don't want a rule to run but aren't ready to delete it, you can disable it either from the grid's **⋮** menu, via bulk action, or by clearing the **Enabled** toggle while editing the rule. A disabled rule stays in the system but is never evaluated.
## Create a rule
Click **Add** on the Rules page to open the rule wizard: **Details → Elevation Mode → Targeting Criteria → Assign Endpoints → Assigned Users → Notifications → Summary**. **Back**, **Next**, **Cancel**, and (on Summary) **Save** are available throughout; **Cancel** discards all changes and returns you to the Rules page.
### 1. Details
| Field | Notes |
| - | - |
| **Status** toggle | Disabled by default, it can be enabled when the rule is ready to run. |
| **Rule Name** | Required, up to 200 characters, must be unique. A duplicate name shows: *"A rule with this name already exists."* |
| **Description** | Optional, up to 500 characters. |
 ### 2. Elevation Mode
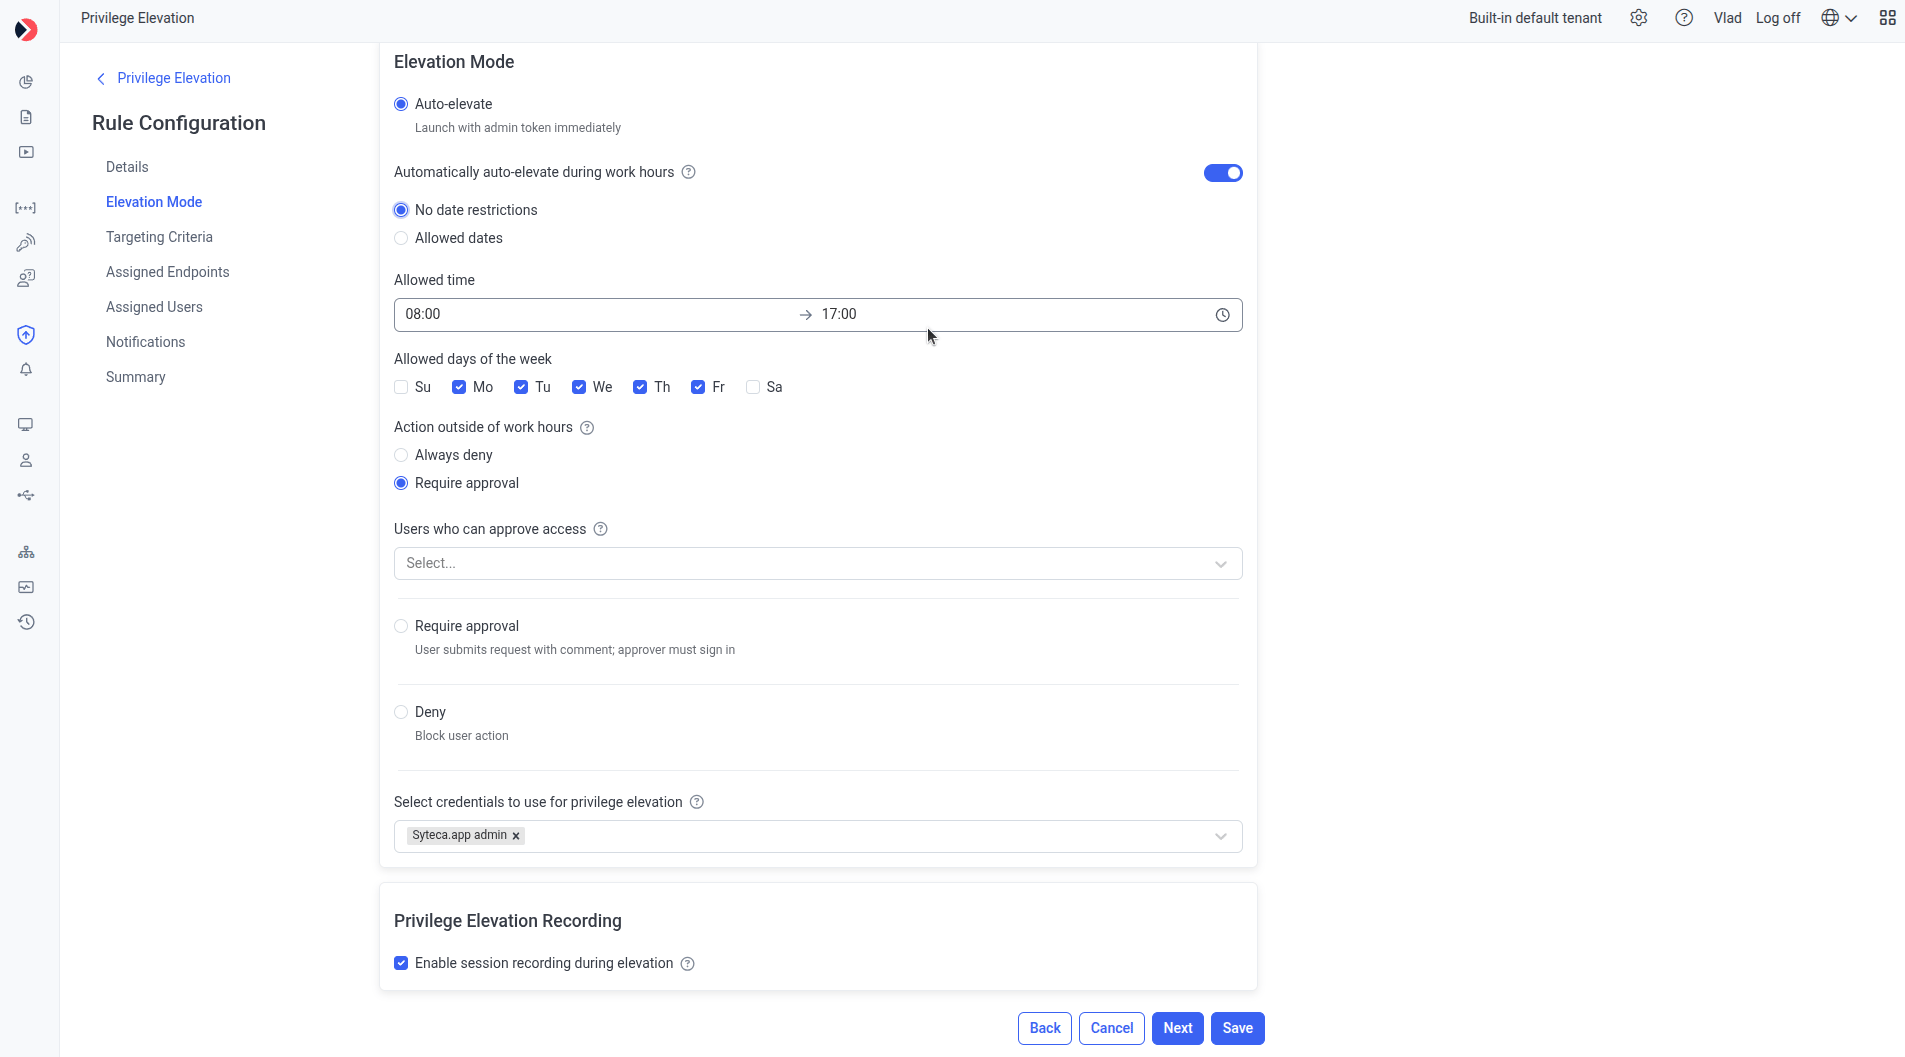
Choose the rule's core action.
Launches the application with administrator rights immediately — no prompt, no approval.
Optionally, enable **Auto-elevate during work hours** to restrict automatic elevation to a schedule:
* **Allowed dates** — defaults to a 2-week range starting from the rule's creation date; edit it manually as needed.
* **Allowed time** — defaults to 08:00–17:00.
* **Allowed days of the week** — defaults to Monday–Friday.
* **Action outside of work hours** — choose **Always deny**, or **Require approval** (which requires selecting **Users who can approve access**).
If a rule's configured **Allowed dates** range expires, the rule doesn't stop working — it falls back to whatever **Action outside of work hours** specifies (deny, or require approval).
The user must submit a request with a comment, and an approver must sign in to approve it before the application launches with administrator rights.
* **Users who can approve access** — required. Select the Management Tool users or user groups who can approve requests for this rule.
* **Select credentials to use for privilege elevation** — required. Choose one or more Secrets (Windows or Active Directory account types) to use as the elevation identity. Only Secrets you have at least **PAM User** permission on are available; click **Add Secret** in the drop-down to create one without leaving the wizard.
Blocks the application launch automatically.
* **Show warning message to user** — optional. When enabled, define a custom message shown to the user (up to 500 characters). Default: *"According to company policy, your request for elevation to admin permissions was denied."*
**Session recording during elevation** is available for **Auto-elevate** and **Require approval** (not **Deny**), off by default. When enabled, it captures screen, keyboard, and command input during the elevated session for audit and forensic purposes — see [Events and monitoring](/docs/pam/privilege-elevation/events) for how this recording behaves depending on your license.
### 2. Elevation Mode
Choose the rule's core action.
Launches the application with administrator rights immediately — no prompt, no approval.
Optionally, enable **Auto-elevate during work hours** to restrict automatic elevation to a schedule:
* **Allowed dates** — defaults to a 2-week range starting from the rule's creation date; edit it manually as needed.
* **Allowed time** — defaults to 08:00–17:00.
* **Allowed days of the week** — defaults to Monday–Friday.
* **Action outside of work hours** — choose **Always deny**, or **Require approval** (which requires selecting **Users who can approve access**).
If a rule's configured **Allowed dates** range expires, the rule doesn't stop working — it falls back to whatever **Action outside of work hours** specifies (deny, or require approval).
The user must submit a request with a comment, and an approver must sign in to approve it before the application launches with administrator rights.
* **Users who can approve access** — required. Select the Management Tool users or user groups who can approve requests for this rule.
* **Select credentials to use for privilege elevation** — required. Choose one or more Secrets (Windows or Active Directory account types) to use as the elevation identity. Only Secrets you have at least **PAM User** permission on are available; click **Add Secret** in the drop-down to create one without leaving the wizard.
Blocks the application launch automatically.
* **Show warning message to user** — optional. When enabled, define a custom message shown to the user (up to 500 characters). Default: *"According to company policy, your request for elevation to admin permissions was denied."*
**Session recording during elevation** is available for **Auto-elevate** and **Require approval** (not **Deny**), off by default. When enabled, it captures screen, keyboard, and command input during the elevated session for audit and forensic purposes — see [Events and monitoring](/docs/pam/privilege-elevation/events) for how this recording behaves depending on your license.
 A Secret selected for privilege elevation can't be deleted while it's in use by a rule. Attempting to delete it individually shows: *"One or more of the selected secrets is used in a Privilege Elevation rule and cannot be removed. These secrets will be skipped."* The same protection applies during bulk secret deletion.
### 3. Targeting Criteria
Define what the rule matches against — manually, by uploading a file to extract its parameters, or both together (combined with AND logic between manual and uploaded parameters, OR logic between parameters of the same type).
Choose a parameter type, a comparison operator, and a value:
| Parameter | Matches on |
| - | - |
| File hash (SHA-256) | The exact file hash. |
| Executable name(s) | The executable's file name. |
| Path prefix | The folder path the executable runs from. |
| Digital signature | The signing publisher. |
| Command line | The full command line used to launch it. |
| Operator | Behavior |
| - | - |
| **Equals** | Exact match. |
| **Like** | Value found as a substring. |
| **Not equals** | Does not exactly match. |
| **Not like** | Substring not found. |
Matching is case-insensitive. For **Like**/**Not like**, a wildcard mask (`*` or `*.exe`) is supported. Enter multiple values separated by semicolons.
Click **+Or** to add another condition of the same logical group, or **+And** to add a condition that must also be true. Conditions of the same parameter type combine with OR; different parameter types combine with AND.
**In SaaS environments, file upload isn't available.** Use the **Offline Parameters Extractor** instead — a standalone, downloadable utility that extracts the same four parameters from a `.exe` or `.msi` file entirely offline (no server interaction), so you can copy the values into your rule manually. [Download the Offline Parameters Extractor](https://download.syteca.com/Offline_Parameters_Extractor.exe) and see [Extract parameters offline](#extract-parameters-offline) below.
Upload a `.exe` or `.msi` file (up to 200 MB) and let Syteca extract its parameters automatically.
Drag and drop, or click to choose a file.
Invalid extension or oversized files show: *"Upload failed. Please try again or choose another file."* — click **Try again** to retry.
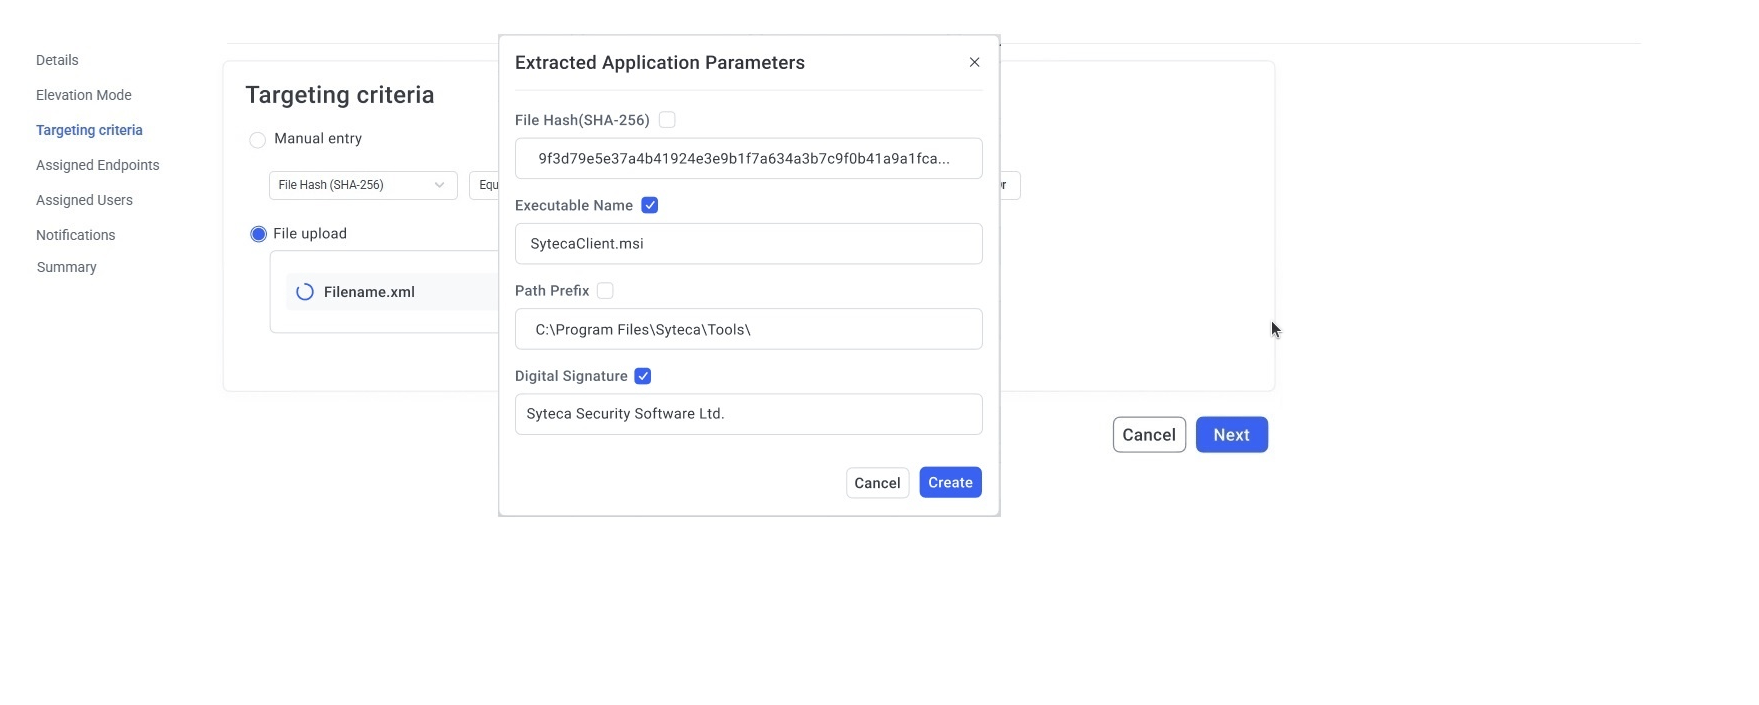
Once uploaded, a pop-up shows the extracted **File hash (SHA-256)**, **Executable name(s)**, **Path prefix**, and **Digital signature**. Select one or more checkboxes, then click **Add**.
A parameter the system couldn't extract shows **Empty** and can't be selected. The uploaded file itself is deleted immediately after extraction — it's never stored or executed.
Click **Add Another File** to repeat the process. If a newly extracted parameter matches one already in the rule (manually entered or from another file), it's grouped with OR logic; otherwise it's added with AND logic.
A Secret selected for privilege elevation can't be deleted while it's in use by a rule. Attempting to delete it individually shows: *"One or more of the selected secrets is used in a Privilege Elevation rule and cannot be removed. These secrets will be skipped."* The same protection applies during bulk secret deletion.
### 3. Targeting Criteria
Define what the rule matches against — manually, by uploading a file to extract its parameters, or both together (combined with AND logic between manual and uploaded parameters, OR logic between parameters of the same type).
Choose a parameter type, a comparison operator, and a value:
| Parameter | Matches on |
| - | - |
| File hash (SHA-256) | The exact file hash. |
| Executable name(s) | The executable's file name. |
| Path prefix | The folder path the executable runs from. |
| Digital signature | The signing publisher. |
| Command line | The full command line used to launch it. |
| Operator | Behavior |
| - | - |
| **Equals** | Exact match. |
| **Like** | Value found as a substring. |
| **Not equals** | Does not exactly match. |
| **Not like** | Substring not found. |
Matching is case-insensitive. For **Like**/**Not like**, a wildcard mask (`*` or `*.exe`) is supported. Enter multiple values separated by semicolons.
Click **+Or** to add another condition of the same logical group, or **+And** to add a condition that must also be true. Conditions of the same parameter type combine with OR; different parameter types combine with AND.
**In SaaS environments, file upload isn't available.** Use the **Offline Parameters Extractor** instead — a standalone, downloadable utility that extracts the same four parameters from a `.exe` or `.msi` file entirely offline (no server interaction), so you can copy the values into your rule manually. [Download the Offline Parameters Extractor](https://download.syteca.com/Offline_Parameters_Extractor.exe) and see [Extract parameters offline](#extract-parameters-offline) below.
Upload a `.exe` or `.msi` file (up to 200 MB) and let Syteca extract its parameters automatically.
Drag and drop, or click to choose a file.
Invalid extension or oversized files show: *"Upload failed. Please try again or choose another file."* — click **Try again** to retry.
Once uploaded, a pop-up shows the extracted **File hash (SHA-256)**, **Executable name(s)**, **Path prefix**, and **Digital signature**. Select one or more checkboxes, then click **Add**.
A parameter the system couldn't extract shows **Empty** and can't be selected. The uploaded file itself is deleted immediately after extraction — it's never stored or executed.
Click **Add Another File** to repeat the process. If a newly extracted parameter matches one already in the rule (manually entered or from another file), it's grouped with OR logic; otherwise it's added with AND logic.
 With 5 or more rules already configured, the tab shows a reminder: *"Use simple rules to reduce rule evaluation time."*
#### Extract parameters offline
For SaaS customers (or anyone who prefers not to upload files to the Management Tool), the **Offline Parameters Extractor** is a small, standalone Windows utility you run locally.
Download the [Offline Parameters Extractor](https://download.syteca.com/Offline_Parameters_Extractor.exe) and run it on any Windows computer — no installation, no server connection required.
Click **Choose file** and select a `.exe` or `.msi` file.
The tool displays **File hash (SHA-256)**, **Executable name(s)**, **Path prefix**, and **Digital signature**, each with its own **Copy** button. A field that couldn't be extracted shows **Empty**.
Paste the copied values into the corresponding manual-entry fields on the Targeting Criteria tab.
The tool never uploads or executes the file — it only reads it locally to extract metadata, and isn't included in the standard server installation package.
### 4. Assign Endpoints
Select at least one endpoint or endpoint group — this is required to proceed.
| Section | Selects |
| - | - |
| **Domain Computer groups** | A domain (only domains added via an [LDAP target](/docs/administration/integrations/ldap-targets)) and an Organizational Unit or computer group within it. Supports `*` as a wildcard for any domain/local computer. |
| **Endpoints** | Individual endpoints where the Syteca Client is installed, or **Select All**. |
| **Endpoint groups** | Existing endpoint groups, or **Select All**. |
**Domain Computer groups** combines with **Endpoints**/**Endpoint groups** using AND logic — if you specify a domain group, you must also select at least one endpoint or endpoint group. **Endpoints** and **Endpoint groups** combine with each other using OR logic. The PAM Client group can't be selected here.
Each added item appears with an **X** to remove it individually; **Clear All** removes everything in that section at once.
### 5. Assigned Users
Choose whether the rule applies to everyone, or to specific users:
| Option | Behavior |
| - | - |
| **All** *(default)* | Applies to every user on the assigned endpoints. |
| **Selected** | Applies only to the users/user groups you add. Leaving this empty when selected shows: *"No users or user groups selected. Add at least one user or user group to continue."* |
Add domain users, domain groups, or local Windows users the same way: pick a **Domain** (from LDAP) or a specific **Endpoint**, then type a username or group with autocomplete suggestions — or use `*` as a wildcard (for example, `*\Administrator` matches that account on any domain or local computer).
**Exceptions**, configured the same way, always override the main selection — a user listed as an exception is excluded from the rule even if they'd otherwise match.
### 6. Notifications
* **Send email to approvers** — for **Require approval** rules, emails the users selected as approvers when a request comes in.
* **Show warning message to user** — for **Deny** rules, shown to the user when their launch is blocked (configured back on the Elevation Mode tab).
* **Notify if elevation failed** — Optional checkbox, off by default.
If **Notify if elevation failed** is checked, a **Recipients** field becomes required — select one or more users to email when an elevation attempt fails (invalid Secret, application launch failure, or insufficient permissions). The notification includes the rule name, affected user and endpoint, the failure reason, and a timestamp.
### 7. Summary
Review every section before saving — Elevation Mode, Targeting Criteria, Assigned Endpoints, Assigned Users (with exceptions), and Notifications. Each section has its own **Edit** link, which jumps directly to that tab. An **Impact preview** shows the total number of endpoints the rule will affect.
If a required setting is missing (for example, **Require approval** selected with no approver defined), the Summary tab highlights it in a red error block so you can fix it before saving.
Click **Save** to activate the rule and return to the Rules page, where it now appears in the grid.
## Edit a rule
Opening an existing rule for editing starts on the **Summary** tab, where you can jump to any section via the left navigation or that section's **Edit** link. Changes save as you move between tabs; nothing is finalized until you click **Save** on the way out, and **Cancel** at any point discards changes made in that session.
## How conflicting rules resolve
If more than one enabled rule matches the same elevation attempt, Syteca doesn't pick a rule arbitrarily — it applies the **most restrictive matching decision**, in this order:
1. **Deny** (most restrictive)
2. **Require approval**
3. **Auto-elevate** (least restrictive)
In other words: if even one matched rule says Deny, the result is Deny — regardless of what any other matched rule allows. If none say Deny but at least one says Require approval, the result is Require approval. Only if every matched rule says Auto-elevate does the attempt actually auto-elevate.
**Example:** Rule A allows Auto-elevate for `notepad.exe`; Rule B denies `notepad.exe`. Both match the same launch attempt → the result is **Deny**.
## What happens when the Client starts enforcing a rule
After installing the Syteca Client, nothing changes on the endpoint until you save an enabled Privilege Elevation rule targeting it.
Once a rule is active, the Syteca Client enforces Windows UAC settings so that elevation always triggers a prompt — silent, unmanaged elevation isn't possible — and intercepts that prompt before it completes, evaluating your rules against it.
Privilege Elevation does not remove any user from the local Administrators group. It governs how elevation happens, not who's technically capable of it.
Upgrading to a version with Privilege Elevation adds the new page and rules to the Management Tool but changes nothing by default — the native Windows UAC continues to work exactly as before until you create and enable your first rule.
### Windows UAC policies that Privilege Elevation changes
To guarantee that every elevation attempt produces a prompt it can intercept, the Syteca Client sets four Windows UAC security policies on the endpoint:
| Policy | Value Syteca sets |
| - | - |
| **User Account Control: Run all administrators in Admin Approval Mode** | **Enabled** |
| **User Account Control: Behavior of the elevation prompt for administrators in Admin Approval Mode** | **Prompt for credentials on the secure desktop** |
| **User Account Control: Behavior of the elevation prompt for standard users** | **Prompt for credentials on the secure desktop** |
| **User Account Control: Admin Approval Mode for the Built-in Administrator account** | **Enabled** |
These policies live under **Security Settings → Local Policies → Security Options** in Local Security Policy or Group Policy.
**A change to "Run all administrators in Admin Approval Mode" takes effect only after the endpoint restarts.** Windows enables this policy by default, so endpoints where it has never been changed need no action. On endpoints where it has been disabled, Syteca sets it back to **Enabled**, and that endpoint must be rebooted before Privilege Elevation rules are enforced on it.
Review these four settings on your target endpoints before you deploy Privilege Elevation. If your organization has changed any of them away from the Windows defaults, include a reboot window in your rollout plan so the rules take effect when you expect them to.
## Related
What Privilege Elevation does and how it's licensed.
Every elevation decision, logged and searchable.
What a user sees when a rule applies to them.
Create the Secret a Require approval or Auto-elevate rule uses.
This documentation is built and hosted on [Mintlify](https://mintlify.com), a developer documentation platform.
With 5 or more rules already configured, the tab shows a reminder: *"Use simple rules to reduce rule evaluation time."*
#### Extract parameters offline
For SaaS customers (or anyone who prefers not to upload files to the Management Tool), the **Offline Parameters Extractor** is a small, standalone Windows utility you run locally.
Download the [Offline Parameters Extractor](https://download.syteca.com/Offline_Parameters_Extractor.exe) and run it on any Windows computer — no installation, no server connection required.
Click **Choose file** and select a `.exe` or `.msi` file.
The tool displays **File hash (SHA-256)**, **Executable name(s)**, **Path prefix**, and **Digital signature**, each with its own **Copy** button. A field that couldn't be extracted shows **Empty**.
Paste the copied values into the corresponding manual-entry fields on the Targeting Criteria tab.
The tool never uploads or executes the file — it only reads it locally to extract metadata, and isn't included in the standard server installation package.
### 4. Assign Endpoints
Select at least one endpoint or endpoint group — this is required to proceed.
| Section | Selects |
| - | - |
| **Domain Computer groups** | A domain (only domains added via an [LDAP target](/docs/administration/integrations/ldap-targets)) and an Organizational Unit or computer group within it. Supports `*` as a wildcard for any domain/local computer. |
| **Endpoints** | Individual endpoints where the Syteca Client is installed, or **Select All**. |
| **Endpoint groups** | Existing endpoint groups, or **Select All**. |
**Domain Computer groups** combines with **Endpoints**/**Endpoint groups** using AND logic — if you specify a domain group, you must also select at least one endpoint or endpoint group. **Endpoints** and **Endpoint groups** combine with each other using OR logic. The PAM Client group can't be selected here.
Each added item appears with an **X** to remove it individually; **Clear All** removes everything in that section at once.
### 5. Assigned Users
Choose whether the rule applies to everyone, or to specific users:
| Option | Behavior |
| - | - |
| **All** *(default)* | Applies to every user on the assigned endpoints. |
| **Selected** | Applies only to the users/user groups you add. Leaving this empty when selected shows: *"No users or user groups selected. Add at least one user or user group to continue."* |
Add domain users, domain groups, or local Windows users the same way: pick a **Domain** (from LDAP) or a specific **Endpoint**, then type a username or group with autocomplete suggestions — or use `*` as a wildcard (for example, `*\Administrator` matches that account on any domain or local computer).
**Exceptions**, configured the same way, always override the main selection — a user listed as an exception is excluded from the rule even if they'd otherwise match.
### 6. Notifications
* **Send email to approvers** — for **Require approval** rules, emails the users selected as approvers when a request comes in.
* **Show warning message to user** — for **Deny** rules, shown to the user when their launch is blocked (configured back on the Elevation Mode tab).
* **Notify if elevation failed** — Optional checkbox, off by default.
If **Notify if elevation failed** is checked, a **Recipients** field becomes required — select one or more users to email when an elevation attempt fails (invalid Secret, application launch failure, or insufficient permissions). The notification includes the rule name, affected user and endpoint, the failure reason, and a timestamp.
### 7. Summary
Review every section before saving — Elevation Mode, Targeting Criteria, Assigned Endpoints, Assigned Users (with exceptions), and Notifications. Each section has its own **Edit** link, which jumps directly to that tab. An **Impact preview** shows the total number of endpoints the rule will affect.
If a required setting is missing (for example, **Require approval** selected with no approver defined), the Summary tab highlights it in a red error block so you can fix it before saving.
Click **Save** to activate the rule and return to the Rules page, where it now appears in the grid.
## Edit a rule
Opening an existing rule for editing starts on the **Summary** tab, where you can jump to any section via the left navigation or that section's **Edit** link. Changes save as you move between tabs; nothing is finalized until you click **Save** on the way out, and **Cancel** at any point discards changes made in that session.
## How conflicting rules resolve
If more than one enabled rule matches the same elevation attempt, Syteca doesn't pick a rule arbitrarily — it applies the **most restrictive matching decision**, in this order:
1. **Deny** (most restrictive)
2. **Require approval**
3. **Auto-elevate** (least restrictive)
In other words: if even one matched rule says Deny, the result is Deny — regardless of what any other matched rule allows. If none say Deny but at least one says Require approval, the result is Require approval. Only if every matched rule says Auto-elevate does the attempt actually auto-elevate.
**Example:** Rule A allows Auto-elevate for `notepad.exe`; Rule B denies `notepad.exe`. Both match the same launch attempt → the result is **Deny**.
## What happens when the Client starts enforcing a rule
After installing the Syteca Client, nothing changes on the endpoint until you save an enabled Privilege Elevation rule targeting it.
Once a rule is active, the Syteca Client enforces Windows UAC settings so that elevation always triggers a prompt — silent, unmanaged elevation isn't possible — and intercepts that prompt before it completes, evaluating your rules against it.
Privilege Elevation does not remove any user from the local Administrators group. It governs how elevation happens, not who's technically capable of it.
Upgrading to a version with Privilege Elevation adds the new page and rules to the Management Tool but changes nothing by default — the native Windows UAC continues to work exactly as before until you create and enable your first rule.
### Windows UAC policies that Privilege Elevation changes
To guarantee that every elevation attempt produces a prompt it can intercept, the Syteca Client sets four Windows UAC security policies on the endpoint:
| Policy | Value Syteca sets |
| - | - |
| **User Account Control: Run all administrators in Admin Approval Mode** | **Enabled** |
| **User Account Control: Behavior of the elevation prompt for administrators in Admin Approval Mode** | **Prompt for credentials on the secure desktop** |
| **User Account Control: Behavior of the elevation prompt for standard users** | **Prompt for credentials on the secure desktop** |
| **User Account Control: Admin Approval Mode for the Built-in Administrator account** | **Enabled** |
These policies live under **Security Settings → Local Policies → Security Options** in Local Security Policy or Group Policy.
**A change to "Run all administrators in Admin Approval Mode" takes effect only after the endpoint restarts.** Windows enables this policy by default, so endpoints where it has never been changed need no action. On endpoints where it has been disabled, Syteca sets it back to **Enabled**, and that endpoint must be rebooted before Privilege Elevation rules are enforced on it.
Review these four settings on your target endpoints before you deploy Privilege Elevation. If your organization has changed any of them away from the Windows defaults, include a reboot window in your rollout plan so the rules take effect when you expect them to.
## Related
What Privilege Elevation does and how it's licensed.
Every elevation decision, logged and searchable.
What a user sees when a rule applies to them.
Create the Secret a Require approval or Auto-elevate rule uses.
This documentation is built and hosted on [Mintlify](https://mintlify.com), a developer documentation platform.