> ## Documentation Index
> Fetch the complete documentation index at: https://syteca.com/docs/llms.txt
> Use this file to discover all available pages before exploring further.
# Add a Secret
> Create and configure a secret in Syteca to securely manage and broker access to a privileged account, with rotation, checkout, and access controls.
A secret stores the credentials for a privileged account and controls how users connect to that account through Syteca Connection Manager. This page explains how to create a secret, choose its type, and configure rotation, recording, checkout, permissions, and access restrictions.
Only users added individually to the Management Tool can create secrets and folders. Users who belong only to an Active Directory group do not have this permission. For more information, see the [Management Tool issues and error messages](/docs/resources/troubleshooting/management-tool-troubleshooting) page.
## Before you start
* Sign in to the Management Tool.
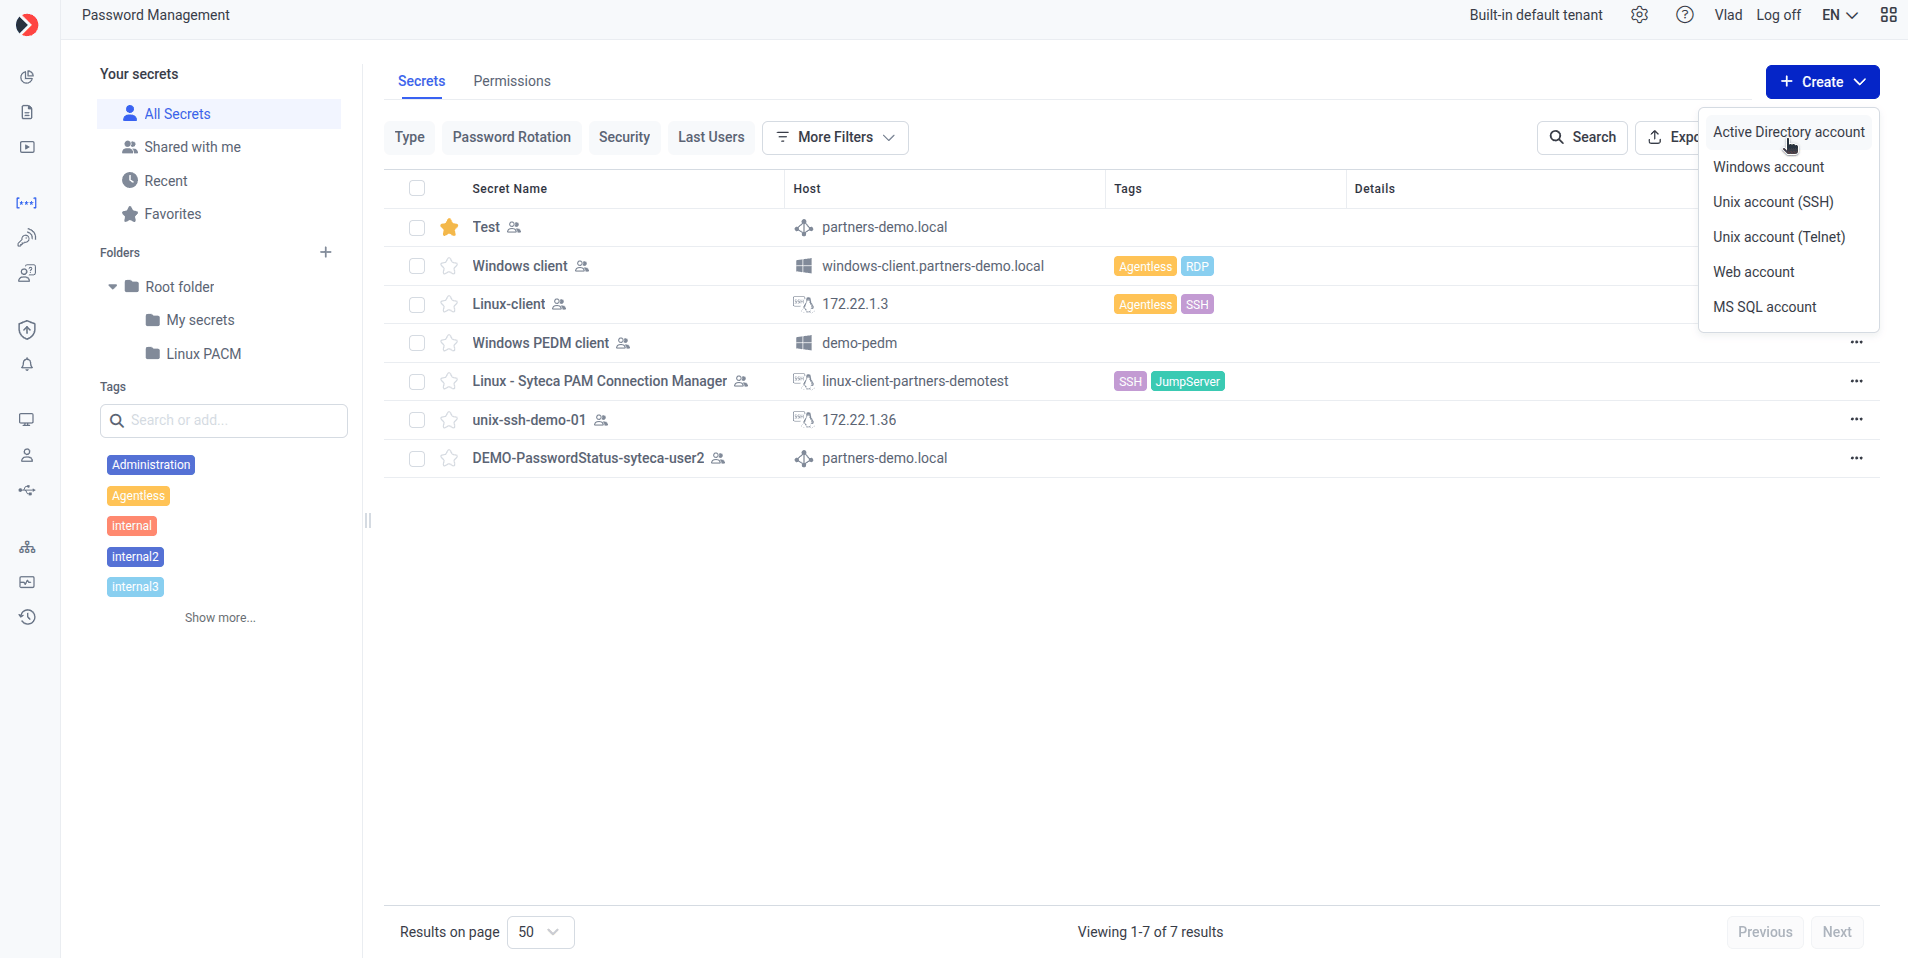
* Identify the [secret type](#2-set-the-general-properties) you need (Active Directory, Windows, Unix SSH, Unix Telnet, Web, or MS SQL).
* Obtain the login and password for the account the secret will access.
## 1. Open the New Secret window
Log in with an account that has permission to add secrets.
Click the **Password Management** tab in the left navigation.
On the **Secrets** tab, click **Create** in the top right of the page and choose available secret's type. The **New Secret** window opens.
 ## 2. Set the general properties
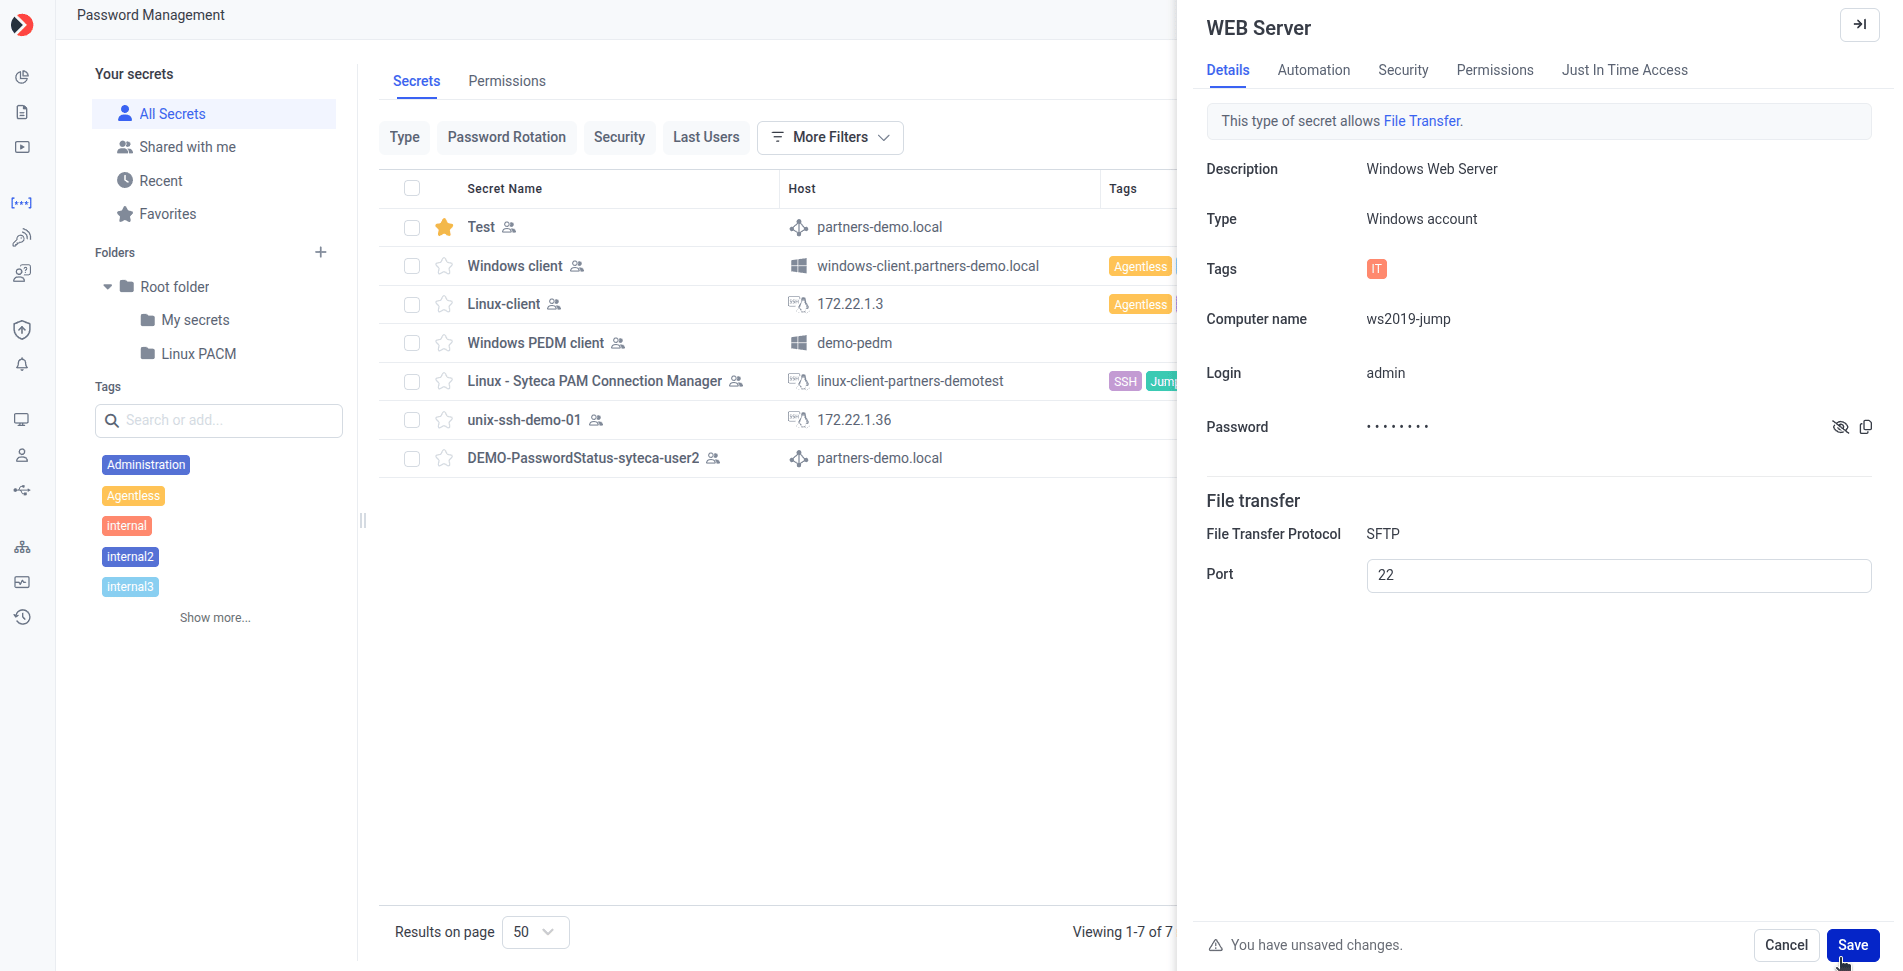
On the **Details** tab, in the **General** section, specify:
* **Secret Name** - a unique name for the secret.
* **Description** (optional) a short description of the secret.
* **Tags** - (optional) are colored labels used to filter the secret grid..
In the **Account** section, specify the details for the account on the host (remote) computer that users will connect to through Syteca Connection Manager. The first field depends on the secret type you selected:
| Secret type | First field | What to enter |
| ---------------------------- | ------------- | ---------------------------------------------------------------------------------------------------------- |
| Active Directory account | Domain | The Active Directory domain name |
| Windows account | Computer Name | The hostname or IP address of the computer |
| Unix account (SSH or Telnet) | Computer Name | The hostname or IP address of the computer |
| Web account | URL | The URL |
| MS SQL account | Server | The hostname or IP of the computer with the MS SQL database. You can specify a port, separated by a comma. |
Then enter:
* **Login** — the existing user name of the account the secret will access.
* **Password** — the existing password for that account.
For the Unix account (SSH) secret type, you can select the **“Use SSH key”** option instead of **“Use password”.** In this case, upload a `.PPK` file containing the private key and enter the private key passphrase, if applicable. See [Remote password rotation](/docs/pam/secrets/remote-password-rotation) for SSH key handling.
For the Active Directory account secret type, you can optionally restrict access to specific computers. Select the checkbox, then choose the required computers from the drop-down list to allow connections only to those computers in the specified domain.
For the Windows account and Unix account (SSH) secret types, if you plan to use the File transfer functionality, please refer to the [Transferring files using the WinSCP application](/docs/pam/secrets/file-transfer) page.
## 2. Set the general properties
On the **Details** tab, in the **General** section, specify:
* **Secret Name** - a unique name for the secret.
* **Description** (optional) a short description of the secret.
* **Tags** - (optional) are colored labels used to filter the secret grid..
In the **Account** section, specify the details for the account on the host (remote) computer that users will connect to through Syteca Connection Manager. The first field depends on the secret type you selected:
| Secret type | First field | What to enter |
| ---------------------------- | ------------- | ---------------------------------------------------------------------------------------------------------- |
| Active Directory account | Domain | The Active Directory domain name |
| Windows account | Computer Name | The hostname or IP address of the computer |
| Unix account (SSH or Telnet) | Computer Name | The hostname or IP address of the computer |
| Web account | URL | The URL |
| MS SQL account | Server | The hostname or IP of the computer with the MS SQL database. You can specify a port, separated by a comma. |
Then enter:
* **Login** — the existing user name of the account the secret will access.
* **Password** — the existing password for that account.
For the Unix account (SSH) secret type, you can select the **“Use SSH key”** option instead of **“Use password”.** In this case, upload a `.PPK` file containing the private key and enter the private key passphrase, if applicable. See [Remote password rotation](/docs/pam/secrets/remote-password-rotation) for SSH key handling.
For the Active Directory account secret type, you can optionally restrict access to specific computers. Select the checkbox, then choose the required computers from the drop-down list to allow connections only to those computers in the specified domain.
For the Windows account and Unix account (SSH) secret types, if you plan to use the File transfer functionality, please refer to the [Transferring files using the WinSCP application](/docs/pam/secrets/file-transfer) page.
 ## 3. Configure automatic password rotation
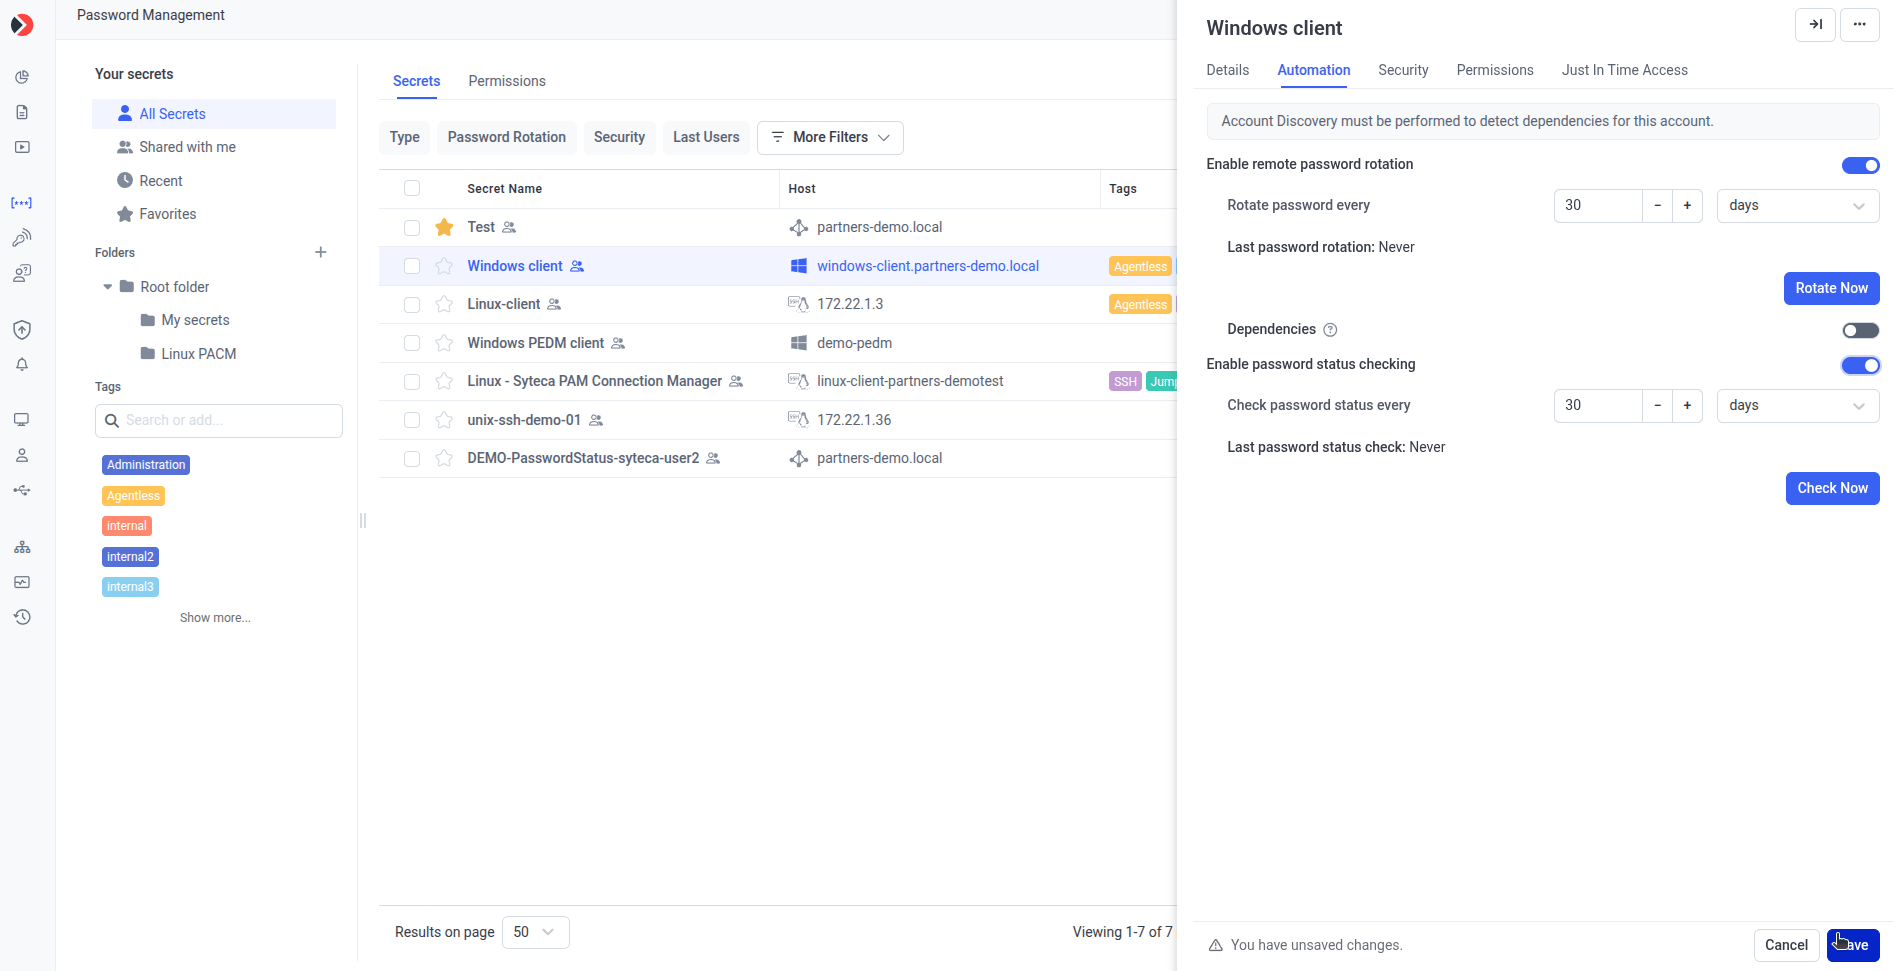
The **Automation** tab is available for the **Active Directory account**, **Windows account**, **Unix account (SSH)**, and **MS SQL account** secret types only.
If you want Syteca to change the account's password automatically, configure [Remote Password (and SSH Key) Rotation](/docs/pam/secrets/remote-password-rotation) on the **Automation** tab:
* **Enable remote password rotation** — select this to allow the account's password (and the secret's matching password) to change automatically, and manually at any time.
* **Rotate Password Every** — set how often the password changes automatically.
After a secret is created, the **Rotate Now** button becomes available on the **Automation** tab when editing the secret. This button allows you to manually rotate (change) the account password at any time.
For Windows and Unix (SSH) account secret types, Remote Password Rotation must be properly configured on the corresponding computer and all required preconditions must be met for the feature to function correctly. See [Remote password rotation](/docs/pam/secrets/remote-password-rotation).
Want to verify a password is still valid without changing it? See [Heartbeat checking](/docs/pam/secrets/heartbeat) — configured further down the same **Automation** tab, below Remote Password Rotation.
If Remote Password Rotation fails, the **“Failed”** status is displayed in the **Password Rotation Status** column on the **Password Management** page, and a corresponding error event appears on the [System Health](/docs/administration/dashboards/system-health-dashboards) page. In this case, further automatic password changes will not occur.
For Active Directory, Windows, and Unix (SSH) account secret types, [File transfer](/docs/pam/secrets/file-transfer) functionality requires Remote Password Rotation to be enabled. Additionally, the password must be rotated at least once before file transfers can be performed using the WinSCP application.
## 3. Configure automatic password rotation
The **Automation** tab is available for the **Active Directory account**, **Windows account**, **Unix account (SSH)**, and **MS SQL account** secret types only.
If you want Syteca to change the account's password automatically, configure [Remote Password (and SSH Key) Rotation](/docs/pam/secrets/remote-password-rotation) on the **Automation** tab:
* **Enable remote password rotation** — select this to allow the account's password (and the secret's matching password) to change automatically, and manually at any time.
* **Rotate Password Every** — set how often the password changes automatically.
After a secret is created, the **Rotate Now** button becomes available on the **Automation** tab when editing the secret. This button allows you to manually rotate (change) the account password at any time.
For Windows and Unix (SSH) account secret types, Remote Password Rotation must be properly configured on the corresponding computer and all required preconditions must be met for the feature to function correctly. See [Remote password rotation](/docs/pam/secrets/remote-password-rotation).
Want to verify a password is still valid without changing it? See [Heartbeat checking](/docs/pam/secrets/heartbeat) — configured further down the same **Automation** tab, below Remote Password Rotation.
If Remote Password Rotation fails, the **“Failed”** status is displayed in the **Password Rotation Status** column on the **Password Management** page, and a corresponding error event appears on the [System Health](/docs/administration/dashboards/system-health-dashboards) page. In this case, further automatic password changes will not occur.
For Active Directory, Windows, and Unix (SSH) account secret types, [File transfer](/docs/pam/secrets/file-transfer) functionality requires Remote Password Rotation to be enabled. Additionally, the password must be rotated at least once before file transfers can be performed using the WinSCP application.
 ## 4. Set security and checkout options
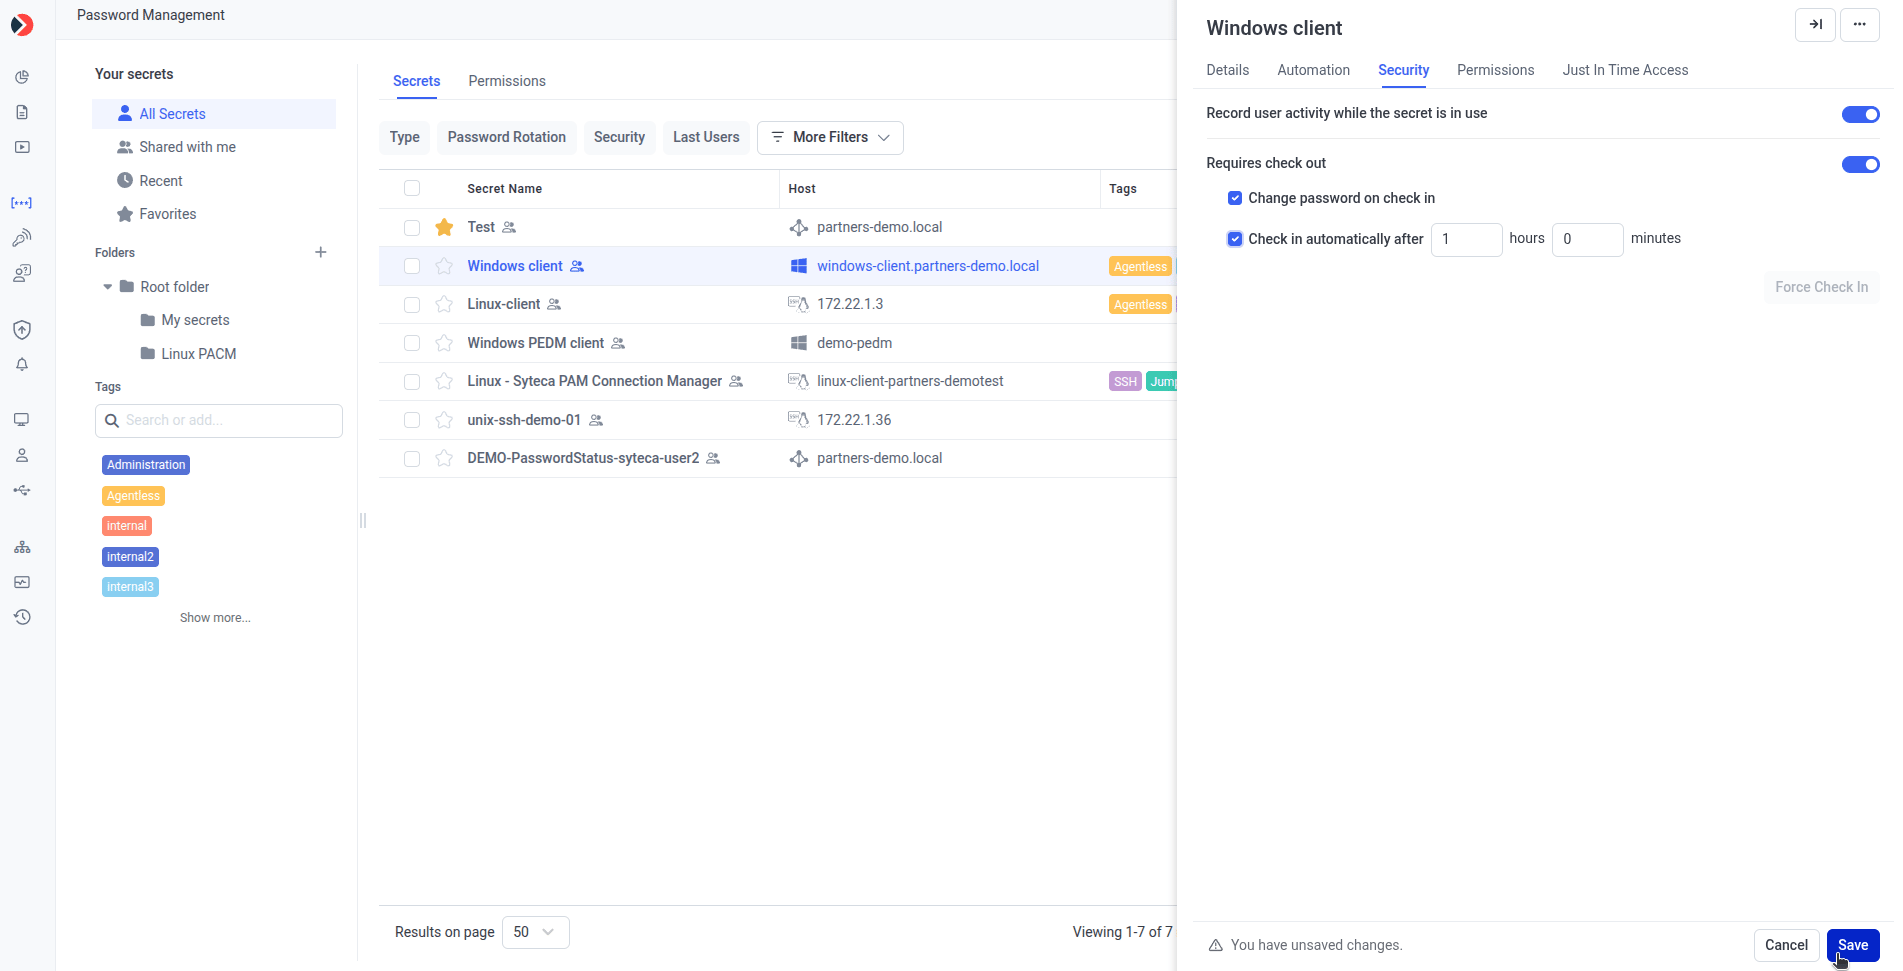
On the **Security** tab, you can enable activity recording during secret use and turn on **Password Checkout** so only one user can use the secret at a time.
* **Record user activity while the secret is in use** — monitors user activity only while a user is connected to the account through Syteca Connection Manager. If unselected, no recording occurs.
* **Requires check out** — enables Password Checkout, so only one user can check out the secret's password (and connect to the account) at any given time.
* **Change password on check in** — *(Active Directory, Windows, Unix SSH, and MS SQL only)* rotates the password every time the secret is checked back in.
* **Check in automatically after** — sets a time period after which the secret is automatically checked back in and the current user is forcibly disconnected.
* **Force Check In** (button) — appears when editing an existing secret; manually checks the password back in and disconnects the current user.
When **Record user activity while the secret is in use** is selected and the Endpoint has an endpoint license with User Activity Monitoring enabled in the [serial key](/docs/administration/licensing/manage-serial-key):
* If the checkbox is **selected**, all user activity is monitored, regardless of the filtering parameters in the Endpoint settings.
* If the checkbox is **not selected**, user activity is monitored according to the filtering parameters in the Endpoint settings.
**Change password on check in** is independent of **Enable remote password rotation** (on the Automation tab). Both options can be enabled and used simultaneously without affecting each other.
**Check in automatically after** is independent of **Allow access without approval during work hours** (on the Just In Time Access tab). Both options can be enabled at the same time. In this case, the user is automatically logged off when the first configured time limit is reached.
To use [File transfer](/docs/pam/secrets/file-transfer) with the WinSCP application, both **Requires check out** and **Change password on check in** must be selected.
## 4. Set security and checkout options
On the **Security** tab, you can enable activity recording during secret use and turn on **Password Checkout** so only one user can use the secret at a time.
* **Record user activity while the secret is in use** — monitors user activity only while a user is connected to the account through Syteca Connection Manager. If unselected, no recording occurs.
* **Requires check out** — enables Password Checkout, so only one user can check out the secret's password (and connect to the account) at any given time.
* **Change password on check in** — *(Active Directory, Windows, Unix SSH, and MS SQL only)* rotates the password every time the secret is checked back in.
* **Check in automatically after** — sets a time period after which the secret is automatically checked back in and the current user is forcibly disconnected.
* **Force Check In** (button) — appears when editing an existing secret; manually checks the password back in and disconnects the current user.
When **Record user activity while the secret is in use** is selected and the Endpoint has an endpoint license with User Activity Monitoring enabled in the [serial key](/docs/administration/licensing/manage-serial-key):
* If the checkbox is **selected**, all user activity is monitored, regardless of the filtering parameters in the Endpoint settings.
* If the checkbox is **not selected**, user activity is monitored according to the filtering parameters in the Endpoint settings.
**Change password on check in** is independent of **Enable remote password rotation** (on the Automation tab). Both options can be enabled and used simultaneously without affecting each other.
**Check in automatically after** is independent of **Allow access without approval during work hours** (on the Just In Time Access tab). Both options can be enabled at the same time. In this case, the user is automatically logged off when the first configured time limit is reached.
To use [File transfer](/docs/pam/secrets/file-transfer) with the WinSCP application, both **Requires check out** and **Change password on check in** must be selected.
 ## 5. Grant permissions
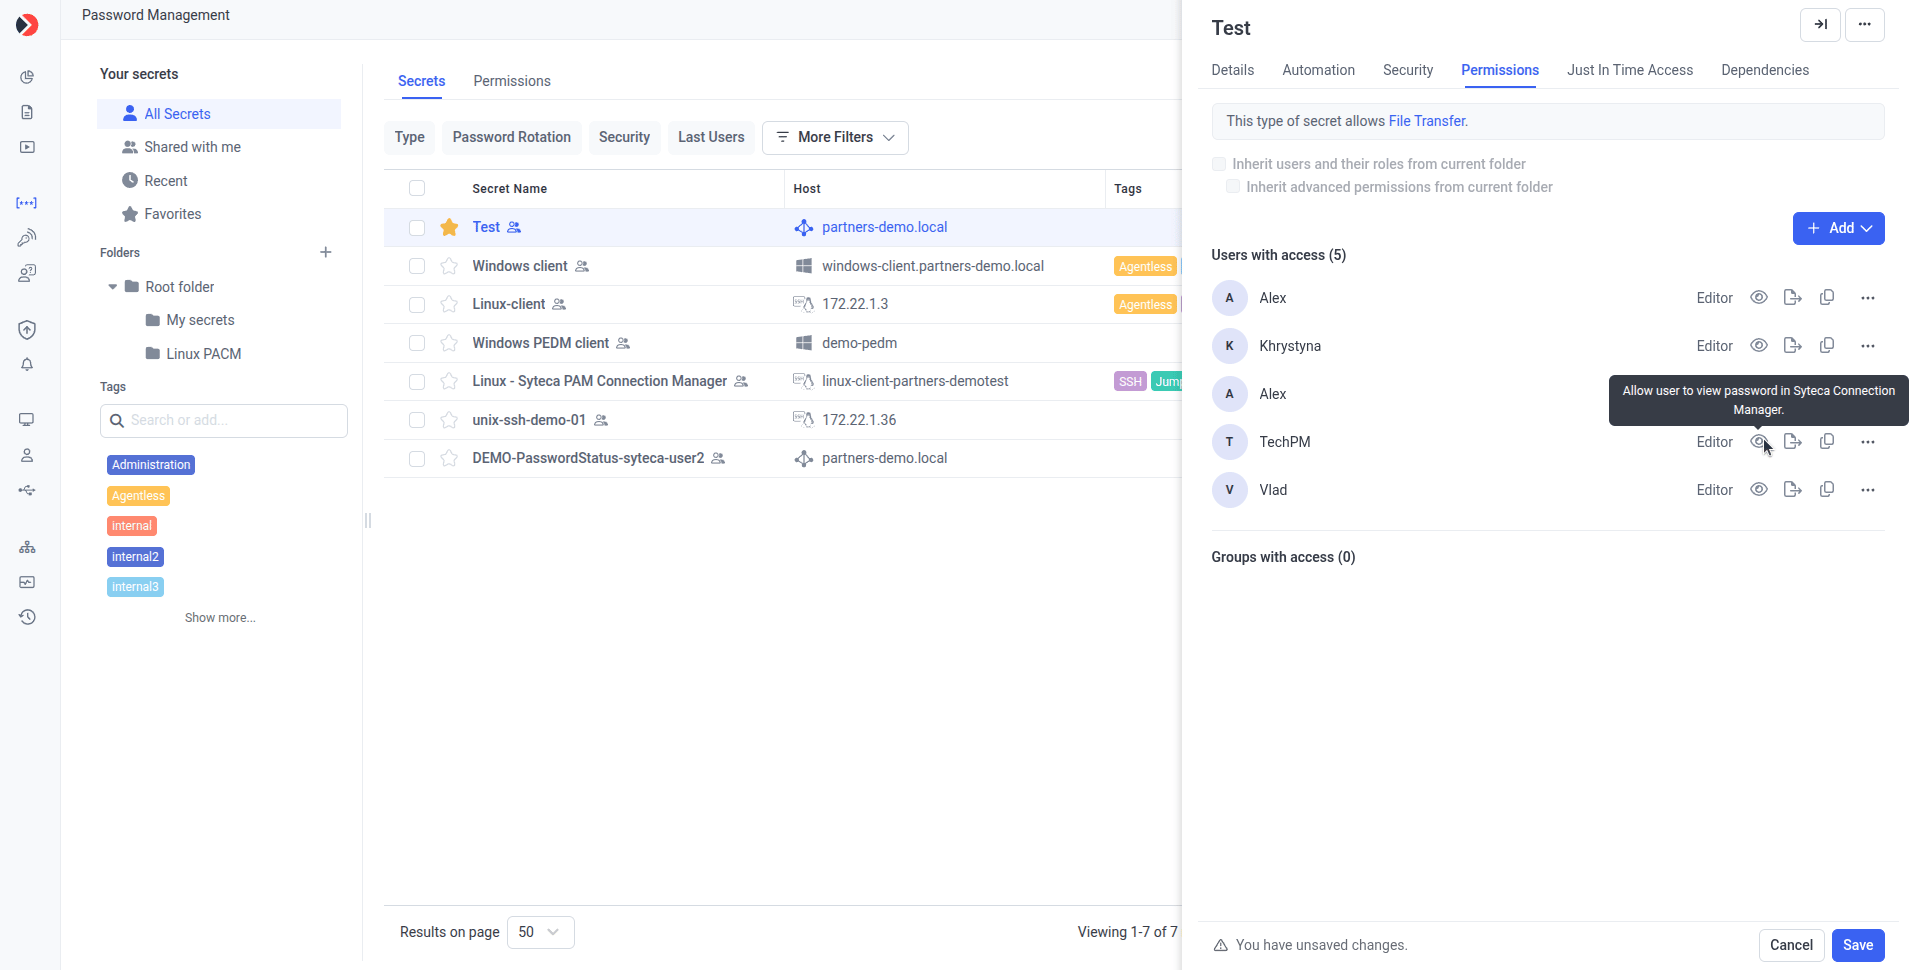
On the **Permissions** tab, add the users and user groups who can use the secret, and set what each can do.
Click **Add**, select the required users or user groups, then assign:
* **Role Type permissions** — select **Owner**, **Editor**, or **PAM User** in the **Role Type** column. See [Permissions for secrets](/docs/pam/secrets/permissions).
* **Advanced permissions** — select the checkboxes in these columns as needed:
* **File Transfer** *(Active Directory, Windows, Unix SSH only)* — allows the user to transfer files with the WinSCP application between the Connection Manager computer and the host computer, if [File transfer](/docs/pam/secrets/file-transfer) is configured.
* **View Password** — allows the user to view the secret's password in Syteca Connection Manager. See [Showing a secret's password](/docs/pam/secrets/view-copy-password).
* **Copy Password** — allows the user to copy the secret's password in Syteca Connection Manager.
Alternatively, the users or user groups who can access the secret, along with their permissions, can be inherited from the [parent folder](https://www.syteca.com/docs/viewing-secrets) (except for the **All secrets** folder). To do this, select **Inherit users and their roles from current folder** to inherit Role Type permissions, and **Inherit advanced permissions from current folder** to inherit **View Password** and **File Transfer** permissions.
## 5. Grant permissions
On the **Permissions** tab, add the users and user groups who can use the secret, and set what each can do.
Click **Add**, select the required users or user groups, then assign:
* **Role Type permissions** — select **Owner**, **Editor**, or **PAM User** in the **Role Type** column. See [Permissions for secrets](/docs/pam/secrets/permissions).
* **Advanced permissions** — select the checkboxes in these columns as needed:
* **File Transfer** *(Active Directory, Windows, Unix SSH only)* — allows the user to transfer files with the WinSCP application between the Connection Manager computer and the host computer, if [File transfer](/docs/pam/secrets/file-transfer) is configured.
* **View Password** — allows the user to view the secret's password in Syteca Connection Manager. See [Showing a secret's password](/docs/pam/secrets/view-copy-password).
* **Copy Password** — allows the user to copy the secret's password in Syteca Connection Manager.
Alternatively, the users or user groups who can access the secret, along with their permissions, can be inherited from the [parent folder](https://www.syteca.com/docs/viewing-secrets) (except for the **All secrets** folder). To do this, select **Inherit users and their roles from current folder** to inherit Role Type permissions, and **Inherit advanced permissions from current folder** to inherit **View Password** and **File Transfer** permissions.
 ## 6. Set access restrictions
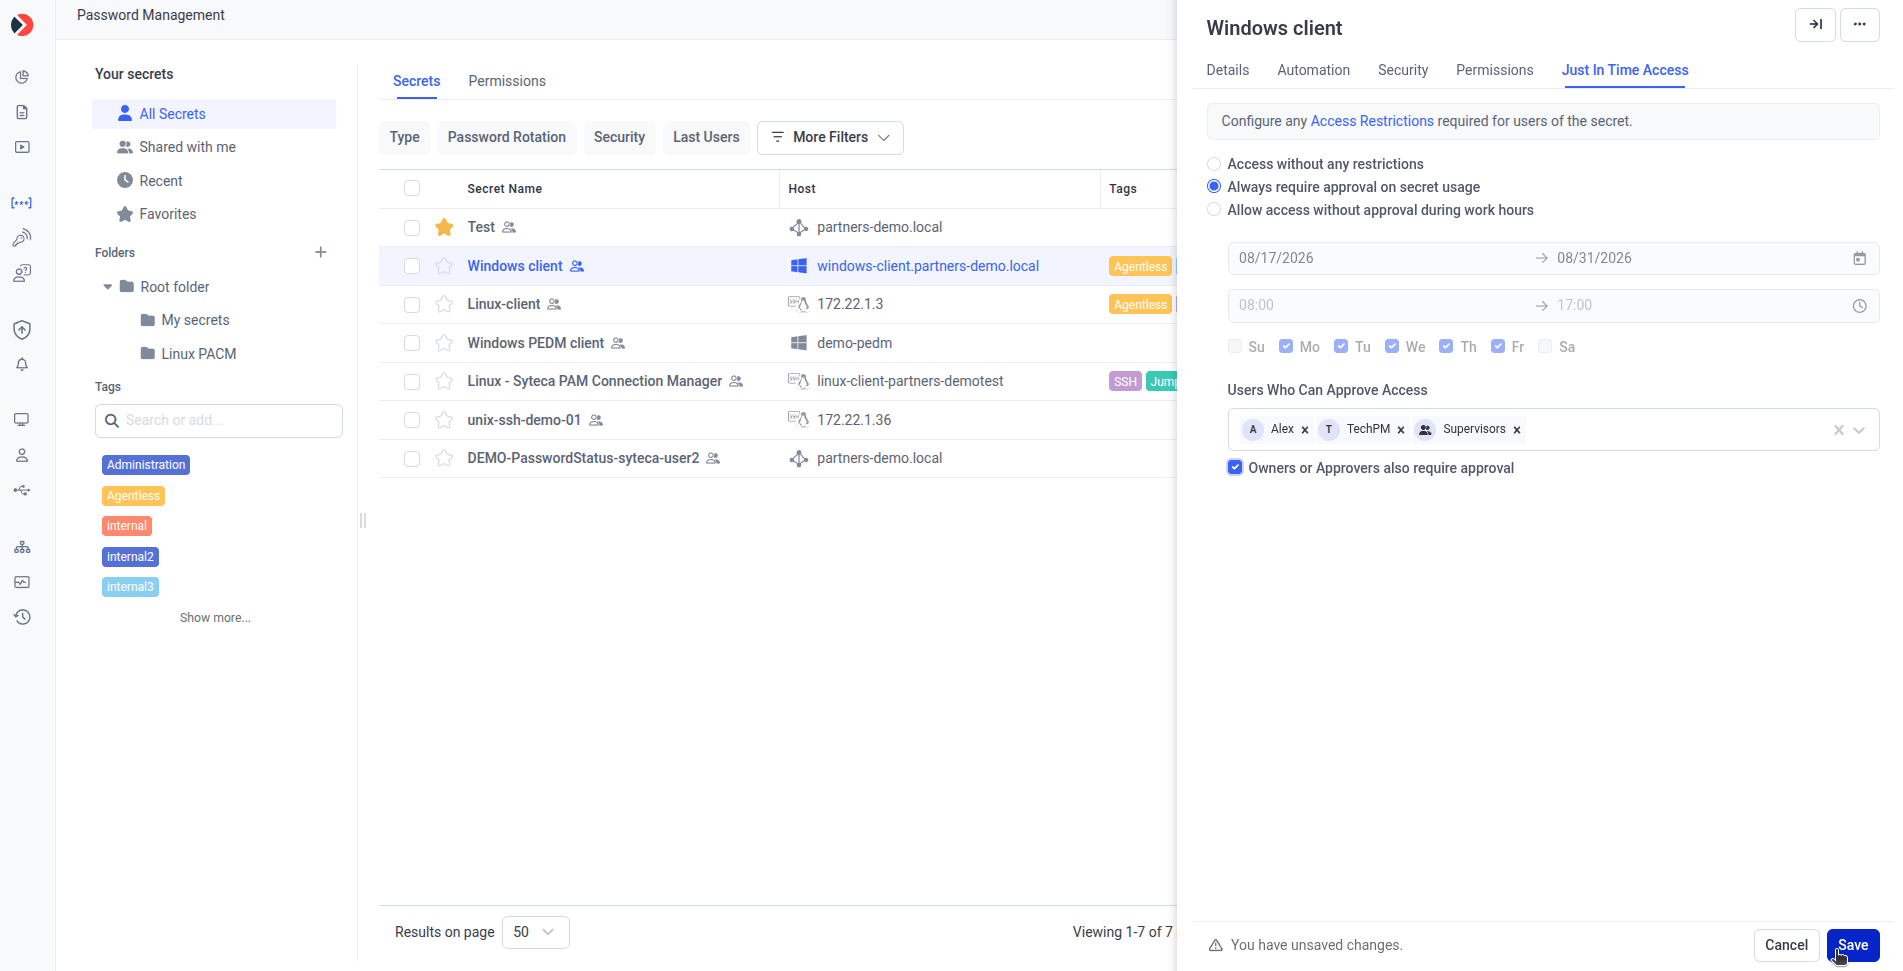
On the **Just In Time Access** tab, configure how users are allowed to access the secret. Select one option:
* **Access without any restrictions** — users can use the secret freely.
* **Always require approval on secret usage** — users must request approval each time they use the secret.
* **Allow access without approval during work hours** — specify the date range, work hours, and days of the week during which users can use the secret without approval.
Then set:
* **Users Who Can Approve Access** — select the Management Tool users (Approvers) who can approve access requests.
* **Owners or Approvers also require approval** — select this to require approval (for example, by the default admin) even for Owners and Approvers.
Approvers receive email notifications and can approve access either from the email link or in the Management Tool. See the [Access requests](/docs/pam/access/access-requests) section.
## 6. Set access restrictions
On the **Just In Time Access** tab, configure how users are allowed to access the secret. Select one option:
* **Access without any restrictions** — users can use the secret freely.
* **Always require approval on secret usage** — users must request approval each time they use the secret.
* **Allow access without approval during work hours** — specify the date range, work hours, and days of the week during which users can use the secret without approval.
Then set:
* **Users Who Can Approve Access** — select the Management Tool users (Approvers) who can approve access requests.
* **Owners or Approvers also require approval** — select this to require approval (for example, by the default admin) even for Owners and Approvers.
Approvers receive email notifications and can approve access either from the email link or in the Management Tool. See the [Access requests](/docs/pam/access/access-requests) section.
 ## 7. Save the secret
Click **Save** in the bottom right to finish creating the secret.
The secret is added to the Secrets list and can be edited at any time.
## Client software prerequisites
Depending on the secret type, specific software must be installed on the computer running Syteca Connection Manager for the secret to work:
| Secret type | Required software |
| ----------------------------------------- | -------------------------------------------------------------------- |
| Active Directory account, Windows account | Microsoft Remote Desktop Connection (`mstsc.exe`) |
| Unix account (SSH) | PuTTY |
| MS SQL account | Microsoft SQL Server Management Studio (SSMS), version 18–20 |
| Web account | Google Chrome — opens in Incognito mode, which prevents data caching |
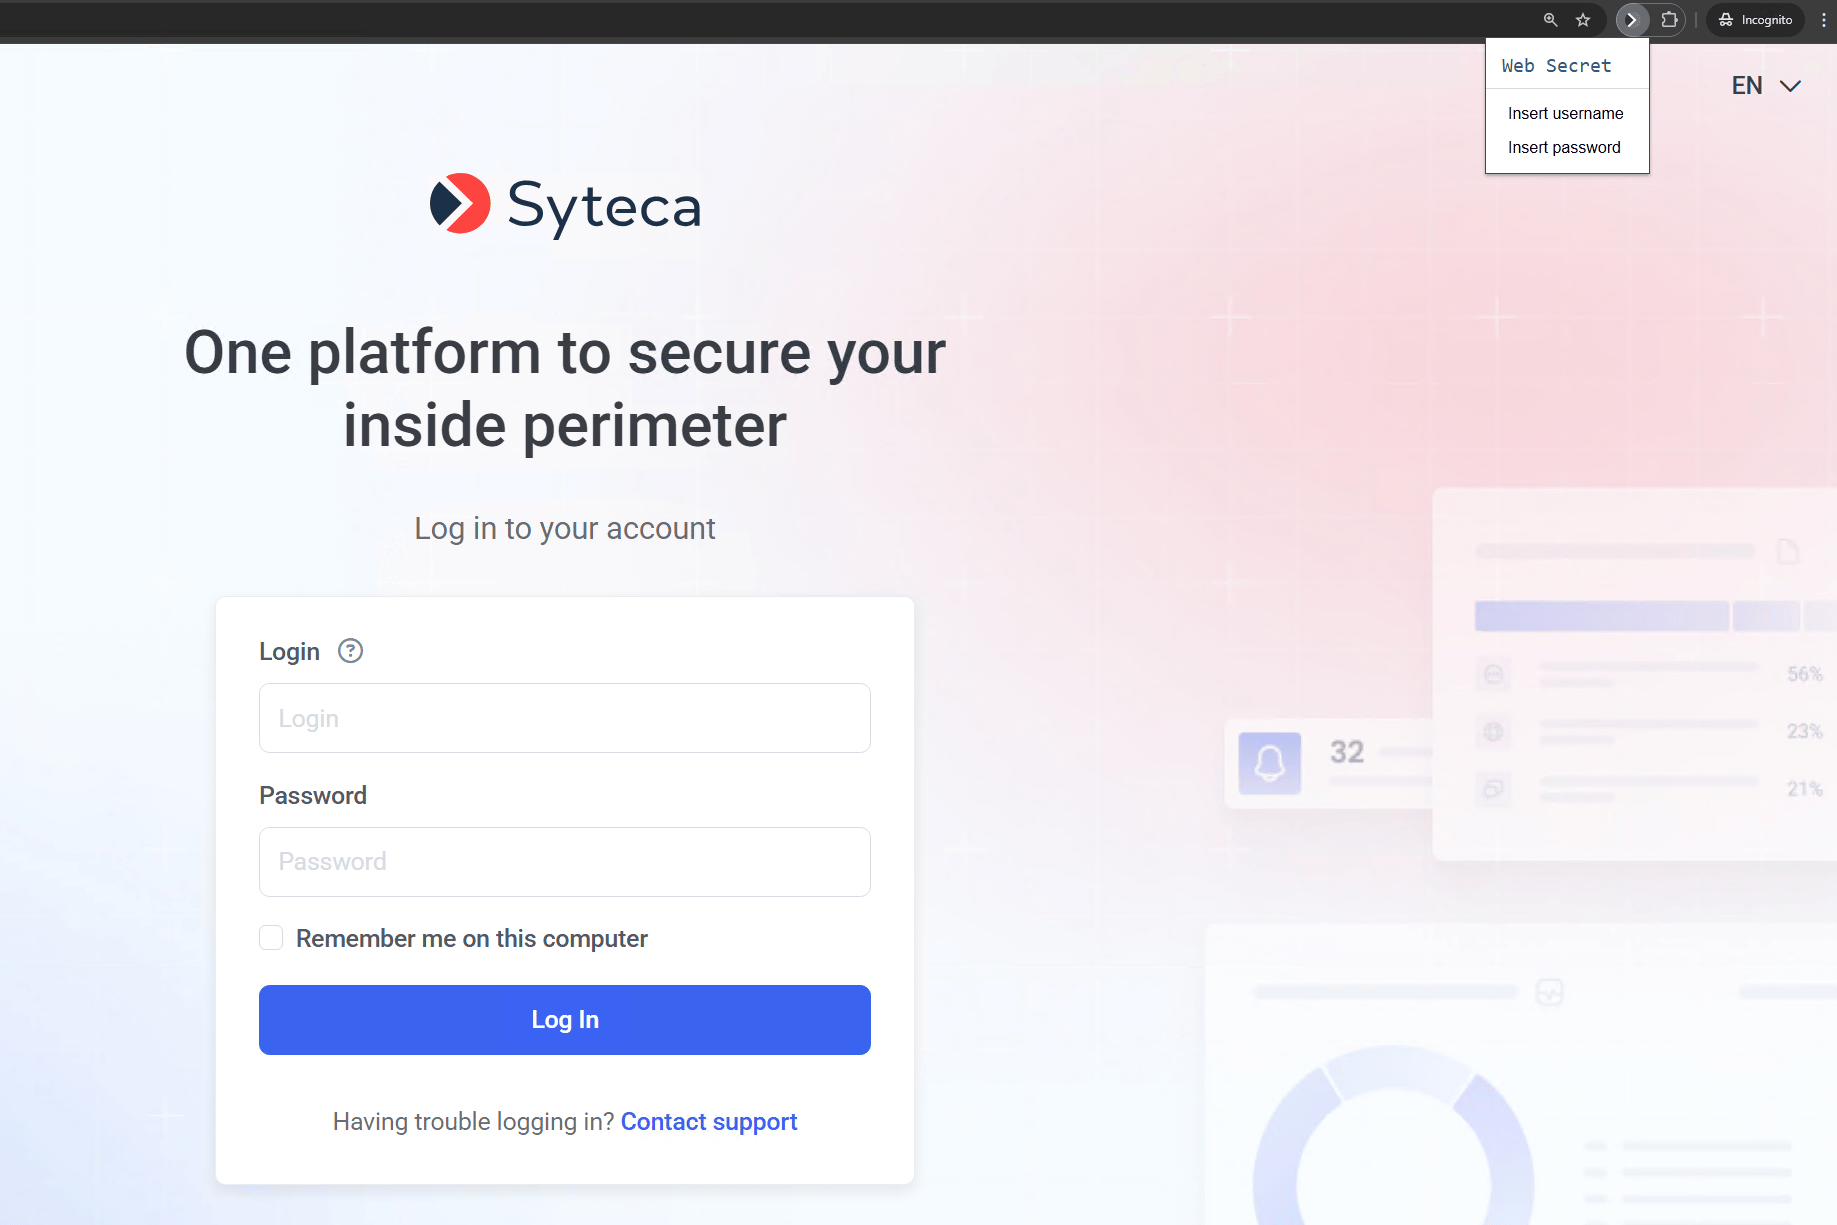
For the Web account secret type, compatibility is limited to Google Chrome only. If the system does not log you in automatically, a Syteca extension for Chrome is available to insert the username and password.
## 7. Save the secret
Click **Save** in the bottom right to finish creating the secret.
The secret is added to the Secrets list and can be edited at any time.
## Client software prerequisites
Depending on the secret type, specific software must be installed on the computer running Syteca Connection Manager for the secret to work:
| Secret type | Required software |
| ----------------------------------------- | -------------------------------------------------------------------- |
| Active Directory account, Windows account | Microsoft Remote Desktop Connection (`mstsc.exe`) |
| Unix account (SSH) | PuTTY |
| MS SQL account | Microsoft SQL Server Management Studio (SSMS), version 18–20 |
| Web account | Google Chrome — opens in Incognito mode, which prevents data caching |
For the Web account secret type, compatibility is limited to Google Chrome only. If the system does not log you in automatically, a Syteca extension for Chrome is available to insert the username and password.
 ## Next steps
Change a secret's properties, rotate on demand, or copy its ID for the ACB.
Remove one or more secrets you no longer need.
Understand Owner, Editor, and PAM User roles and advanced permissions.
Configure automatic and on-demand password and SSH key rotation.
## Next steps
Change a secret's properties, rotate on demand, or copy its ID for the ACB.
Remove one or more secrets you no longer need.
Understand Owner, Editor, and PAM User roles and advanced permissions.
Configure automatic and on-demand password and SSH key rotation.