> ## Documentation Index
> Fetch the complete documentation index at: https://syteca.com/docs/llms.txt
> Use this file to discover all available pages before exploring further.
# Linux Client Troubleshooting
> Configure an SSH jump server so tunneled connections are logged, and resolve SSH connection delays on Linux endpoints using mDNS.
## Resolve Backspace key issues (MobaXterm vs. PuTTY/OpenSSH)
By default, MobaXterm sends ^H (ASCII 0x08, the BS character) when you press Backspace, while PuTTY and OpenSSH clients typically send ^? (DEL, 0x7F). If the client and server don't agree on which character represents Backspace, you may see ^H printed on screen instead of characters being deleted, or Backspace may not work at all.
### Step 1: Choose a fix location
You can resolve the mismatch either on the client (MobaXterm) or on the server.
*Option A — Client-side (MobaXterm)*
1. Open Settings → Terminal
2. Disable the "Backspace sends ^H" option
3. Restart the session
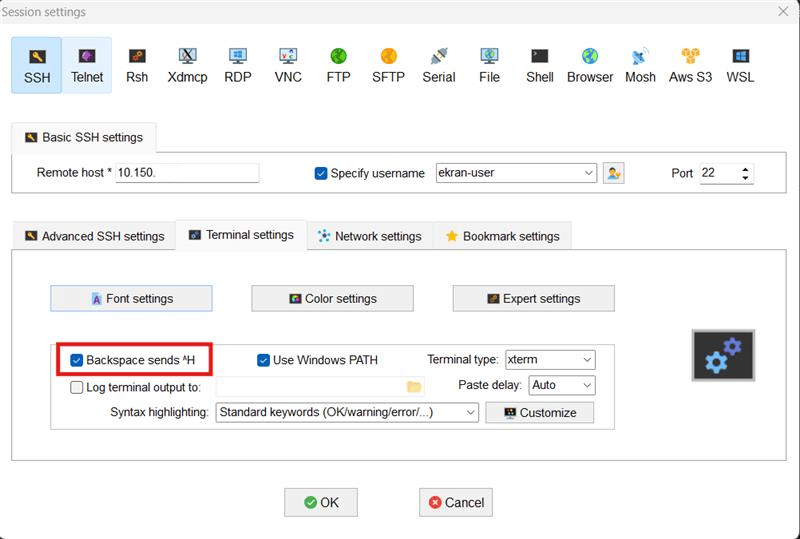 This makes MobaXterm send ^? instead, matching PuTTY/OpenSSH behavior.
*Option B — Server-side*
Run the following command on the server:
```text theme={"system"}
stty erase ^H
```
This tells the server to interpret ^H as the erase/backspace character.
### Step 2: Verify the fix
Press Backspace in your terminal session and confirm that characters are deleted correctly and ^H is no longer printed on screen.
If the issue persists after applying one fix, try the other side (client vs. server) — some environments require both settings to align, especially when connecting through intermediate hosts or jump servers.
## Log SSH connections through a jump server
When an SSH connection is tunneled through a jump server, the jump host never opens an actual new SSH connection to the target — it just forwards the TCP stream, and that stream stays encrypted end-to-end between the original client and the final target. Because of this, a Syteca Client installed on the jump host **can't monitor tunneled connections**, whether the tunnel was opened with the `-J` flag or by proxying through `sshd_config`. To monitor these sessions, Syteca must be installed on the target host instead.
### Prevent tunneling through the jump host
To stop connections from tunneling through a jump server entirely, add the following to its `sshd_config`:
```text theme={"system"}
AllowAgentForwarding no
AllowTcpForwarding no
PermitTunnel no
```
### Log tunneled connections at the jump host
Alternatively, if the connection is opened as a nested SSH command rather than a true tunnel:
```bash theme={"system"}
ssh -tt jumpHost "ssh -tt targetHost"
```
Syteca installed on the jump host logs this as a new connection and monitors its output normally.
## Resolve SSH connection delays with mDNS
Configuring mDNS (multicast DNS) on a Linux endpoint lets it resolve other local devices' hostnames without a central DNS server — which can eliminate the delay some SSH connections experience while the system tries (and fails) to resolve local hostnames without one. **Avahi** is the most common mDNS implementation for Linux.
```bash theme={"system"}
sudo apt-get update
sudo apt-get install avahi-daemon avahi-utils
```
```bash theme={"system"}
sudo yum update
sudo yum install avahi-daemon avahi-tools
```
```bash theme={"system"}
sudo systemctl enable avahi-daemon
sudo systemctl start avahi-daemon
```
```bash theme={"system"}
sudo nano /etc/avahi/avahi-daemon.conf
```
Relevant settings:
* `use-ipv4=yes` / `use-ipv6=yes` — enable Avahi on IPv4, IPv6, or both.
* `allow-interfaces=eth0` — restrict Avahi to specific interfaces.
* `deny-interfaces=eth1` — exclude specific interfaces.
```bash theme={"system"}
sudo systemctl restart avahi-daemon
```
```bash theme={"system"}
sudo systemctl status avahi-daemon
```
Avahi needs UDP port `5353` open:
```bash theme={"system"}
sudo iptables -A INPUT -p udp --dport 5353 -j ACCEPT
sudo iptables -A OUTPUT -p udp --dport 5353 -j ACCEPT
```
```bash theme={"system"}
sudo firewall-cmd --zone=public --add-port=5353/udp --permanent
sudo firewall-cmd --reload
```
```bash theme={"system"}
ping .local
```
Replace `` with the target computer's actual hostname. Names ending in `.local` should now resolve without further configuration.
Confirm the firewall allows port 5353 with `sudo iptables -L INPUT -n --line-numbers | grep :5353` (iptables) or `sudo firewall-cmd --list-all | grep 5353` (firewalld). Confirm Avahi itself is working with:
```bash theme={"system"}
avahi-resolve-host-name -4 -n .local
```
`-4` restricts resolution to IPv4 (use `-6` for IPv6); `-n` specifies the hostname to resolve. A returned IP address confirms Avahi and the firewall are both configured correctly.
## The Linux Client doesn't record sessions of non-root users
**NOT AVAILABLE IN SAAS.**
Confirm the Linux Client is online with a valid license, and that no [filtering parameter](/docs/session-monitoring/recording/filtering) or rule excludes the affected users.
Run:
```bash theme={"system"}
ls -l /etc/.ekran/settings.xml
```
The `.ekran` folder needs **755** permissions, and `settings.xml` needs **644**.
Run:
```bash theme={"system"}
ls -l /opt/.Ekran/
```
The `.Ekran` folder and every file inside it need **755** permissions.
Run:
```bash theme={"system"}
ls -l /etc/ld.so.preload
```
This file needs **644** permissions.
## Restart the Linux Client
**NOT AVAILABLE IN SAAS.**
```bash theme={"system"}
sudo service Ekran restart
```
Or stop and start it separately:
```bash theme={"system"}
sudo service Ekran stop
sudo service Ekran start
```
`Ekran` (the service name) is a literal system identifier, preserved verbatim from source.
## Related
Full Linux Client installation and configuration reference.
Ports required for Application Server connectivity.
General causes of a Client appearing offline.
Collect Linux Client logs for deeper diagnosis.
This makes MobaXterm send ^? instead, matching PuTTY/OpenSSH behavior.
*Option B — Server-side*
Run the following command on the server:
```text theme={"system"}
stty erase ^H
```
This tells the server to interpret ^H as the erase/backspace character.
### Step 2: Verify the fix
Press Backspace in your terminal session and confirm that characters are deleted correctly and ^H is no longer printed on screen.
If the issue persists after applying one fix, try the other side (client vs. server) — some environments require both settings to align, especially when connecting through intermediate hosts or jump servers.
## Log SSH connections through a jump server
When an SSH connection is tunneled through a jump server, the jump host never opens an actual new SSH connection to the target — it just forwards the TCP stream, and that stream stays encrypted end-to-end between the original client and the final target. Because of this, a Syteca Client installed on the jump host **can't monitor tunneled connections**, whether the tunnel was opened with the `-J` flag or by proxying through `sshd_config`. To monitor these sessions, Syteca must be installed on the target host instead.
### Prevent tunneling through the jump host
To stop connections from tunneling through a jump server entirely, add the following to its `sshd_config`:
```text theme={"system"}
AllowAgentForwarding no
AllowTcpForwarding no
PermitTunnel no
```
### Log tunneled connections at the jump host
Alternatively, if the connection is opened as a nested SSH command rather than a true tunnel:
```bash theme={"system"}
ssh -tt jumpHost "ssh -tt targetHost"
```
Syteca installed on the jump host logs this as a new connection and monitors its output normally.
## Resolve SSH connection delays with mDNS
Configuring mDNS (multicast DNS) on a Linux endpoint lets it resolve other local devices' hostnames without a central DNS server — which can eliminate the delay some SSH connections experience while the system tries (and fails) to resolve local hostnames without one. **Avahi** is the most common mDNS implementation for Linux.
```bash theme={"system"}
sudo apt-get update
sudo apt-get install avahi-daemon avahi-utils
```
```bash theme={"system"}
sudo yum update
sudo yum install avahi-daemon avahi-tools
```
```bash theme={"system"}
sudo systemctl enable avahi-daemon
sudo systemctl start avahi-daemon
```
```bash theme={"system"}
sudo nano /etc/avahi/avahi-daemon.conf
```
Relevant settings:
* `use-ipv4=yes` / `use-ipv6=yes` — enable Avahi on IPv4, IPv6, or both.
* `allow-interfaces=eth0` — restrict Avahi to specific interfaces.
* `deny-interfaces=eth1` — exclude specific interfaces.
```bash theme={"system"}
sudo systemctl restart avahi-daemon
```
```bash theme={"system"}
sudo systemctl status avahi-daemon
```
Avahi needs UDP port `5353` open:
```bash theme={"system"}
sudo iptables -A INPUT -p udp --dport 5353 -j ACCEPT
sudo iptables -A OUTPUT -p udp --dport 5353 -j ACCEPT
```
```bash theme={"system"}
sudo firewall-cmd --zone=public --add-port=5353/udp --permanent
sudo firewall-cmd --reload
```
```bash theme={"system"}
ping .local
```
Replace `` with the target computer's actual hostname. Names ending in `.local` should now resolve without further configuration.
Confirm the firewall allows port 5353 with `sudo iptables -L INPUT -n --line-numbers | grep :5353` (iptables) or `sudo firewall-cmd --list-all | grep 5353` (firewalld). Confirm Avahi itself is working with:
```bash theme={"system"}
avahi-resolve-host-name -4 -n .local
```
`-4` restricts resolution to IPv4 (use `-6` for IPv6); `-n` specifies the hostname to resolve. A returned IP address confirms Avahi and the firewall are both configured correctly.
## The Linux Client doesn't record sessions of non-root users
**NOT AVAILABLE IN SAAS.**
Confirm the Linux Client is online with a valid license, and that no [filtering parameter](/docs/session-monitoring/recording/filtering) or rule excludes the affected users.
Run:
```bash theme={"system"}
ls -l /etc/.ekran/settings.xml
```
The `.ekran` folder needs **755** permissions, and `settings.xml` needs **644**.
Run:
```bash theme={"system"}
ls -l /opt/.Ekran/
```
The `.Ekran` folder and every file inside it need **755** permissions.
Run:
```bash theme={"system"}
ls -l /etc/ld.so.preload
```
This file needs **644** permissions.
## Restart the Linux Client
**NOT AVAILABLE IN SAAS.**
```bash theme={"system"}
sudo service Ekran restart
```
Or stop and start it separately:
```bash theme={"system"}
sudo service Ekran stop
sudo service Ekran start
```
`Ekran` (the service name) is a literal system identifier, preserved verbatim from source.
## Related
Full Linux Client installation and configuration reference.
Ports required for Application Server connectivity.
General causes of a Client appearing offline.
Collect Linux Client logs for deeper diagnosis.