> ## Documentation Index
> Fetch the complete documentation index at: https://syteca.com/docs/llms.txt
> Use this file to discover all available pages before exploring further.
# Generate Ad-Hoc Reports
> Generate one-time Syteca reports for any time period using the Report Generator — pick a report type, set filters, and download the result in PDF, Excel, CSV, or other formats.
The **Report Generator** generates one-time reports manually for any time period — useful for investigations, evidence requests, or any time you need a specific slice of data instead of a recurring email. For reports that should run automatically on a schedule, see [Scheduled reports](/docs/session-monitoring/reports/scheduled-reports) instead.
Ad-hoc reports can only be generated by a user with the [administrative Viewing Monitoring Results permission](/docs/administration/users/administrative-permissions). Only Clients you have the [Viewing Monitoring Results permission for Clients](/docs/administration/users/client-permissions) for are available.
## Generate a report
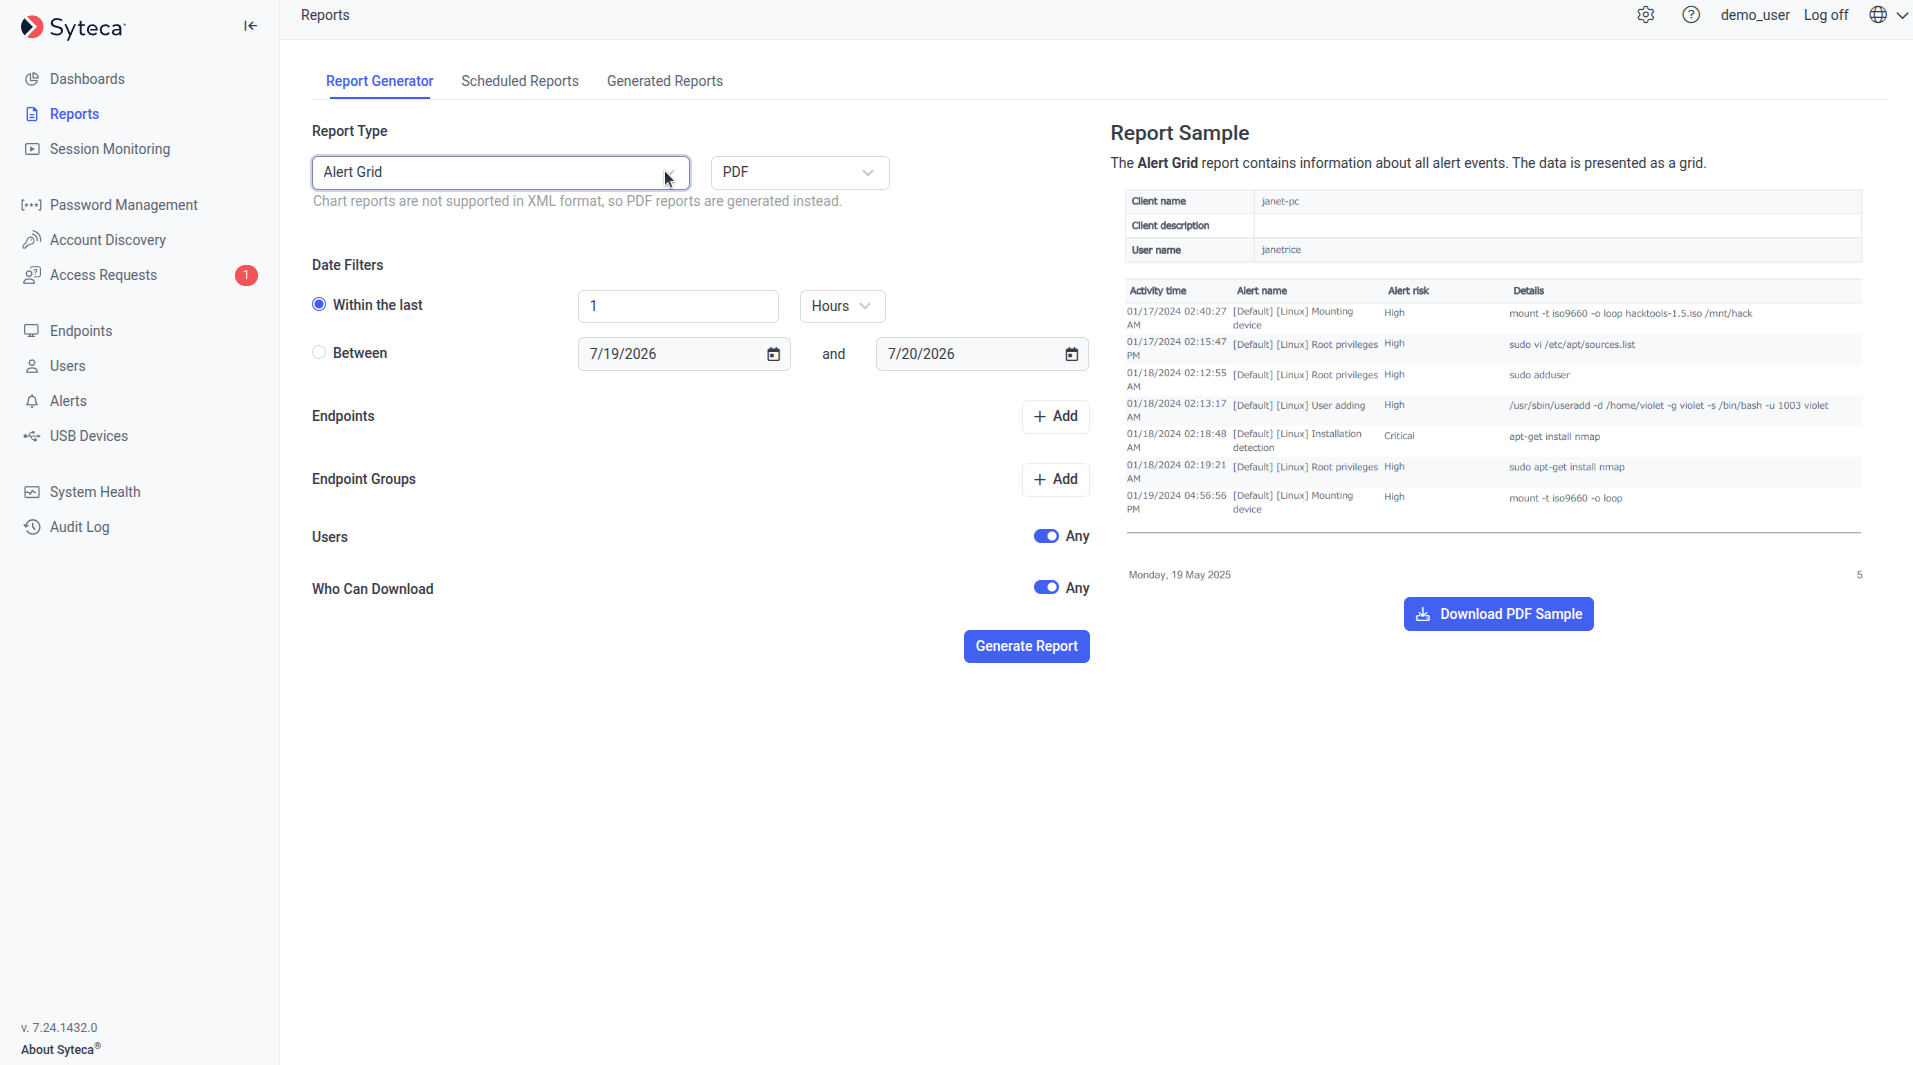 Sign in to the Management Tool and click **Reports** in the left navigation. The **Report Generator** tab is shown by default.
In the **Report Type** section, pick the [type of report](/docs/session-monitoring/reports/overview#report-types) and the file format.
When you select a report type, its description and an example image appear in the pane on the right. Click **Download PDF Sample** in the bottom right to download a complete sample report of that type.
Only one report type can be generated at a time from the Report Generator. (For multiple report types in one workflow, use a [Scheduled Report rule](/docs/session-monitoring/reports/scheduled-reports) — even if you only run it manually.)
In the **Date Filters** section, choose:
* **Within the last** *(N)* **hours**, **days**, or **weeks**, or
* **Between** a start date and an end date.
For the **Overtime Work Grid** and **Sessions Outside of Work Hours Grid** report types, the **Work Hours** section appears. In **Generate For**, pick which days of the week to include, then define the work hours for each day. All time worked outside those hours will appear in the report.
In the **Clients** and **Client Groups** sections, click **Add** in each. In the pop-up, find the Clients and groups you want to include and select their checkboxes, then click **Add**.
Use the **Search** box to find specific Clients by name. Only Clients you have permission for are listed.
In the **Users** section:
* Leave **Any** selected to include all users' activity, **or**
* Move the toggle to the left, click **Add**, search for and select specific users, and click **Add**.
Only users whose activities have already been monitored are listed.
In the **Who Can Download** section:
* Leave **Any** selected to allow all users to download the report, **or**
* Move the toggle to the left, click **Add**, search for and select specific users, and click **Add**.
This controls who sees the **Download** icon on the Generated Reports tab once the report is built.
Click **Generate Report** at the bottom of the page. In the **Generation in Progress** pop-up, click **Open Generated Reports**.
On the [Generated Reports](/docs/session-monitoring/reports/overview#the-generated-reports-tab) tab, the new report appears in the top row. Once its status changes to **Finished**, click the **Download** icon next to it to save the file.
Generating a report for a long time period across many Clients can take several minutes. The report request runs in the background — you can navigate away and come back to the Generated Reports tab later.
## Related
All 28+ report types, export formats, and the Generated Reports tab.
Recurring reports emailed automatically on a schedule.
Live, interactive views for exploration before deciding what to report on.
The administrator-action log surfaced in the Audit Session Grid report.
Sign in to the Management Tool and click **Reports** in the left navigation. The **Report Generator** tab is shown by default.
In the **Report Type** section, pick the [type of report](/docs/session-monitoring/reports/overview#report-types) and the file format.
When you select a report type, its description and an example image appear in the pane on the right. Click **Download PDF Sample** in the bottom right to download a complete sample report of that type.
Only one report type can be generated at a time from the Report Generator. (For multiple report types in one workflow, use a [Scheduled Report rule](/docs/session-monitoring/reports/scheduled-reports) — even if you only run it manually.)
In the **Date Filters** section, choose:
* **Within the last** *(N)* **hours**, **days**, or **weeks**, or
* **Between** a start date and an end date.
For the **Overtime Work Grid** and **Sessions Outside of Work Hours Grid** report types, the **Work Hours** section appears. In **Generate For**, pick which days of the week to include, then define the work hours for each day. All time worked outside those hours will appear in the report.
In the **Clients** and **Client Groups** sections, click **Add** in each. In the pop-up, find the Clients and groups you want to include and select their checkboxes, then click **Add**.
Use the **Search** box to find specific Clients by name. Only Clients you have permission for are listed.
In the **Users** section:
* Leave **Any** selected to include all users' activity, **or**
* Move the toggle to the left, click **Add**, search for and select specific users, and click **Add**.
Only users whose activities have already been monitored are listed.
In the **Who Can Download** section:
* Leave **Any** selected to allow all users to download the report, **or**
* Move the toggle to the left, click **Add**, search for and select specific users, and click **Add**.
This controls who sees the **Download** icon on the Generated Reports tab once the report is built.
Click **Generate Report** at the bottom of the page. In the **Generation in Progress** pop-up, click **Open Generated Reports**.
On the [Generated Reports](/docs/session-monitoring/reports/overview#the-generated-reports-tab) tab, the new report appears in the top row. Once its status changes to **Finished**, click the **Download** icon next to it to save the file.
Generating a report for a long time period across many Clients can take several minutes. The report request runs in the background — you can navigate away and come back to the Generated Reports tab later.
## Related
All 28+ report types, export formats, and the Generated Reports tab.
Recurring reports emailed automatically on a schedule.
Live, interactive views for exploration before deciding what to report on.
The administrator-action log surfaced in the Audit Session Grid report.