

Hand the evidence to your legal team without handing them your monitoring console
Recording every session sounds powerful in a sales meeting. The moment you actually need to use the recording - to defend a wrongful termination, support a fraud investigation, respond to an e-discovery request, or hand evidence to law enforcement - the question becomes harder: how do you give a recorded session to someone who doesn’t have access to your monitoring platform, in a form their lawyer will accept as evidence? Many platforms answer this with “export a video file” or “download a screen recording.” Those work, until opposing counsel asks how you can prove the video wasn’t edited. SHA256 hash? Where? Password protection? None. Standalone player your forensic team can use without a Management Tool license? You’re emailing them an MP4 and hoping they have VLC. Syteca Forensic Export is built for the moment a recording leaves the platform and becomes evidence. Sessions export as encrypted.efe files with a SHA256 hash for integrity verification, optional password protection, optional restriction to a specific time window inside a session, and playback in the Syteca Forensic Player - a standalone Windows/macOS/Linux application that opens .efe files without needing Management Tool access. The Forensic Export History tab is the audit trail of every export performed, by whom, with what comment, and with what hash.
Use Forensic Export when you need to:
- Produce legal-grade evidence for litigation, e-discovery requests, or law enforcement, with SHA256-verifiable integrity.
- Support HR investigations and wrongful-termination defense with session recordings the HR team can review independently.
- Comply with SOC 2 incident response evidence requirements, ISO 27001 incident records, GDPR data subject access requests, or PCI DSS forensic investigation needs.
- Share specific session evidence with third-party investigators, auditors, or insurance carriers without granting them access to your monitoring platform.
- Maintain a chain-of-custody audit trail for every recording that leaves the platform - who exported it, when, what comment they attached, what hash it produced.
Forensic Export requires the Viewing Monitoring Results permission for Clients - you can only export sessions from Clients you have permission to view.
How Forensic Export works
Every Forensic Export produces an encrypted file that can be played back outside the Management Tool. Two file formats depending on the recording mode:
In both cases, the export file lives on the Application Server in the Forensic Export History tab - downloadable, hashed, and audited.
Two entry points for triggering an export:
Export a single session (or a session fragment)
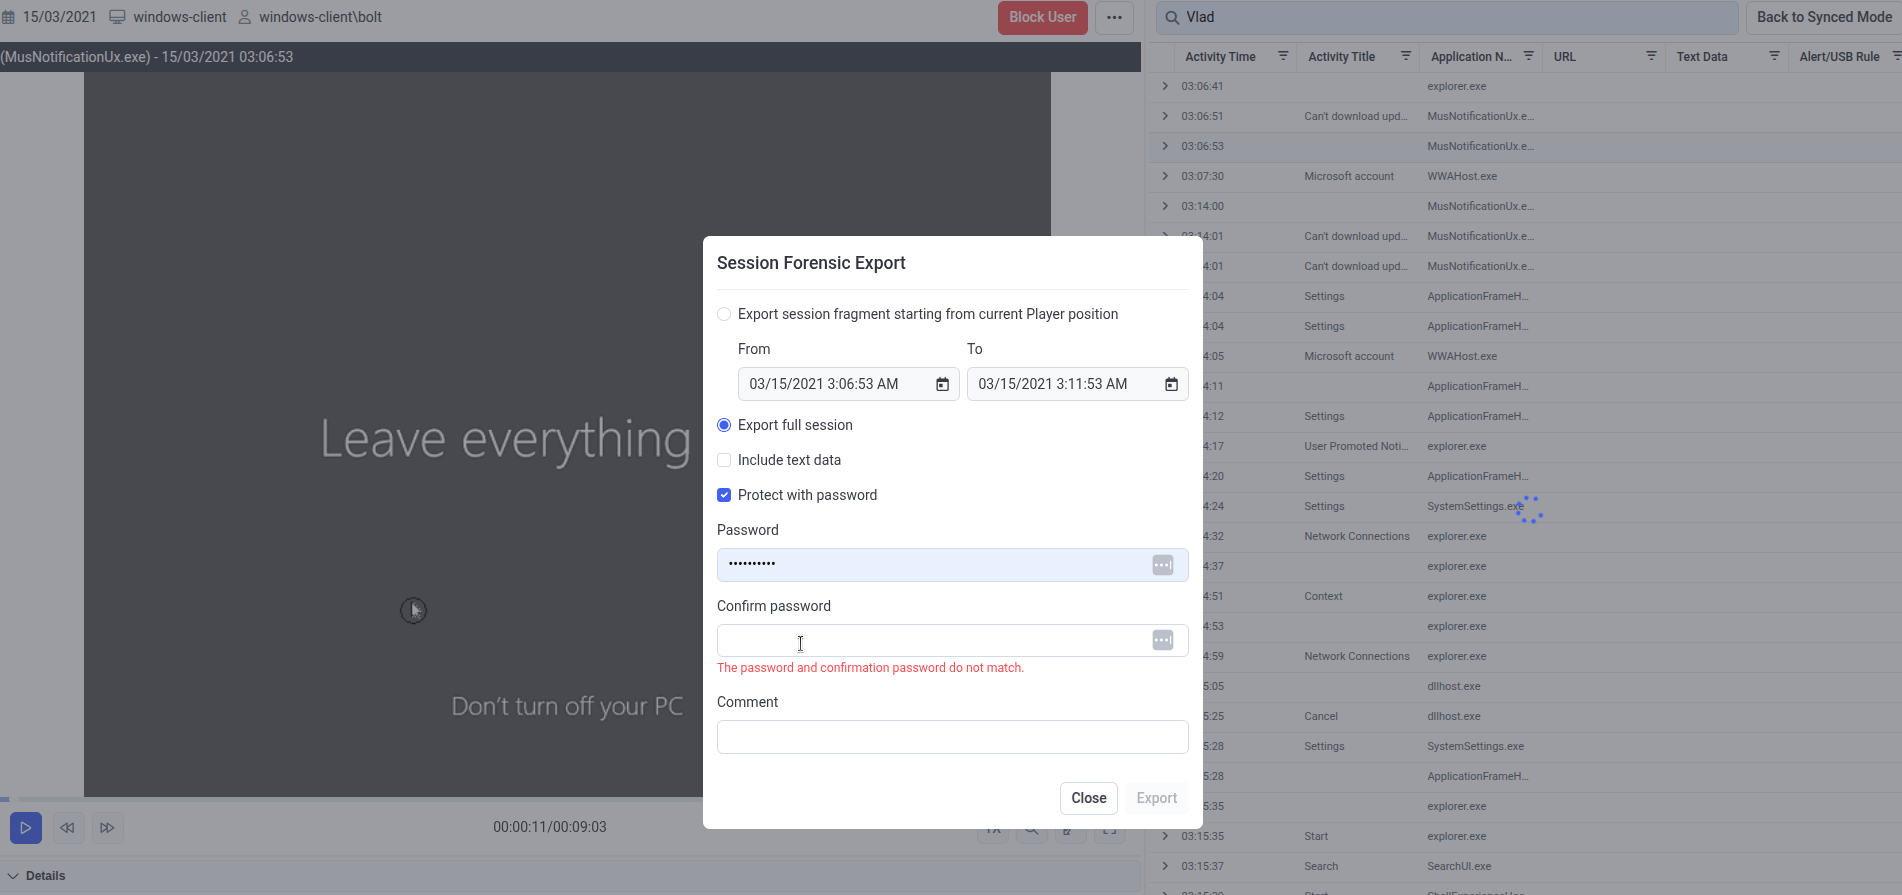
The Session Forensic Export dialog - fragment-or-full export, optional text data, optional password protection, and an audit-trail Comment.
1
Open the session
Sign in to the Management Tool, open the session in the Session Viewer.
2
Open the Forensic Export dialog
In the Session Player pane, click the Tools icon in the top right, then select Forensic Export in the drop-down list.
3
Choose what to export
In the Session Forensic Export pop-up, select one:
- Export session fragment starting from current Player position - enter the From and To dates and times for the slice to export.
- Export full session - export the whole session.
4
Choose options
Optionally configure:
5
Export and download
Click Export. The Forensic Export History tab opens, showing the export progress. When status changes to Generated, click the Download icon to download the file.
Export multiple sessions in bulk
Use this entry point when you need to export many sessions at once - for example, all sessions from a specific user across a specific time window for an investigation.1
Open the Sessions List
Sign in to the Management Tool, click Activity Monitoring in the left navigation.
2
Filter to the sessions you need
On the Client Sessions tab, filter the list to narrow it to the sessions you want to export.
3
Select sessions
Select the checkboxes next to the required sessions, or the Select All checkbox in the column header to select all visible sessions.
4
Start the export
Click Bulk Action in the top left, then select Forensic Export in the drop-down.
5
Choose options
In the Sessions Forensic Export pop-up:
- Optionally select Protect with password and enter a password in both fields.
- Optionally enter a Comment that will appear in the Forensic Export History.
6
Download from the history
The Forensic Export History tab opens. As each session finishes, its Download icon becomes active - download the file once status is Generated.
Multi-session bulk exports don’t support the Include text data option - bulk exports always include text data (keystrokes and clipboard) where the exporting user has the Viewing Text Data permission for the Client.
The Forensic Export History tab
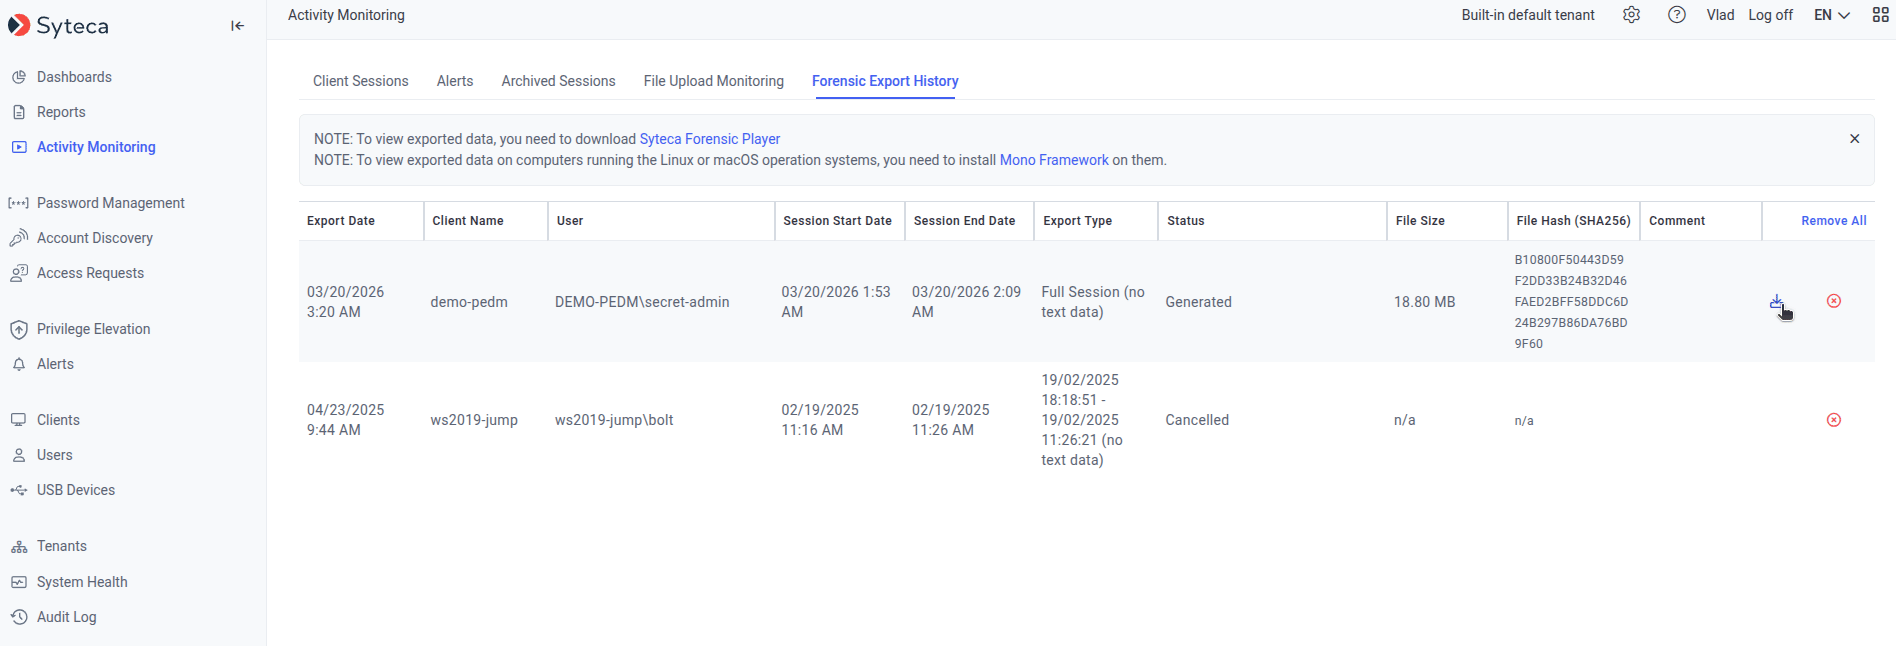
The Forensic Export History tab - every export ever performed, with SHA256 hashes for chain-of-custody verification and a download link for the standalone Syteca Forensic Player.
.efe files. See Play an exported session below.
The grid
Export types
Forensic Export tasks still in progress can be canceled on the Tasks List tab of the System Health page.
Play an exported session
Exported.efe files play in the Syteca Forensic Player - a standalone application that doesn’t require Management Tool access. Useful for forensic investigators, third-party auditors, legal teams, and anyone else outside the Syteca user base who needs to review session evidence.
1
Download the Forensic Player
On the Forensic Export History tab in the Management Tool, click the Syteca Forensic Player link at the top of the page to download the installer.
2
Install (per OS)
Install on the computer where the recipient will review the evidence:
- Windows
- macOS / Linux
Run the Syteca Forensic Player installer. The application installs as a normal Windows application - no additional dependencies.
3
Open the .efe file
Launch the Syteca Forensic Player and open the
.efe file. If the file is password-protected, enter the password when prompted.For MP4 exports from Full Motion Capture mode, any standard video player can be used - no Syteca Forensic Player needed.
What you see in the Syteca Forensic Player
The Forensic Player mirrors the layout of the in-product Session Viewer:If the user performing the export doesn’t have the Viewing Text Data permission for the Client, the exported file won’t contain any text data - the Details area will be empty in the Forensic Player.
If Enable screen capture recording along with user activity recording wasn’t selected on the Client, the exported sessions won’t contain any screen captures - only metadata.
Forensic Player controls
Verify the integrity of an exported session
The whole point of a SHA256 hash on the Forensic Export History tab is to prove the file you’re handing over is byte-identical to what came out of Syteca. Any opposing counsel, auditor, or forensic investigator can independently verify the file by recomputing the SHA256 on their copy and comparing it to what’s on the Forensic Export History tab.1
Get the hash from Syteca
On the Forensic Export History tab, copy the value from the File Hash (SHA256) column for the exported session.
2
Compute SHA256 on the file
On the computer that has the exported file, compute its SHA256 hash:
- Windows (PowerShell)
- macOS
- Linux
3
Compare
Compare the two hashes. They must match exactly, character-for-character. If they don’t, the file has been modified or corrupted between Syteca and the comparison point.
Related
The Sessions List
Where bulk Forensic Export starts - find and filter the sessions to export.
Session Viewer
Where single-session Forensic Export starts (via the Tools menu).
Audit log
The audit trail of every administrator action - including who exported what.
Full Motion Capture
The recording mode that produces MP4 exports instead of EFE.