

One interface for sessions across every facility
Distributed organizations run into a common problem with session monitoring. Each location (a branch office, a regional data center, a satellite site) needs its own Application Server for latency and network-locality reasons. Investigators and compliance officers, though, need to see every session from every location together. Without central aggregation, they end up logging in to five or ten different Management Tools and manually reconciling what they find. The Syteca Master Panel solves that. It’s a component installed on a dedicated Windows Server machine that reads session data from every Application Server in the organization and presents it in a single web interface. Sessions, filtering, risk levels, and alerts all appear consolidated. No copying data, no separate database, no relogins.Use the Master Panel when your deployment has any of the following characteristics:
- Facilities in multiple locations, each with its own Application Server and Management Tool.
- A need for centralized visibility of session risk levels and triggered alerts across the whole organization.
- Compliance requirements that ask for a single consolidated audit view instead of per-site logs.
- Investigators or SOC analysts who need to search or filter sessions without knowing in advance which Application Server holds the relevant recording.
What the Master Panel provides
The Master Panel combines data from multiple isolated Syteca Application Servers or deployments into a single user interface. From that interface, an investigator can:- View the full list of sessions across every connected Application Server.
- Filter, search, and sort sessions using the same criteria available in the per-Application-Server Management Tool.
- Open any session and view its details, including the recorded activity.
- See risk levels calculated for each session and the alerts triggered within them.
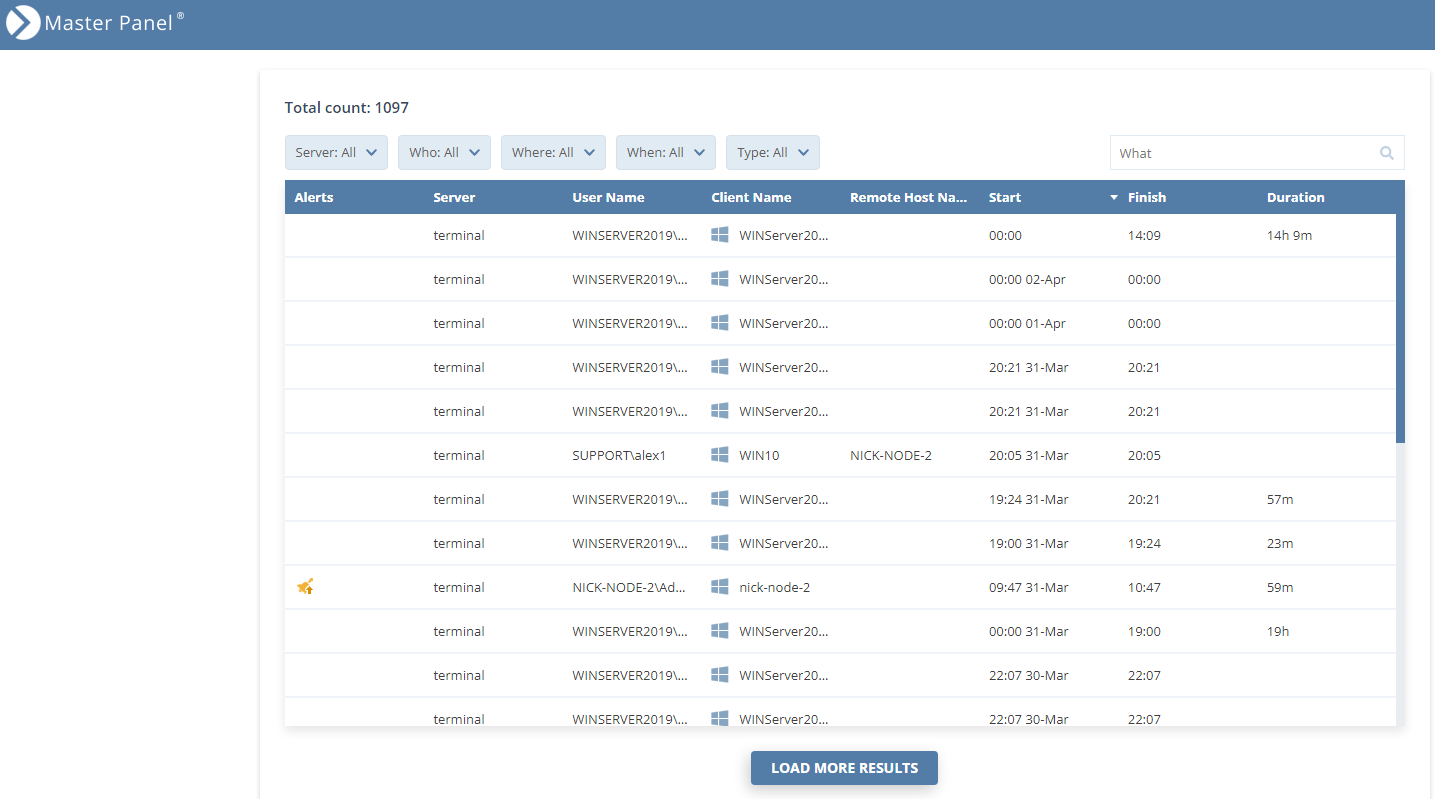
The Master Panel consolidated session list showing sessions from multiple Application Servers side by side.
System requirements
The machine hosting the Master Panel must meet the following requirements:The Master Panel can be opened in other browsers, but compatibility is not guaranteed. If your organization standardizes on a different browser, test it against a non-production Master Panel first.
Install the Master Panel
The installation procedure depends on the operating system on the target machine. Windows Server 2019 Core is a headless (no GUI) variant, so it uses PowerShell commands throughout. All other supported operating systems use the graphical Master Panel Setup wizard.Download the installation package
The Master Panel installation package (latest released version) is available at:SytecaMasterPanel.msi) to each machine where the Master Panel will be installed.
- Windows Server 2022 / 2019 / 2016 / 2012 or Windows 10
- Windows Server 2019 Core
On a Windows Server or Windows 10 machine with the desktop experience, use the graphical Master Panel Setup wizard.
- Download the latest MSI installation file for the Master Panel from your Syteca distribution package.
- Run the MSI installation file to open the Master Panel Setup wizard.
- On the Welcome to the Master Panel Setup Wizard page, click Next.
- On the End-User License Agreement page, select the I accept the terms in the License Agreement checkbox, then click Next.
-
On the Requirements page, the wizard checks whether IIS and ASP.NET Core Runtime are installed. If a required component is missing, a yellow warning triangle appears next to it.
If IIS needs to be installed or configured, see the Quick Start Deployment Guide for the IIS turn-on and configuration procedure. If ASP.NET Core 7.0 Runtime (v7.0.0) Windows Hosting Bundle needs to be installed, click the link next to the warning triangle to download it from Microsoft. Any version later than 7.0.0 can also be used.
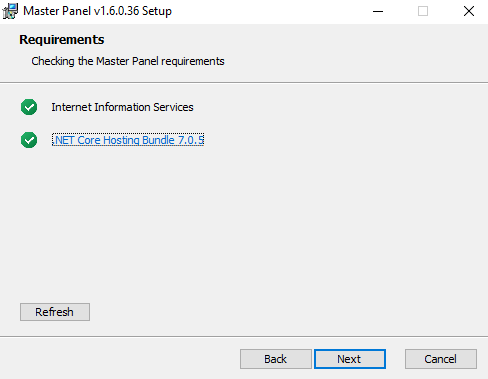
The Requirements page shows which system components are already installed and which need attention before installation can continue.
- After installing any missing components, click Refresh (in the bottom left of the Requirements page) so the wizard rechecks the system.
- Once every requirement is satisfied, click Next.
- On the Destination Folder page, select the folder where the Master Panel will be installed, then click Next.
- On the Ready to install Master Panel page, click Install to start the installation.
- Wait for installation to complete on the Installing Master Panel page.
- On the Complete the Master Panel Setup Wizard page, click Finish to close the wizard.
Configure the Master Panel and connect it to Management Tools
After the Master Panel is installed, the Configuration Wizard runs on first launch. Set the local admin password, then connect the Master Panel to every Management Tool that will feed sessions into it.Open the Master Panel
Open the Master Panel by entering its URL in a browser address bar:To open the Master Panel from a different computer, replace
localhost with the IP address or hostname of the computer where the Master Panel is installed.For a secure HTTPS connection when accessing the Master Panel from other computers, set up an HTTPS binding for the default website. See the Quick Start Deployment Guide for the HTTPS binding procedure.
Set the Master Panel admin password
On the first startup of the Master Panel, the Configuration Wizard opens.- Enter a password for the
adminuser in both the Password and Password Confirmation fields. - Click OK.
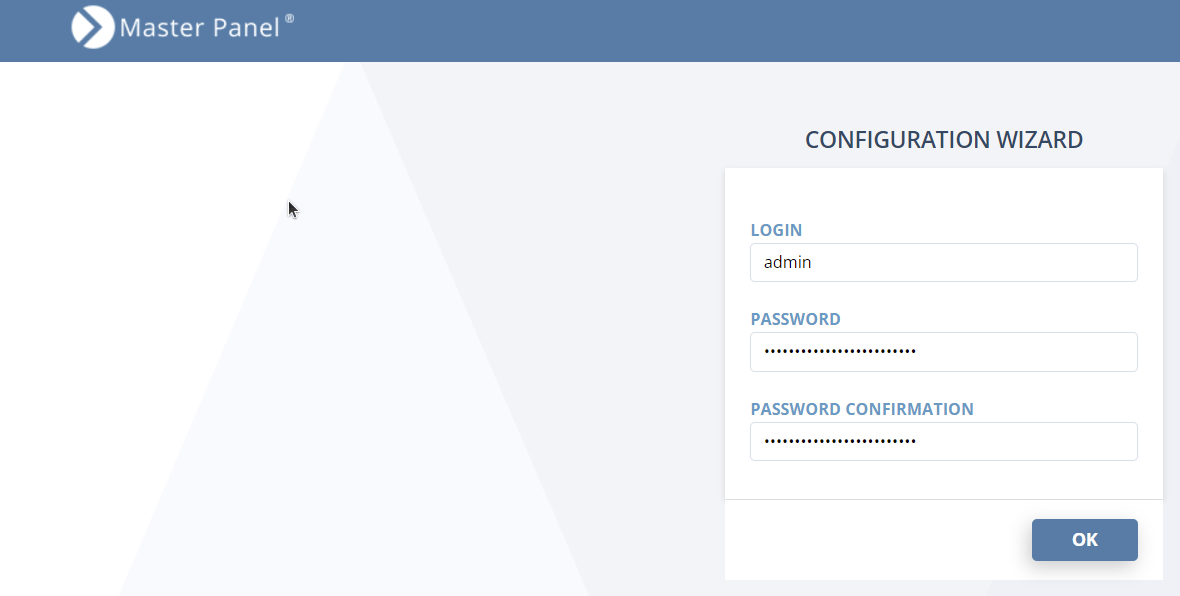
Master Panel Configuration Wizard. Set the local admin password on first launch.
Get the Master Panel Access Key
The Configuration Wizard displays the Master Panel Access Key. This key authorizes each Management Tool to be added to the Master Panel. Click the Copy button to the right of the Access Key to copy it to the clipboard.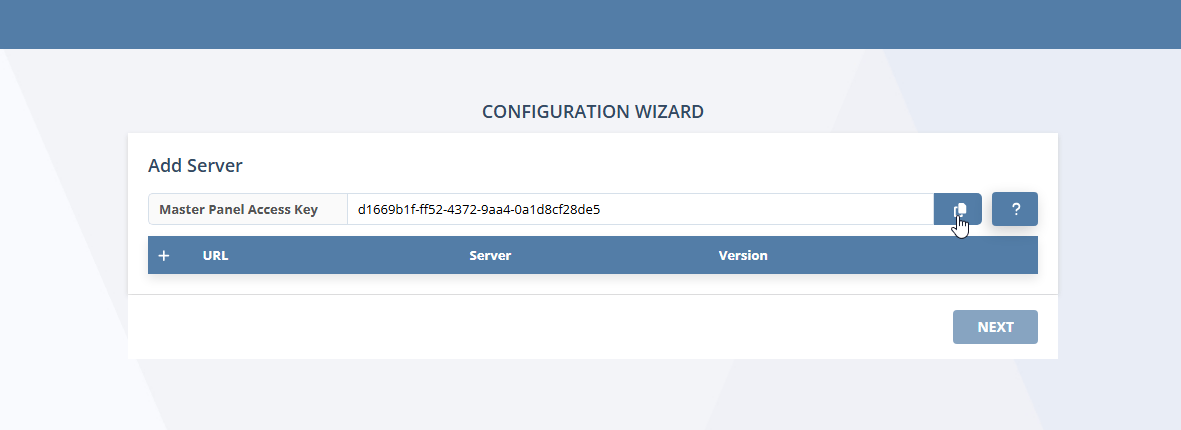
The Master Panel Access Key. Copy it now for the next step in each Management Tool.
Add the Access Key in each Management Tool
For every Management Tool the Master Panel will connect to, log in to that Management Tool and add the Access Key.The user performing this step in each Management Tool needs the following administrative permissions:
- Tenant Management and System Configuration
- Management Tool Access
1
Open Configuration
In the Management Tool, click the Configuration button at the top of the interface.
2
Open the Master Panel Access tab
On the Configuration page, select the Master Panel Access tab.
3
Paste the Access Key
Paste the Access Key that you copied from the Master Panel into the empty field, then click Add to the right of the field.
4
Verify the Access Key was added
The Access Key appears at the bottom of the Access Key list. It can be removed later by clicking the remove icon on the right of it.
Add each Management Tool to the Master Panel
Switch back to the Master Panel Configuration Wizard, then add each Management Tool.1
Add a new server row
Click the + button on the left of the URL column header. A new empty row appears.
2
Enter the URL and server name
In the new row:
- Enter the URL of the Management Tool in the URL field. Format:
https://<hostname>/<Path_to_the_Management_Tool>(for example,https://terminal/Syteca). The hostname is the computer where the Management Tool is installed. - Enter a unique name for the server in the Server field.
- Click the check mark on the right of the row to save.
3
Confirm the Management Tool was added
The Management Tool now appears in the list of Management Tools connected to the Master Panel.
Skip or configure SSO
On the SSO configuration step, either configure single-sign-on now or click Skip to finish setup.SSO configuration can be done later at any time. Master Panel SSO uses the same mechanism as Management Tool SSO, and must be configured in both the Master Panel and every connected Management Tool.
Modify configuration later
To modify the Master Panel configuration or connect it to additional Management Tools, log in to the Master Panel as theadmin user and repeat the steps above as needed.
The user drop-down menu in the top right of the Master Panel page includes:
Health monitoring and diagnostics
The Servers grid at the top of the page controls the connected Management Tools:
The Health Monitoring grid at the bottom shows issues with any Management Tool or its associated Application Server:
Use the Master Panel
Once configuration is complete, users log in to the Master Panel to view sessions from every connected Management Tool in a single interface.Log in to the Master Panel
To view all sessions from all Management Tools, log in to the Master Panel using the credentials of an Active Directory user.The logged-in user will only see sessions from Management Tools where they hold the following administrative permissions:
- Management Tool Access permission.
- Viewing Monitoring Results permission.
The three grids on the Master Panel page
After logging in, the Master Panel displays three grids: Sessions grid (top). All active and completed Client sessions from all connected Management Tools. Filtering, searching, and sorting work the same way as in each Management Tool. Click a session to open it in the Session Player.The Sessions grid consolidates Client sessions from every connected Management Tool.
Related
System requirements
General Syteca System Requirements for Application Servers and Clients.
Application Server deployment
Install and configure the Application Servers that the Master Panel will aggregate data from.
Deployment architecture
How Application Servers, Clients, and the Master Panel fit into a distributed deployment.
High availability
High-availability options for the Application Servers behind the Master Panel.