

Syteca_Server.exe with the Update/Add/Remove components path. For the full system upgrade procedure including pre-update database backup, Isolation Mode, post-update data migration, and Client updates, see Update Syteca.
Before running this procedure, follow the Phase 1 preparation steps in Update Syteca — disable auto-update on Clients, enable Isolation Mode, back up the database, snapshot the Application Server host. Skipping those steps leaves the deployment without a recovery path if anything goes wrong.
Run the Setup wizard’s Update path
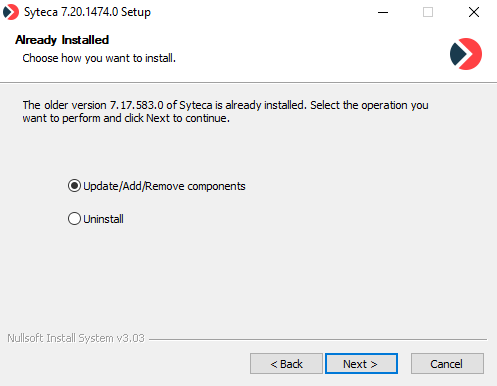
The Setup wizard's Already Installed page when running Syteca_Server.exe on a host with an existing installation — pick Update/Add/Remove components to upgrade in place.
1
Run the new installer
Run
Syteca_Server.exe for the new Syteca version on the Application Server host. The same installer binary handles install, update, and uninstall.2
Step through the wizard
Click Next on the Welcome page. On the License Agreement page, accept the EULA.
3
Verify prerequisites
On the Requirements page, the wizard checks for .NET Runtime 8.0 and ASP.NET Core 8.0 Runtime (required for Syteca v.7.23 and higher).
- Yellow triangles indicate missing components — click the links to install each, then click Refresh.
- Green checkmarks indicate satisfied prerequisites.
4
Pick the Update path
On the Already Installed page, select Update/Add/Remove components, then click Next.
If you see an SMBv2 update warning pop-up when updating to v.7.23 or higher with a shared folder for binary data storage, see Application Server issues and error messages for the resolution.
5
Choose database handling
On the Database Update page, pick one:
Click Next to start the update.
6
Finish and verify
When the update completes, click Finish to exit the wizard.The Application Server starts automatically. The orange Data Migration Progress Bar appears at the top of all Management Tool pages while post-update data migration runs in the background — see After updating the system in the system-wide upgrade procedure for the post-migration steps (update Clients, disable Isolation Mode, verify operation).
Related
Update Syteca (full upgrade procedure)
The system-wide upgrade workflow — backup, Isolation Mode, data migration, Client updates.
Install Application Server
Fresh Application Server installation (for new deployments).
Master Certificate management
Back up the Master Certificate before updating — required for recovery if the update fails.
Release notes
Review changes between your current version and the target — including data migrations.