Step-by-step installation of the Syteca Application Server on Windows — Setup wizard walkthrough, database selection (PostgreSQL / MS SQL Server), Master Certificate generation, Windows Firewall configuration, cloud deployment notes, and external/cloud-based AS setup.
The Syteca Application Server is the central service every Client connects to and every Management Tool reads from. This page walks the on-premises installation end-to-end — Setup wizard, database selection, Master Certificate generation, administrator credentials, and post-installation network configuration including Windows Firewall, cloud deployments, and external-network deployments.
NOT AVAILABLE IN SAAS. Syteca SaaS deployments have the Application Server pre-installed and managed by your vendor — customers don’t perform these steps. This procedure applies to on-premises deployments only.
Before starting: Confirm the host meets the system requirements and has .NET 8.0 Runtime + ASP.NET Core 8.0 Runtime installed (for Syteca v.7.23 and higher) or .NET Framework 4.8 (for older versions). The Setup wizard’s Requirements page detects missing components and provides download links — but installing them ahead of time avoids back-and-forth restarts.
The Setup wizard's Choose the Installation Mode page — select New for the first Application Server in a deployment, or Add for additional instances in an HA cluster.
1
Run the installer
Run Syteca_Server.exe to open the Syteca Setup wizard. Click Next on the Welcome to Syteca Setup page.
2
Accept the license agreement
On the License Agreement page, read the End User License Agreement carefully, then click I agree.
3
Verify prerequisites
On the Requirements page, the wizard checks for .NET Runtime 8.0 and ASP.NET Core 8.0 Runtime (for Syteca v.7.23 and higher).
Yellow triangle icons indicate missing components — click the links on the page to install each, then click Refresh.
Green checkmark icons indicate satisfied prerequisites.
Click Next when all icons are green.
4
Choose the installation mode
On the Choose the Installation Mode page, select:
New Syteca Application Server — for the first Application Server in the deployment.
Add Application Server to existing deployment - for adding additional Application Server instances in High Availability or large-deployment configurations.
Click Next.
5
Choose the installation location
On the Choose Install Location page, enter the installation path or click Browse to navigate to it. The default path is C:\Program Files\Ekran System\Ekran System\. Click Next.
If more than one Master Certificate (named EkranMasterCertificate) is detected in the Windows Certificate Store — e.g. from a previous installation that wasn’t cleanly removed — the wizard displays a warning, and installation cannot proceed until the unnecessary Master Certificates are deleted.
6
Configure the Master Certificate
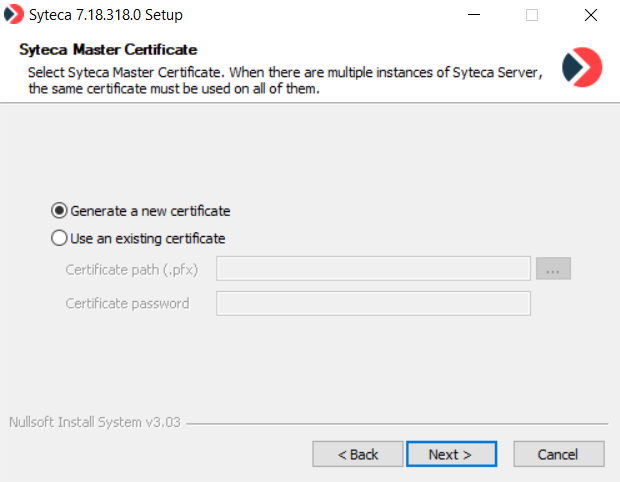
On the Syteca Master Certificate page:
Generate a new certificate — for the first Application Server in a deployment.
Use an existing certificate — for subsequent Application Server instances in High Availability or multi-instance deployments. Use the Master Certificate from the first instance.
The Syteca Master Certificate (EkranMasterCertificate) is the root of Syteca’s encryption hierarchy. It must be generated during the first installation and backed up immediately afterwards — see Back up the Master Certificate. Loss of the Master Certificate means the database becomes unreadable; there is no recovery mechanism.
The Setup wizard's Master Certificate page — generate a new certificate for the first Application Server, or import an existing one for HA / migration scenarios.
Click Next.
7
Choose the database type
On the Database Type page, select PostgreSQL or MS SQL Server. See Comparison of database types for the differences.
If you already have a Syteca database from a previous installation, select its type and define the connection parameters to reuse it.
Click Next.
8
Configure the database connection
On the database configuration page:
PostgreSQL
MS SQL Server
Server instance — hostname or IP address (use localhost for the default PostgreSQL instance). Append a custom port with a colon: <server_instance>:<port>.
User name / Password — credentials for the database user. By default, the postgres user with the password defined during PostgreSQL installation.
Use encrypted connection(optional) — select to enable SSL between Application Server and database. A certificate for the database server must be configured and imported as trusted on this computer before selecting.
Server instance — hostname or IP address. Use just the machine name for the default instance. Append a custom port with a comma: <server_instance>,<port>.
Authentication type:
SQL Server Authentication — use either sa (system administrator) credentials or a user with the dbcreator permission.
Windows Authentication — enter <domain_name>\<user_name> and the password. The user must already exist in MS SQL Server with system administrator permissions.
Use encrypted connection(optional) — same caveat as PostgreSQL.
Click Next.
9
Choose the binary data location
On the Binary Data Location page, choose where screen captures and other binary monitoring data are stored:
SQL Database — stores binaries inside the database. Not recommended except for small deployments because of accumulation over time.
File system — stores binaries in a folder on the Application Server or a network share.
Amazon S3-like storage — stores binaries in an S3-compatible bucket. See Configure Amazon S3 binary storage for the additional configuration.
If the wizard displays an SMBv2 update warning for a File System share (when installing Syteca 7.23 or higher), see Application Server issues and error messages for the resolution.
10
Define the Syteca database names
On the Syteca Database Names page, define unique names for the Syteca databases.
Internally, Syteca creates three separate databases. The names you set here apply as a prefix.
If a database with the same name already exists (from a previous installation), the wizard offers to reuse it:
Yes — keeps the existing database and data.
No — deletes the existing database and creates a new one. Data is lost.
11
Define administrator credentials
On the Administrator credentials page, define the credentials for Syteca’s built-in admin user (the administrator of the built-in default tenant):
Login — defaults to admin. Can be 5–50 characters, letters and numbers only, or an email address.
Password / Confirm password — at least 8 characters, with at least one lowercase letter, one uppercase letter, one numeric character, and one special character. Cannot contain more than 3 consecutive identical characters.
These credentials can be changed later on the Users page.
Click Next.
12
Define the Client Uninstallation key
On the Syteca Client Uninstallation Key page, enter the key used for local Client uninstallation. Click Next.
13
Select the Syteca Endpoint Risk & Compliance Control module parameters
On the Syteca Endpoint Exposure Management page, select the Install Syteca Endpoint Exposure Management module option to enable the endpoint exposure management. Then define the module parameters (Database name and Hostname) and the connectivity parameters for the Exposure Management module of the Client (Hostname and Port).
By default, the hostnames match the name of the machine where the server is being installed. Change them, if needed, to match the domain name or proxy name.
14
[Optional] Select the backed up Endpoint Exposure Management module secrets
If the database with the name defined on the Syteca Endpoint Exposure Management page exists, you will be proposed to reuse it.To reuse the database, you need the backup of Endpoint Exposure Management secrets. If you have the backup, define its path and password.
It is strongly recommended to always create the Endpoint Exposure Management secrets backup immediately after the installation.
15
Install and finish
Click Install to start installation. When the Installing page completes, the final page is displayed.If the Endpoint Exposure Management module is being installed, the Completing Endpoint Exposure Management Module Installation page will be displayed before the Final page. On this page, do the following:
Copy the Endpoint Exposure Management module thumbprint.
Create a Endpoint Exposure Management secrets backup.
Three things to do immediately after installation completes:
1
Back up the Master Certificate
Back up the Syteca Master Certificate — required for Application Server recovery, system updates, computer migration, and High Availability cluster creation. The database is unreadable without this certificate.
2
If reusing an existing database, restore the original Master Certificate
If you reused an existing database from a previous installation, delete the newly-generated Master Certificate and import the backup of the original Master Certificate — otherwise the new certificate can’t decrypt the existing data. See Delete the Master Certificate and Import the Master Certificate.
3
Confirm Windows Firewall is configured
Windows Firewall is automatically configured if it was enabled during the Application Server installation. Required inbound TCP ports:
Port
Purpose
9447
Connection between Application Server and Clients
22712
Connection between Application Server and Management Tool
22713
Connection between Application Server and Management Tool
22714
Connection between Application Server and Management Tool
The source documentation has a discrepancy here — the Windows Firewall configuration page lists ports 9447, 22713, 22714 only (missing 22712), but the install page and cloud install page list all four. The list above follows the install page.
To install the Application Server on a cloud VM (AWS EC2, Azure VM, Google Compute Engine, etc.):
1
Install normally
Install the Application Server in the cloud VM using the same Setup wizard steps as above.
2
Open ports in the cloud security group
In your cloud provider’s management console or security group configuration, allow inbound TCP connections via ports 9447 (AS↔Clients) and 22712, 22713, 22714 (AS↔Management Tool). This is on top of any Windows Firewall configuration on the VM itself.
Install the Application Server and the Management Tool on the same cloud VM to minimize cross-VM network traffic and reduce egress costs. This is the recommended pattern for cloud deployments.
If Windows Firewall was disabled during installation (or you’re using a different firewall product), configure inbound rules manually:
1
Open Windows Firewall
In Control Panel, select System and Security → Windows Firewall. Click Advanced settings in the Windows Firewall window.
2
Create a new inbound rule
In the Windows Firewall with Advanced Security window, right-click Inbound Rules and select New rule… from the context menu. The New Inbound Rule Wizard opens.
3
Pick the rule type
On the Rule Type page, select Program, then click Next.
4
Specify the Application Server executable
On the Program page, select This program path, click Browse, and navigate to the Application Server executable. The default path is:
On the Action page, select Allow the connection, then Next. On the Profile page, select the network profile(s) used to connect remote computers, then Next.
6
Name the rule
On the Name page, enter a descriptive Name (e.g. Syteca Application Server), then click Finish.The rule is created and by default allows any connection via any port.
7
Restrict to specific TCP ports
Double-click the rule to open its Properties window. On the Protocols and Ports tab:
Protocol type: TCP
Local port: Specific Ports, then enter:
9447 (Application Server ↔ Clients)
22712, 22713, 22714 (Application Server ↔ Management Tool)
Click Apply, then OK. Close the Windows Firewall window.