

For Syteca 7.1 and later, this native method is recommended over the older Mounting Amazon S3 as network file storage approach.
Configure the S3 storage location
Provide four values: Service Url, Bucket name, Access Key ID, and Secret Access Key. These can be set at two points:- During Application Server installation
- After installation
On the Binary Data Location page of the installer, select Amazon S3-like storage and enter the four values.
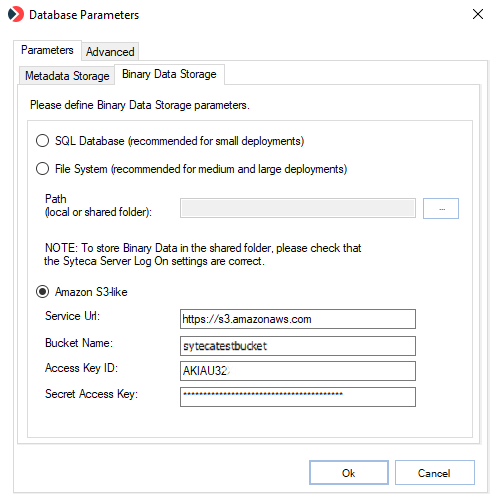
Amazon S3 configuration fields in the Database Parameters tool.
Add an archived database using the same S3 storage
When adding an archived database on the Archived Sessions tab of the Activity Monitoring page, enter the same Bucket name, Access key ID, and Secret access key used above into the corresponding archive fields.The Use separate credentials to access binary storage option isn’t available when using Amazon S3-like storage.
Legacy method: mounting via an NFS gateway (before Syteca 7.1)
This approach mounts an S3 bucket as an NFS file share on the Application Server’s EC2 instance, then points Syteca’s File System binary storage at the mounted drive.1
Install the NFS client feature
On the Application Server’s EC2 Windows VM (same VPC and security group as your S3 File Gateway), open Server Manager > Add Roles and Features, and under Features select Client for NFS.
2
Create a mount script
Create a batch file (for example
C:\mount_nfs.bat) containing the mount command from your file share’s Details section, similar to:3
Schedule the script to run at startup
In Task Scheduler, create a task that runs as SYSTEM (via Change User or Group → enter
SYSTEM), with an action pointing at the batch file and a trigger set to At startup.4
Restart the VM
Restart the Application Server VM to confirm the mount succeeds automatically.
5
Point Syteca at the mounted drive
Right-click the Syteca Server tray icon, select Database Parameters, open the Binary Data Storage tab, and set File System > Path to the mounted drive. Click Yes to restart the Application Server automatically.
Related
Azure Blob storage
An NFS-based alternative for Azure-hosted deployments.
Database parameters
All binary data storage options.
Database management
Archive and Cleanup configuration.